


 Battle shrinking attention spans with immersive learning scenarios that your learners can experience in Virtual Reality using VR headsets. Now Adobe Captivate makes it possible for you to import 360° media assets and add hotspots, quizzes and other interactive elements to engage your learners with near real-life scenarios. Achieve learning use cases such as – “be in the shoes of”, “virtual tours”, “crises management”, “safety drills” and more.
Steps:
- Launch Adobe Captivate.
- On the Welcome Screen, under New tab, double-click Virtual Reality Project.


You will see the familiar Captivate interface, but on the stage, you will find a 360 Placeholder image. A 360 image is a photographic / graphic image which is designed to be rendered by the computer as a kind of 360 degree sphere, with your learner looking from the absolute center of the sphere. Because of this, 360 images have been specially formatted to prevent distortion when viewed.
A typical 360 image appears distorted, as though viewed through a fun house mirror.
Because of the accommodation for drawing on the inside of the sphere, you will need special images to create a 360 VR experience. You may create 360 images with a 360 camera, and by using 360 output features from various 3D authoring tools. You will also find many 360 VR images available on stock.adobe.com, Adobe’s photo and media stock purchasing service as well as many other stock photography resources.
- Select the plus symbol in the center of the 360 VR placeholder on the Captivate stage to find the 360 image that you would like to include in your project.
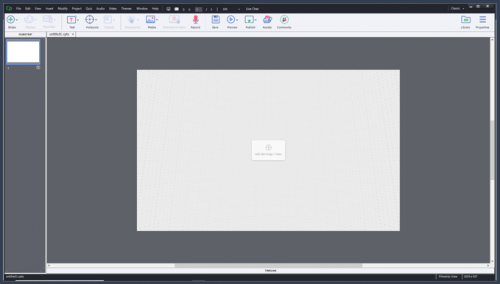
The circle + icon in the center of the stage area may be used to insert a VR image
- Captivate will invite you to select from a library within the course, or to browse for the file on your computer. Select an image from those provided or select your own 360 image using the file browser on your computer.

The Captivate import dialog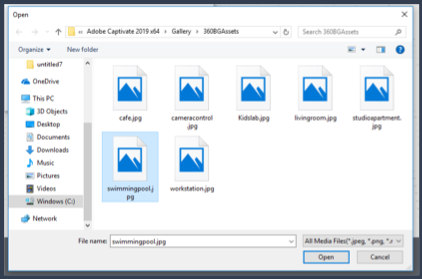
- Browse your files for appropriate images. Select the image and click Open.
- Once inserted, you can click and drag the mouse on the image to rotate the view.

- To add a Hotspot, click Hotspots on the Toolbar.

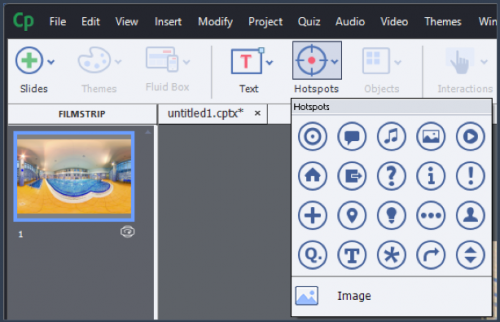
The hotspot menu will drop down to display premade icons.
- Select any of the individual hotspot icons from the Hotspots drop down menu to insert a new interactive 360 hotspot into your project.
- A hotspot will appear at the center of the currently viewed image when inserted.
- Hotspots will appear enlarged, or in their selected state when inserted.
- Click off the hotspot, then on again to see the selection effect. Once the inserted hotspot has been selected, you will see an On Click trigger menu for the hotspot appear in the Properties Inspector.

Hint: If you do not see the Properties Inspector, double click the hotspot.
- Select the drop down On Click menu to reveal the available actions. You may select any one of these actions to be performed when the learner clicks the hotspot during the VR experience.
- By default, the action will be set to go to the next slide. This would cause the project to move to the next available slide, and the learner would leave the 360 VR Space currently displayed.
- Select the Display Text action from the drop-down list, and then enter a short sentence or paragraph into the available field.
- Now let’s preview the project. Go to the Toolbar and click Preview > Project.
- A preview of your project will appear in a web browser on your computer. Click the Play button in the project to begin.

- Once your project is loaded, try dragging your mouse to navigate the space. Click and hold the left mouse button down, while dragging the mouse to the left and right, and up and down.
- When you have seen the space, navigate back to the hotspot and click the hotspot button.
- Text appears in an overlay.
- Close the preview and go back to Captivate.
- You may adjust the length of time that the text overlay appears using the Display Duration setting below the text entry field.
- If you want to force the learner to click any given hotspot before moving on to the next item or slide, check the Must view once option.
- You may also trigger other actions using this method, including showing images, playing sound effects and navigating to other areas in your project.
- Now insert at least one additional hotspot, using the same steps you did for the first one. Once you have inserted 2 or more hotspots, select the grey, scratch area outside the stage.
- Selecting the scratch area causes the Properties Inspector to reveal the properties of the entire slide, rather than the properties of an individual element. You will now find an option to make the slide either guided or exploratory.


In an Exploratory project, learners will experience the content with no guidance about which elements should be viewed in a given order.
In a Guided experience, learners will be ‘led’ to the next sequential hotspot after each hotspot is triggered. Captivate will use the sequence in the timeline to determine the order and will animate the camera to go to the next hotspot in the sequence. (At least it will do so in a 2D viewer of the 3D experience.) Because such animation might be disorienting inside a VR viewer, if Guided mode is selected, Captivate will draw arrows on the screen to guide the learner to the next desired interaction.
Try it in Interactive Virtual Reality
- For this next step, you will need a VR headset. Google Cardboard or any derivative format should work nicely. You may either navigate via web browser to a published version of your project, or you may select the Preview > Live preview on devices option from the Toolbar.
- If you use the live preview feature, be certain that your phone / VR device and your computer are on the same WIFI network, and that you are not in a High Security environment.
- Visit the Live Device Preview page for details on how to do live preview.
- Once you are in the virtual reality preview there are a few slight differences in the viewing experience compared to 2D viewing in a browser.
- A new button will appear on the control menu below the project that looks like the VR Project button.
- You will need to click the button to launch your 3D viewing experience. This will then put you inside the VR space, and you can simply move your head to navigate.

Because you now have limited ways to interact with the 360 environment, Adobe Captivate 2019 adds a method of triggering events called Gaze. Captivate will monitor what the learner is looking at, and if an interactive element is the focus of your gaze for more than a few seconds, it will click or trigger that interaction.
Active Gaze is timing the look duration, indicating that a click will occur shortly.
- Look for the green animated timer to learn how active gaze will assist learners in clicking by simply looking at an object.
- Captivate will also add arrows to guide the learner, rather than automatically shifting the focus to the next hotspot when guided experience is enabled for the project.

An arrow appears in VR to guide learners to the next hotspot.
- Finally, Captivate will provide additional guidance in the form of a navigation menu. If the learner looks downward, they will be given a navigation button. This set of four squares will launch the control menu, and learners may navigate using this menu.

The navigation menu may also be accessed with gaze controls.
Adding a quiz
- You may also add quizzes to your project using the hotspot menu. Return to Captivate authoring environment and insert a new hotspot using the steps outlined previously.
- With the hotspot selected, click the Add questions button in the Properties Inspector.
- You will be asked to say how many Multiple Choice and how many True/False quiz questions you would like to include in this project. Once you have completed the dialog, click OK.
- Captivate will add templates for the requested questions, a new 360 image slide, and a quiz summary slide.
- You may edit the quiz questions directly on the stage, while the quiz slide is selected.
- If you need to add more answers, click the Add Answers button or use the quiz properties tab to specify changes in the quiz answer count and logic.
- You may also edit the question, the captions and configure SCORM reporting details in the Quiz Properties tab.
- After the quiz is completed, Captivate will take the learner to another slide where you can summarize the lesson. This is the added 360 slide. You can use any VR environment you like but this is probably most useful if you simply use the same image you did initially.
- Finally, Adobe Captivate 2019 will display the quiz results, directly on the second VR slide.


Recommendations for an optimum VR learning experience
Recommended VR devices for content playback:
- Google Day dream
- Samsung Gear VR (2017)
Recommended OS & Browser compatibility:
- iOS 11 & later running Safari 11.1 & later.
- Android 6.0 & later running Google Chrome 67 & later
While VR content will work on other device and browser combinations, we recommend the above for the best learner experience.
Watch this video to learn more about this feature in Adobe Captivate (2019 release):
well done – this is amazing
thanks
good write up
very cool!
Fine overview and a perfect starting point for VR. Thank you !
It’s an amazing with nice features.
Quick question: Is there a way to collect the quiz data?
This is a fantastic overview of a lot of information. Thank you for putting this together. It seems like this is generally user friendly. Would you recommend this as an easy way to make trips for students? I don’t know how much time they take (but obviously that depends on what you’re doing).
Hi, this is very great new feature however is it still the case that Adobe Captivate only recommend the devices outlined in this article as quite limited?
Can this do 180 3D content as well, or just 360?
Ok, this has some interesting potential.
Hi Piotr, If you have subscription, you can download the build & install the CP2019 along side Cp2017 using your subscription AdobeId, no need to buy again.
Looks attractive. But I understand that subscription members will get the new version without the necessity to buy it ?
You must be logged in to post a comment.


