 Staff
44 posts
Staff
44 posts

There’s a lot to love in the 2019 Release of Adobe Captivate, but the big headline has to be that the creation of 360 Virtual Reality (VR) simulations and training are supported in this release. You might think that would add a lot of complexity to the authoring tool, but nope. I actually found it takes only seconds to create VR content with the quick and easy tools Adobe has included. I’ll drill down into the examples and activities in a moment but first, a high level summary of a sensational release from the Adobe Team.
The Highlights

There are three major new features in this release along with a number of minor features and many enhancements. Of course Virtual Reality course creation will get all the headlines, but the new Video Overlay (think popup video) feature brings huge opportunities to interactive and remediated instruction via video. It is no secret that video has been doing the heavy lifting in eLearning for decades. It’s a trend that has pushed ahead even farther with the excitement over micro-learning.
If you are new to Captivate, the above video will give you a good overview.

The new overlay video feature in Captivate brings a number of interactive video power tools over to the cool kids table to make spicing up your video, adding knowledge checks, interactions and even remediation a breeze. The secret is that they’ve added bookmarks to the overlay video workflow and provided a method for creating overlays of custom shapes and sizes, with a gorgeous video blur effect to gently reassure the learner that their training hasn’t gone anywhere while they experience the latest knowledge check challenge, informational nugget or even interaction. Here’s a quick example that I made using the Captivate course that is included in the 2019 release.

Try the overlay video project by clicking the play button above. When you come to the knowledge check, watch what happens when you answer incorrectly.
I added a drag and drop activity into the interactive video. (See the interactive version above.) The entire exercise took me under an hour and to be honest most of the time spent was building a rule to bulk process all my image states so I could show off on the drag and drop actions. That’s because all you have to do is build a normal slide, and then within the overlay video slide, add an overlay. The overlay selector will let you choose from any of the available slides you already built. That slide will now appear as an interactive video overlay. The only thing to do differently than a typical slide is that you will probably want to add some background – using a shape for example, that is smaller than the whole slide. You don’t have to, but it’s a great way to get that light box look for your popup overlay.
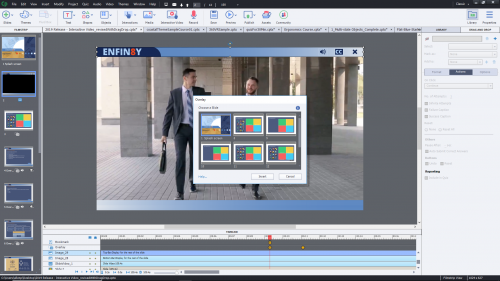
Inserting a video is just one click from the timeline. You can select from your other slides. You can also create a bookmark anywhere on the video timeline and use it for remediation. They failed that knowledge check? No worries, easily send them to any bookmark in the video using the new GoToBookmark command from the question failure options.
I absolutely love that the video pauses and blurs and that I can control every aspect of what goes on top of that background. You can also use this to do irregular light box overlays – because any shape or stack of shapes you place on the slide above the background layer can form the foundation for your popup. The huge win here has to be the remediation workflow for video. You can import YouTube video or start from a local video file. Captivate handles this one like a champ!

Also on the video front, the Adobe team has added new webcam capture and a very cool automatic Chroma Key filtering effect to the video capture workflow. Now you can capture a web cam, and the desktop screen both in high definition full screen video at the same time. It’s an incredibly easy way to build talking head and presentation videos and you don’t really need a green screen.
Just set up a web cam and hit record. Captivate will capture both your camera and the desktop, and even give you an option to knockout the background from your webcam capture, so you can put yourself right into the desktop picture, or whatever you captured during that screen recording.

This one is a huge plus if you are doing narrated videos, and a lot of fun if you want to explore those studio weather replacement experiences.
Last but not least, bring on the VR. Virtual reality has been on a rocky ride, but this implementation is sure to be a hit. The cost of production is lower than I have ever seen. Just import a 360 image and then drop hotspots into the world to provide interaction and assessment opportunities for your learners. Adobe considered the audience well with this one as the feature works both in 2D browser windows on traditional computers and other devices, and is able to launch into fully immersive VR simulations when it is played on a device that is bound for a Virtual Reality headset.

One of the more amazing details here is the addition of a Live Device preview solution. The easiest way to understand the feature is to describe the experience. You finish your VR course – it didn’t take you long. You press the preview button and see an option for Live Device Preview. Captivate launches a browser and shows you a QR code. You launch a QR reader on your phone or tablet, and woosh, you are off to witness the magic. As long as your phone and your computer are sharing the same Wifi network, you will automatically see your course on your phone, and on your desktop preview. It works for regular responsive projects too, not just VR.

Live Preview on a Samsung Galaxy 8.
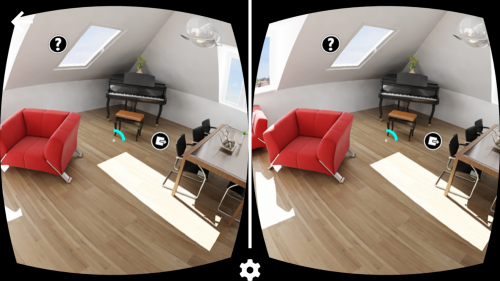
Notice that there is an extra button on that playbar, and a message encouraging the learner to enter the virtual reality space. After clicking the VR button, the learner can slide their phone into a Cardboard or similar viewer and will find themselves directly inside the 360 VR environment. The same content viewed on a Desktop will simply create a 360 world that the learner can navigate with mouse click and drag. The version in the VR headset will rotate the camera to match the rotation of the learner’s head. It will also use ‘Gaze’ in the viewer. This is a method of interaction where you stare at a hotspot or interactive virtual object in order to select or click it. To your learner it appears as a partially filled green donut, which animates to a complete ring over time. When the donut is complete, the item under your gaze is selected.
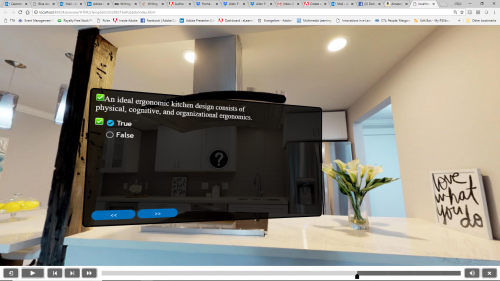
Probably the most exciting part is that the 360 immersive space can contain complete Captivate quizzes. You can add questions and answers by typing directly on the slide in authoring mode, just as you would for a traditional assessment. The VR viewer can use gaze to select the correct answer and submit their results. Captivate includes new interactions to display text in the 3D world, to show an image, to play a sound effect, to navigate to other slides in the project and to activate an in world quiz question.

The array of new VR hotspot icons
Authoring the interactions is simple too. Just select a hotspot from the new hotspot icons provided, or select your own from an image on your computer. To associate interactions with the hotspot you select it on screen and then chose an action from the property inspector. To move it, you simply click and drag to place it anywhere in the 360 scene.

Unfortunately you won’t be able to import your favorite game models or animate furniture in Captivate yet. This solution is really designed to provide a very simple authoring experience that still brings the benefits of immersive training. I’d recommend it for activities that reinforce awareness of physical spaces that the trainee will work in, to create basic scenarios that would benefit by creating an environment that is as real as you can make it, and for exploratory experiences where you want the learner to poke around and discover new things about an environment, ecosystem or period in history.
360 cameras have reached a very accessible price point, and stock photography sites like stock.adobe.com appear to have a growing collection of high quality options as well. The Adobe team has also provided a few samples in the product, so you can use one of those if you are just dying to try it out. There is one more aspect of this that deserves extra kudos. If you use more than one hotspot in your VR project, you can enable ‘guided’ experience. This will cause the camera to slowly pan to the next hotspot after an interaction completes. (This is what happens on a desktop 2D browser, but in the VR headset arrows appear to guide the learner to the next logical hotspot.) I’m a huge fan of this kind of guidance system. To find the setting just click in the grey area around the 360 slide, and you’ll find the guided option button in the property inspector.
Enhancements
There are also a lot of enhancements in the 2019 release of Adobe Captivate. The most substantial of these is a set of enhancements to responsive course authoring. The easiest way to explain this enhancement is, if you were building responsive courses before it just got a lot easier to select things, specify positions and sizes of objects on the slide and to figure out which fluid box was controlling the movement behavior.

If you never used, now is definitely the time to start. Among the enhancements in the fluid box zone, are all new responsive layouts and built in themes. What a great way to jump start your responsive projects? The only way to really appreciate these fluid box enhancements is to jump right in and build something with fluid boxes. There is built in tutorial to guide you through the steps – I suggest that you start there and then check out Pooja’s latest 14 part series on working with Responsive fluid boxes. We will also be doing eSeminars to show off the enhanced features in the coming weeks, so keep an eye peeled on the community forum for announcements.
One of my favorites is PowerPoint to mobile. PowerPoint has been a bit of a problem for eLearning developers working to make it accessible on mobile devices. Like video, it generally does not behave well when stretched or rearranged. With this release Captivate can now gracefully include PowerPoint slides in HTML5 responsive projects. It will retain the aspect ratio of the original PowerPoint slide, but it will convert it to HTML5, enabling playback of your animations, transitions and more on the mobile device. It behaves a lot like video, and is one of the more elegant solutions that I have seen.
If you are a teacher, or a trainer working with huge assessments, there is an exciting enhancement for you in added support for *.csv quiz format import. This tool let’s you import quiz questions from a spreadsheet. It’s a convenient bulk upload solution that will save tons of time for anyone with a lot of questions to create.
Excited? Wondering where and how you can get Adobe Captivate 2019?
It’s easy, just click here to download the free 30 day trial.
What’s next?
Consider joining us for the launch Webinar: http://bit.ly/CPWebinar_08302018
Already a subscriber?
Click here to download and install the 2019 release. Your previous version of Captivate 2017 will remain active. Login using your Adobe ID to enable your subscription on Captivate 2019. As always, let me know your thoughts in the comment section below. I’m especially curious to hear how you like the new version once you’ve had a week or two to explore.
Don’t forget the eLearning Assets and Voices.
They are separate downloads, and you can find them here: Assets and Voices. Both are installation executable files, so you will need to install them after download.
Words to the Wise about Upgrading from Adobe Captivate 2017 to Adobe Captivate 2019
When you upgrade a whole version number of Captivate the format of the file changes and that means that while you can seamlessly update your Captivate 2017 projects to Adobe Captivate 2019 files, BUT you can not go backwards. Always save your upgraded projects with a new version number, so you will have the original that can open in Captivate 2017 if something changes.
Why can’t I just run the “Help: Update” command? Do I really have to download a whole new version of Captivate?
The major advantage of installing the new version this way is that you may have clients who are still using / need to continue using the 2017 Release of Adobe Captivate. Your prior version(s) of Captivate will remain in place and can be used alongside the 2019 Release of Adobe Captivate.
There’s a lot to love in the 2019 Release of Adobe Captivate, but the big headline has to be that the creation of 360 Virtual Reality (VR) simulations and training are supported in this release. You might think that would add a lot of complexity to the authoring tool, but nope. I actually found it takes only seconds to create VR content with the quick and easy tools Adobe has included. I’ll drill down into the examples and activities in a moment but first, a high level summary of a sensational release from the Adobe Team.
The Highlights
There are three major new features in this release along with a number of minor features and many enhancements. Of course Virtual Reality course creation will get all the headlines, but the new Video Overlay (think popup video) feature brings huge opportunities to interactive and remediated instruction via video. It is no secret that video has been doing the heavy lifting in eLearning for decades. It’s a trend that has pushed ahead even farther with the excitement over micro-learning.
If you are new to Captivate, the above video will give you a good overview.
The new overlay video feature in Captivate brings a number of interactive video power tools over to the cool kids table to make spicing up your video, adding knowledge checks, interactions and even remediation a breeze. The secret is that they’ve added bookmarks to the overlay video workflow and provided a method for creating overlays of custom shapes and sizes, with a gorgeous video blur effect to gently reassure the learner that their training hasn’t gone anywhere while they experience the latest knowledge check challenge, informational nugget or even interaction. Here’s a quick example that I made using the Captivate course that is included in the 2019 release.
Try the overlay video project by clicking the play button above. When you come to the knowledge check, watch what happens when you answer incorrectly.
I added a drag and drop activity into the interactive video. (See the interactive version above.) The entire exercise took me under an hour and to be honest most of the time spent was building a rule to bulk process all my image states so I could show off on the drag and drop actions. That’s because all you have to do is build a normal slide, and then within the overlay video slide, add an overlay. The overlay selector will let you choose from any of the available slides you already built. That slide will now appear as an interactive video overlay. The only thing to do differently than a typical slide is that you will probably want to add some background – using a shape for example, that is smaller than the whole slide. You don’t have to, but it’s a great way to get that light box look for your popup overlay.
Inserting a video is just one click from the timeline. You can select from your other slides. You can also create a bookmark anywhere on the video timeline and use it for remediation. They failed that knowledge check? No worries, easily send them to any bookmark in the video using the new GoToBookmark command from the question failure options.
I absolutely love that the video pauses and blurs and that I can control every aspect of what goes on top of that background. You can also use this to do irregular light box overlays – because any shape or stack of shapes you place on the slide above the background layer can form the foundation for your popup. The huge win here has to be the remediation workflow for video. You can import YouTube video or start from a local video file. Captivate handles this one like a champ!
Also on the video front, the Adobe team has added new webcam capture and a very cool automatic Chroma Key filtering effect to the video capture workflow. Now you can capture a web cam, and the desktop screen both in high definition full screen video at the same time. It’s an incredibly easy way to build talking head and presentation videos and you don’t really need a green screen.
Just set up a web cam and hit record. Captivate will capture both your camera and the desktop, and even give you an option to knockout the background from your webcam capture, so you can put yourself right into the desktop picture, or whatever you captured during that screen recording.
This one is a huge plus if you are doing narrated videos, and a lot of fun if you want to explore those studio weather replacement experiences.
Last but not least, bring on the VR. Virtual reality has been on a rocky ride, but this implementation is sure to be a hit. The cost of production is lower than I have ever seen. Just import a 360 image and then drop hotspots into the world to provide interaction and assessment opportunities for your learners. Adobe considered the audience well with this one as the feature works both in 2D browser windows on traditional computers and other devices, and is able to launch into fully immersive VR simulations when it is played on a device that is bound for a Virtual Reality headset.
One of the more amazing details here is the addition of a Live Device preview solution. The easiest way to understand the feature is to describe the experience. You finish your VR course – it didn’t take you long. You press the preview button and see an option for Live Device Preview. Captivate launches a browser and shows you a QR code. You launch a QR reader on your phone or tablet, and woosh, you are off to witness the magic. As long as your phone and your computer are sharing the same Wifi network, you will automatically see your course on your phone, and on your desktop preview. It works for regular responsive projects too, not just VR.
Live Preview on a Samsung Galaxy 8.
Notice that there is an extra button on that playbar, and a message encouraging the learner to enter the virtual reality space. After clicking the VR button, the learner can slide their phone into a Cardboard or similar viewer and will find themselves directly inside the 360 VR environment. The same content viewed on a Desktop will simply create a 360 world that the learner can navigate with mouse click and drag. The version in the VR headset will rotate the camera to match the rotation of the learner’s head. It will also use ‘Gaze’ in the viewer. This is a method of interaction where you stare at a hotspot or interactive virtual object in order to select or click it. To your learner it appears as a partially filled green donut, which animates to a complete ring over time. When the donut is complete, the item under your gaze is selected.
Probably the most exciting part is that the 360 immersive space can contain complete Captivate quizzes. You can add questions and answers by typing directly on the slide in authoring mode, just as you would for a traditional assessment. The VR viewer can use gaze to select the correct answer and submit their results. Captivate includes new interactions to display text in the 3D world, to show an image, to play a sound effect, to navigate to other slides in the project and to activate an in world quiz question.
The array of new VR hotspot icons
Authoring the interactions is simple too. Just select a hotspot from the new hotspot icons provided, or select your own from an image on your computer. To associate interactions with the hotspot you select it on screen and then chose an action from the property inspector. To move it, you simply click and drag to place it anywhere in the 360 scene.
Unfortunately you won’t be able to import your favorite game models or animate furniture in Captivate yet. This solution is really designed to provide a very simple authoring experience that still brings the benefits of immersive training. I’d recommend it for activities that reinforce awareness of physical spaces that the trainee will work in, to create basic scenarios that would benefit by creating an environment that is as real as you can make it, and for exploratory experiences where you want the learner to poke around and discover new things about an environment, ecosystem or period in history.
360 cameras have reached a very accessible price point, and stock photography sites like stock.adobe.com appear to have a growing collection of high quality options as well. The Adobe team has also provided a few samples in the product, so you can use one of those if you are just dying to try it out. There is one more aspect of this that deserves extra kudos. If you use more than one hotspot in your VR project, you can enable ‘guided’ experience. This will cause the camera to slowly pan to the next hotspot after an interaction completes. (This is what happens on a desktop 2D browser, but in the VR headset arrows appear to guide the learner to the next logical hotspot.) I’m a huge fan of this kind of guidance system. To find the setting just click in the grey area around the 360 slide, and you’ll find the guided option button in the property inspector.
Enhancements
There are also a lot of enhancements in the 2019 release of Adobe Captivate. The most substantial of these is a set of enhancements to responsive course authoring. The easiest way to explain this enhancement is, if you were building responsive courses before it just got a lot easier to select things, specify positions and sizes of objects on the slide and to figure out which fluid box was controlling the movement behavior.
If you never used, now is definitely the time to start. Among the enhancements in the fluid box zone, are all new responsive layouts and built in themes. What a great way to jump start your responsive projects? The only way to really appreciate these fluid box enhancements is to jump right in and build something with fluid boxes. There is built in tutorial to guide you through the steps – I suggest that you start there and then check out Pooja’s latest 14 part series on working with Responsive fluid boxes. We will also be doing eSeminars to show off the enhanced features in the coming weeks, so keep an eye peeled on the community forum for announcements.
One of my favorites is PowerPoint to mobile. PowerPoint has been a bit of a problem for eLearning developers working to make it accessible on mobile devices. Like video, it generally does not behave well when stretched or rearranged. With this release Captivate can now gracefully include PowerPoint slides in HTML5 responsive projects. It will retain the aspect ratio of the original PowerPoint slide, but it will convert it to HTML5, enabling playback of your animations, transitions and more on the mobile device. It behaves a lot like video, and is one of the more elegant solutions that I have seen.
If you are a teacher, or a trainer working with huge assessments, there is an exciting enhancement for you in added support for *.csv quiz format import. This tool let’s you import quiz questions from a spreadsheet. It’s a convenient bulk upload solution that will save tons of time for anyone with a lot of questions to create.
Excited? Wondering where and how you can get Adobe Captivate 2019?
It’s easy, just click here to download the free 30 day trial.
What’s next?
Consider joining us for the launch Webinar: http://bit.ly/CPWebinar_08302018
Already a subscriber?
Click here to download and install the 2019 release. Your previous version of Captivate 2017 will remain active. Login using your Adobe ID to enable your subscription on Captivate 2019. As always, let me know your thoughts in the comment section below. I’m especially curious to hear how you like the new version once you’ve had a week or two to explore.
Don’t forget the eLearning Assets and Voices.
They are separate downloads, and you can find them here: Assets and Voices. Both are installation executable files, so you will need to install them after download.
Words to the Wise about Upgrading from Adobe Captivate 2017 to Adobe Captivate 2019
When you upgrade a whole version number of Captivate the format of the file changes and that means that while you can seamlessly update your Captivate 2017 projects to Adobe Captivate 2019 files, BUT you can not go backwards. Always save your upgraded projects with a new version number, so you will have the original that can open in Captivate 2017 if something changes.
Why can’t I just run the “Help: Update” command? Do I really have to download a whole new version of Captivate?
The major advantage of installing the new version this way is that you may have clients who are still using / need to continue using the 2017 Release of Adobe Captivate. Your prior version(s) of Captivate will remain in place and can be used alongside the 2019 Release of Adobe Captivate.


You must be logged in to post a comment.
- Most Recent
- Most Relevant
have people had good experienced with this
how reliable is this
I would love to see support for Oculus Go & Oculus Quest. I was planning on rolling VR training out to our enterprise but after building some sample content and hosting on our webserver I realized it doesn’t work with either VR headset. You cannot click on any of the buttons to interact. I thought with the HTML5 output this would not be the case, but I have tested both headsets without success. Please someone tell Adobe to add support for Oculus Go & Oculus Quest. Support for them will be the driver for VR training success. I have Captivate 2019 with the latest update and still not working.
There appears to be some ways of getting VR content to work Oculus but requires the use of additional hardware (server etc.). Compatibility with devices is definitely an issue for Adobe currently, and like xr1, I hope Adobe will work on this in the future to streamline the processes.
Just following up on this, I have just tried a Captivate 2019 course (run from an ext server) on the default browser on an Oculus Go and the hotspots and functionality within our sample project worked well. I can’t comment on Quest but if I get the chance to use on this hardware, I will report back.
What steps did you take to be able to play a captivate project on an oculus go?
Hi Matthew,
We host the courses on an external server and then access to the VR course via the oculus browser. It’s not a perfect setup but works and VR experience is good.
Thanks,
Sam
How exactly does the learner transition from a web page to VR cardboard goggles? I can’t find any information anywhere. The title says “Grab your goggles..” and yes it does show you how to preview your Captivate project in 360 however, there is no information on how exactly the learner can transition from a web page to vr cardboard goggles. Has anyone found any information on this?
It would have been great to fix the bugs before adding another feature to an already slow programme. Our institute has stepped away from Captivate due to how unreliable it is, we couldn’t meet deadlines due to constant crashing and freezing. Just type in Captivate Slow in the Adobe forums….
Seems a serious issue. Did anything change since Nov, 2018 ?
When clicking the just click here link I am referred to a page with as title Adobe Captivate 2017
Can someone please confirm that this link is redirecting to the 2019 version (and confirm that the title is misleading and should be corrected by Adobe)?
I just tried the link and got directed to the 2019 version.
Attachment 
I have been waiting for the interactive video overlay functionality. Please consider how xAPI can be used to collect and view enduser data.
