 Legend
245 posts
Legend
245 posts
Introduction to editing Characters in an eLearning course, either on the stage or in the Library. Including a warning about avoiding changes to the original files. Will be followed by interactive videos to illustrate the editing process using Photoshop.
Why?
Yesterday a question appeared on the forums: ‘How to save in the Library the edits to Characters’. In this use case it was meant to save the flipped version of the Character. In the Library the original version will always be kept. Result: when you drag another instance of the character on a slide, it will not be flipped. Edits to the character, made with the Edit image functionalities will never be saved to the original image in the Library.
Characters folder
As you probably know, the downloaded characters are stored (for Windows) in Public Documents, under AdobeeLearning Assets. If you have multiple versions of Captivate, you’ll find a subfolder ‘Characters xx’ for each of the versions. Because of that location you are able to edit the characters even without Administrator rights.
For each character in the folder you’ll have a Thumbnails and an Images subfolder. The Thumbnails show all what is available for that character, the Images only the downloaded image, both in a High and a Low version. Although you can always choose for 3 ways of inserting a character: Full, Half and CloseUp, there is only one image in Low and High version, real images for those who were downloaded, placeholders for the others.
When you insert a character in a Captivate project, it will appear on the stage and in the Library. The file showing up in the Library can be one of the 6 possible versions: High/Low in CloseUp, Half or Full version.
Editing Characters
On the stage
You can edit the Character on the stage with the set of editing possibilities provided by Captivate:
- Resizing, flipping, rotating using the Options tab in the Properties panel (inspector).
- Using the Edit Image button in the Properties. It is a limited set of editing functionality but could be sufficient in some circumstances. In this image you’ll see some edited instances of the same character.
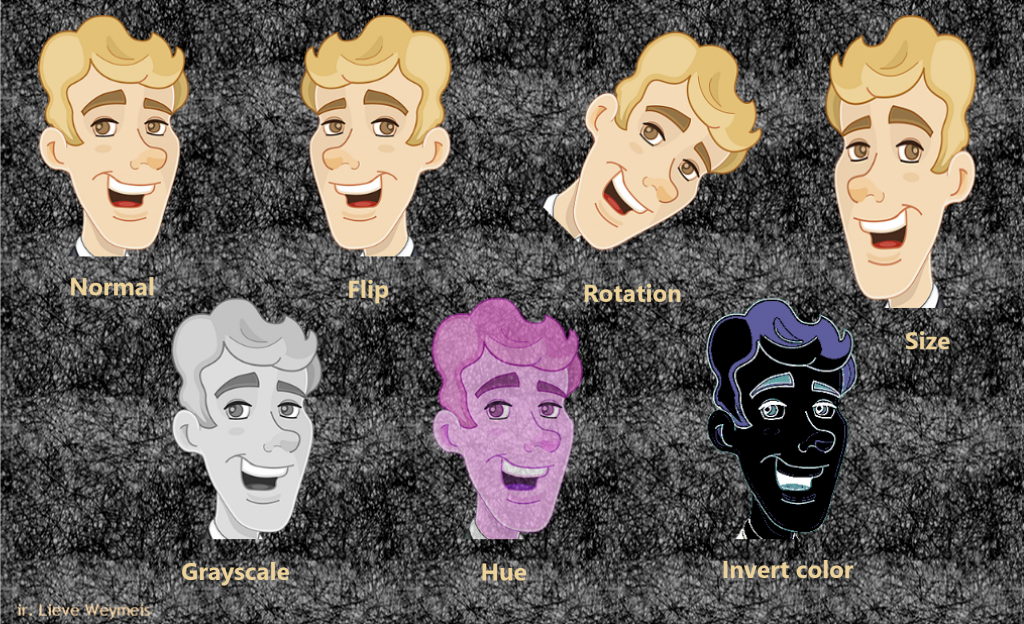
This workflow will not change the original image in the Library. However if you need to use the same edited image multiple times, you’ll have to use the copy/paste workflow. The editing is not saved in the Library.
In the Library
Eidting on the stage will keep the original image save. If you want to reuse the edited image multiple times in your course it can be a good idea to use the ‘Edit with….’ option on the image in the Library. You have to be careful not to change the original image as it is stored on your system.
Do NOT Rename
Renaming the image in the Library is not a solution: when using Edit with… the original name will appear in the editing application. Have a look at these screenshots: renamed the image in the Library, opened it in Photoshop with ‘Edit with…’ and you’ll see the original name in PS.

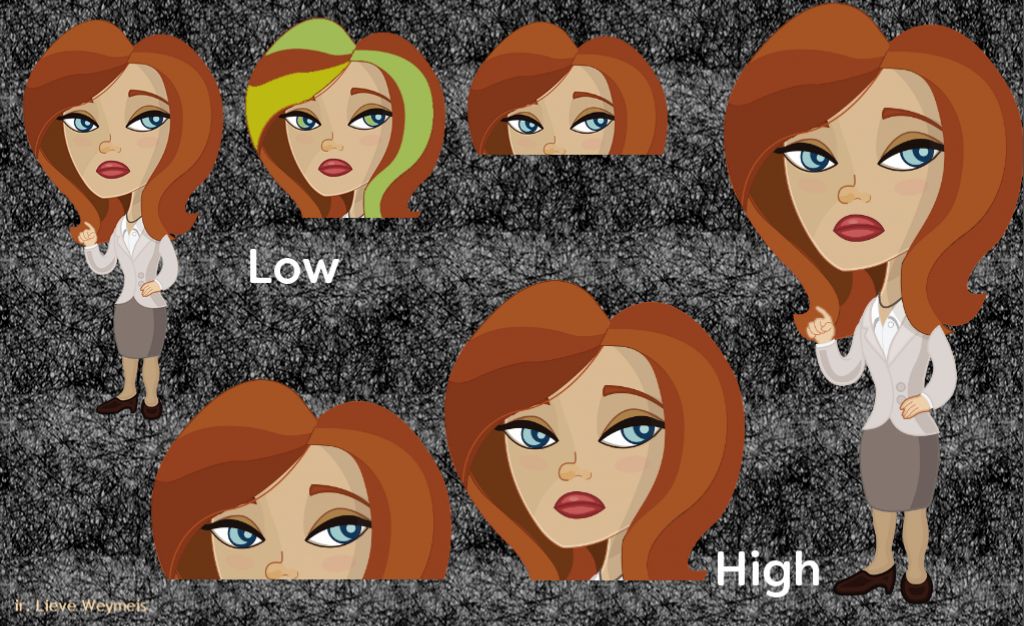
If you save it that way that particular instance of the image will be changed also for future project. Bit confusing, but the other 5 instances remain untouched. In this example I edited the Low, Half version of Sarah01 (Illustrated category). As you can see in this screenshot, the other instances keep their original look, although you’ll find only one image for Low on your system.
Do Duplicate
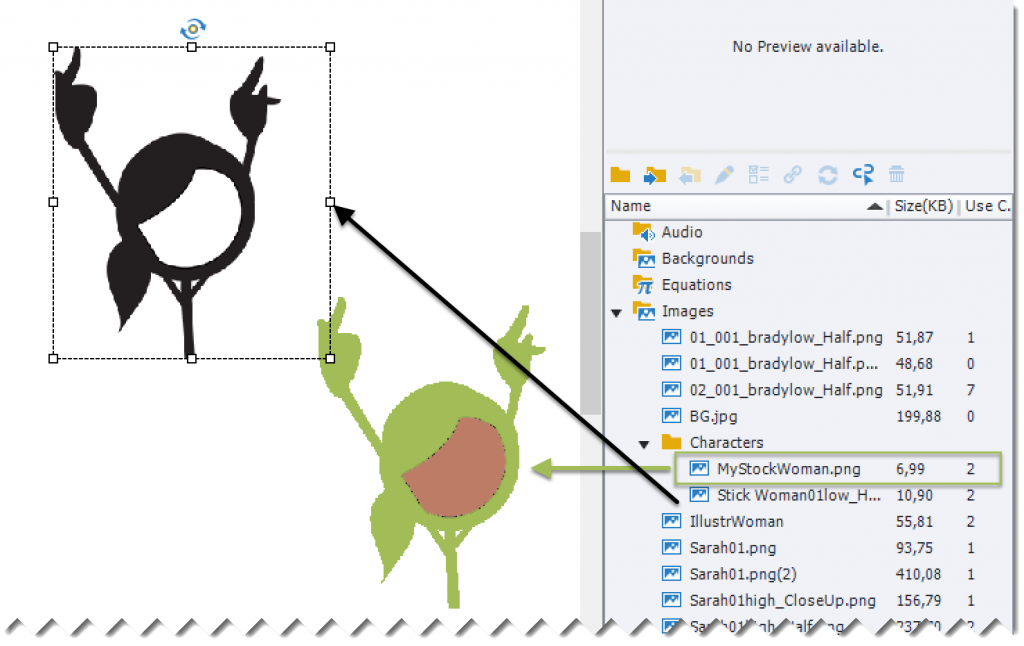
What is the correct way to preserve the original image? You have to duplicate the image in the Library and edit the duplicate. You can see the result on this screenshot for the Sticky Woman, low resolution, Half instance:
Roundtripping in Photoshop with the duplicate image is not happening the first time as you are used to for normal images. It will get a generic name in PS, and you’ll have to export it to a PNG file, to a wanted location after the first editing. Later on roundtripping will happen in the usual way. I will show the workflow step-by-step in a future interactive video.
Multiple edited characters
If I need multiple edited characters in a course, to be reused over and over again I would prefer to create a layered Photoshop file and use the Import functionality. You did see that I created an extra folder for Characters under the Images folder in the Library in the last screenshot. With an Imported PS file that would be unnecessary. Do not forget that it is always possible to use edited characters in the Library in any other project, by using the External Library workflow.
How?
In this first interactive video I show how you can flip the duplicate image, and edit solid colors (in illustration characters) using roundtripping with Photoshop I am now busy with a second interactive video, to show how you can use masking in Photoshop to edit colors in a photographic character. Later on you’ll see how to use roundtripping with the source Photoshop file to edit multiple versions of the same character. This post was meant as an introduction.
Why?
Yesterday a question appeared on the forums: ‘How to save in the Library the edits to Characters’. In this use case it was meant to save the flipped version of the Character. In the Library the original version will always be kept. Result: when you drag another instance of the character on a slide, it will not be flipped. Edits to the character, made with the Edit image functionalities will never be saved to the original image in the Library.
Characters folder
As you probably know, the downloaded characters are stored (for Windows) in Public Documents, under AdobeeLearning Assets. If you have multiple versions of Captivate, you’ll find a subfolder ‘Characters xx’ for each of the versions. Because of that location you are able to edit the characters even without Administrator rights.
For each character in the folder you’ll have a Thumbnails and an Images subfolder. The Thumbnails show all what is available for that character, the Images only the downloaded image, both in a High and a Low version. Although you can always choose for 3 ways of inserting a character: Full, Half and CloseUp, there is only one image in Low and High version, real images for those who were downloaded, placeholders for the others.
When you insert a character in a Captivate project, it will appear on the stage and in the Library. The file showing up in the Library can be one of the 6 possible versions: High/Low in CloseUp, Half or Full version.
Editing Characters
On the stage
You can edit the Character on the stage with the set of editing possibilities provided by Captivate:
- Resizing, flipping, rotating using the Options tab in the Properties panel (inspector).
- Using the Edit Image button in the Properties. It is a limited set of editing functionality but could be sufficient in some circumstances. In this image you’ll see some edited instances of the same character.
This workflow will not change the original image in the Library. However if you need to use the same edited image multiple times, you’ll have to use the copy/paste workflow. The editing is not saved in the Library.
In the Library
Eidting on the stage will keep the original image save. If you want to reuse the edited image multiple times in your course it can be a good idea to use the ‘Edit with….’ option on the image in the Library. You have to be careful not to change the original image as it is stored on your system.
Do NOT Rename
Renaming the image in the Library is not a solution: when using Edit with… the original name will appear in the editing application. Have a look at these screenshots: renamed the image in the Library, opened it in Photoshop with ‘Edit with…’ and you’ll see the original name in PS.
If you save it that way that particular instance of the image will be changed also for future project. Bit confusing, but the other 5 instances remain untouched. In this example I edited the Low, Half version of Sarah01 (Illustrated category). As you can see in this screenshot, the other instances keep their original look, although you’ll find only one image for Low on your system.
Do Duplicate
What is the correct way to preserve the original image? You have to duplicate the image in the Library and edit the duplicate. You can see the result on this screenshot for the Sticky Woman, low resolution, Half instance:
Roundtripping in Photoshop with the duplicate image is not happening the first time as you are used to for normal images. It will get a generic name in PS, and you’ll have to export it to a PNG file, to a wanted location after the first editing. Later on roundtripping will happen in the usual way. I will show the workflow step-by-step in a future interactive video.
Multiple edited characters
If I need multiple edited characters in a course, to be reused over and over again I would prefer to create a layered Photoshop file and use the Import functionality. You did see that I created an extra folder for Characters under the Images folder in the Library in the last screenshot. With an Imported PS file that would be unnecessary. Do not forget that it is always possible to use edited characters in the Library in any other project, by using the External Library workflow.
How?
In this first interactive video I show how you can flip the duplicate image, and edit solid colors (in illustration characters) using roundtripping with Photoshop I am now busy with a second interactive video, to show how you can use masking in Photoshop to edit colors in a photographic character. Later on you’ll see how to use roundtripping with the source Photoshop file to edit multiple versions of the same character. This post was meant as an introduction.


You must be logged in to post a comment.
- Most Recent
- Most Relevant
