 Newbie
12 posts
Newbie
12 posts
Fonts help set the tone for an e-learning project, but they are rarely a choice made by the e-learning developer or instructional designer. In my experience, most organizations have fonts stipulated within their branding requirements and compliance with the brand is mandatory. Marketing or Communications departments will often supply the font files to support and encourage continued brand compliance. That is how I typically acquire new system fonts. I then have to embed these fonts within an Adobe Captivate Project. This is the process I describe in this article.
Fonts help set the tone for an e-learning project, but they are rarely a choice made by the e-learning developer or instructional designer. In my experience, most organizations have fonts stipulated within their branding requirements and compliance with the brand is mandatory. Marketing or Communications departments will often supply the font files to support and encourage continued brand compliance. This is how I typically acquire new system fonts.
In these cases, even though Adobe conveniently incorporates access to Adobe TypeKit fonts directly into Adobe Captivate, I have no justification for purchasing additional font licenses (via Adobe TypeKit) because the company has already purchased the appropriate licenses for the fonts and acquired the files.
After Adobe TypeKit, the second easiest option would be to access the fonts as Web fonts –if they are available via Google Fonts. If the font is available via Google Fonts, the following blog post by Steven Warwick outlines how you can add it to your project using some simple JavaScript.
However, there are limitations to this method.
- Some fonts are not available via Google Fonts (usually because they are not free of charge).
- This method requires internet access and access specifically to Google since we are using JavaScript to link to the font while the e-learning module is playing. Hence, if the e-learning module is running on a very secure intranet with no access to sites outside of the company’s domain, the fonts will not be displayed.
In practice, I have found the need to exercise a third option: to embed the company’s fonts directly into Adobe Captivate.
After some fishing around on the internet, I was able to find a blog post that described how to do this. I have included the URL in the resources section at the end of this article.
To have the instructions directly available from this forum, and also to have an article that specifically refers to the 2019 version of Adobe Captivate, I am detailing what I have learned.
There are three phases to embedding a new system font within an Adobe Captivate project:
- Install the font on your computer;
- Add the font to Adobe Captivate’s main CSS folder;
- Update the main CSS file in the published output of the Adobe Captivate project.
Step 1: Install the Font on Your Computer
- Download the font to your computer.
- Install the font. On a Mac, double-click the font files to open them in the Font Book, and then click the Install Font button. On Windows 10, drag the font files to the Fonts control panel.
I have found that as soon as the fonts are installed on the system, they become immediately available to select from the Font menu within Adobe Captivate 2019. If this does not happen, simply restart Adobe Captivate.
You will now be able to apply the font to the text within your Adobe Captivate project, and also view the font when you preview the project in the preview window. I have found that, at this stage, previewing the project within a browser yields mixed results.
While my Adobe Captivate projects are under development, I generally test them in both the Chrome and Safari browsers. In my experience Chrome displays any installed system fonts in project previews; Safari does not display the font until it is embedded within the published output.
Step 2: Add the Font to Adobe Captivate’s Main CSS Folder
If you are going to use the fonts regularly, you can ensure that Adobe Captivate adds the fonts’ files to every published project by adding the fonts’ files to Adobe Captivate’s CSS folder.
- Find out where Adobe Captivate is installed on your machine.
- The CSS folder is located under /Adobe Captivate 2019/HTML/assets/css. Navigate to it.
- Within the CSS folder, create a new folder, called fonts (you can call this anything, but you need to remember its name).
- Copy your fonts files to the newly created fonts folder.
- Return to the CSS folder. This is where you will create a CSS file that will tell browsers where to find the new fonts and how to process them.
- Using a text editor, create a file named fonts.css (you can call this anything you like, but you need to remember its name).
- In fonts.css, define each font and specify where the font is located. For this, you will need to know a little CSS and since I am not going to teach it in this article, here is an example of a fonts.css file I created for a recent project.

- Your CSS folder should now resemble the image below.

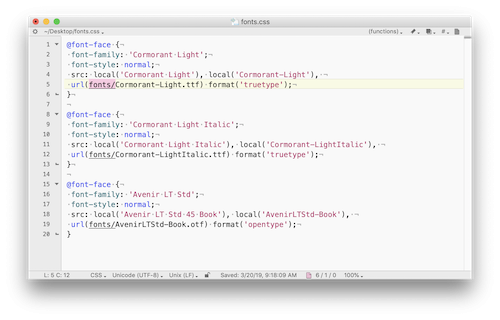

If you examine the image above, there is an additional CSS file (CPLibraryAll.css) that we have not yet modified. This the file that tells the project where to find all its CSS information. We will eventually add the location of our new font.css file to definitions within this file. But not just yet. Through trial and error, I have found that there is no value in modifying CPLibraryAll.css at this stage, as it seems as though this file is freshly generated for each published project, and any changes are overwritten. Therefore, I edit CPLibraryAll.css AFTER publishing the project.
Step 3: Add the Font to the Published Output
- After publishing your project, unzip it if necessary.
- Browse to the assets/css folder.
- Open CPLibraryAll.css and add the following code to the very start of the file:
@import URL("fonts.css"); - Save and close CPLibraryAll.css.
- Navigate back up to the main folder level and zip the files up again.
That’s it! It gets easier with practice!
In case you run into any problems, here are some troubleshooting tips I hope you will find helpful.
Troubleshooting
Live Preview
Live preview on devices will not display the new fonts. To the fonts on mobile devices, upload the course to your Web server or LMS.
The New Fonts Do Not Display in the Browser: 1
If you are like me, then the most likely mistake to avoid will be misspelling the font’s name within the fonts.css file. I have had this problem in the past when embedding fonts in Web pages. On this occasion, to avoid misspelling the font’s name, I just cut and pasted it directly from the font’s filename and then replaced dashes with spaces wherever necessary.
The New Fonts Do Not Display in the Browser: 2
Refresh the web page in your browser. I like to clear the browser history also to be sure that a cached version of the project is not being displayed.
SCORM Output No Longer Works — Unable to Locate imsmanifest.xml File!
When the file is unzipped, the imsmanifest.xml file should be at its root level.
Sometimes when re-zipping SCORM output, an extra folder level may be inadvertently created. If this is the case, rezip just the CONTENTS of the publish folder (do not include the actual publish folder) to avoid recreating the unneeded sub-folder.
Resources
- Flick Learning – How to Embed Fonts in Adobe Captivate:https://www.flicklearning.com/blog/how-to-embed-fonts-in-adobe-captivate
- Integrating Adobe Typekit Fonts: https://helpx.adobe.com/captivate/using/integrate-adobe-fonts.html
- Using Web Fonts in Adobe Captivate: https://elearning.adobe.com/2017/03/using-custom-fonts-in-adobe-captivate/
- Fonts and Adobe Captivate: https://elearning.adobe.com/2018/03/fonts-adobe-captivate/
You can find this and other articles I’ve written on my blog at toyinja.com.
Fonts help set the tone for an e-learning project, but they are rarely a choice made by the e-learning developer or instructional designer. In my experience, most organizations have fonts stipulated within their branding requirements and compliance with the brand is mandatory. Marketing or Communications departments will often supply the font files to support and encourage continued brand compliance. This is how I typically acquire new system fonts.
In these cases, even though Adobe conveniently incorporates access to Adobe TypeKit fonts directly into Adobe Captivate, I have no justification for purchasing additional font licenses (via Adobe TypeKit) because the company has already purchased the appropriate licenses for the fonts and acquired the files.
After Adobe TypeKit, the second easiest option would be to access the fonts as Web fonts –if they are available via Google Fonts. If the font is available via Google Fonts, the following blog post by Steven Warwick outlines how you can add it to your project using some simple JavaScript.
However, there are limitations to this method.
- Some fonts are not available via Google Fonts (usually because they are not free of charge).
- This method requires internet access and access specifically to Google since we are using JavaScript to link to the font while the e-learning module is playing. Hence, if the e-learning module is running on a very secure intranet with no access to sites outside of the company’s domain, the fonts will not be displayed.
In practice, I have found the need to exercise a third option: to embed the company’s fonts directly into Adobe Captivate.
After some fishing around on the internet, I was able to find a blog post that described how to do this. I have included the URL in the resources section at the end of this article.
To have the instructions directly available from this forum, and also to have an article that specifically refers to the 2019 version of Adobe Captivate, I am detailing what I have learned.
There are three phases to embedding a new system font within an Adobe Captivate project:
- Install the font on your computer;
- Add the font to Adobe Captivate’s main CSS folder;
- Update the main CSS file in the published output of the Adobe Captivate project.
Step 1: Install the Font on Your Computer
- Download the font to your computer.
- Install the font. On a Mac, double-click the font files to open them in the Font Book, and then click the Install Font button. On Windows 10, drag the font files to the Fonts control panel.
I have found that as soon as the fonts are installed on the system, they become immediately available to select from the Font menu within Adobe Captivate 2019. If this does not happen, simply restart Adobe Captivate.
You will now be able to apply the font to the text within your Adobe Captivate project, and also view the font when you preview the project in the preview window. I have found that, at this stage, previewing the project within a browser yields mixed results.
While my Adobe Captivate projects are under development, I generally test them in both the Chrome and Safari browsers. In my experience Chrome displays any installed system fonts in project previews; Safari does not display the font until it is embedded within the published output.
Step 2: Add the Font to Adobe Captivate’s Main CSS Folder
If you are going to use the fonts regularly, you can ensure that Adobe Captivate adds the fonts’ files to every published project by adding the fonts’ files to Adobe Captivate’s CSS folder.
- Find out where Adobe Captivate is installed on your machine.
- The CSS folder is located under /Adobe Captivate 2019/HTML/assets/css. Navigate to it.
- Within the CSS folder, create a new folder, called fonts (you can call this anything, but you need to remember its name).
- Copy your fonts files to the newly created fonts folder.
- Return to the CSS folder. This is where you will create a CSS file that will tell browsers where to find the new fonts and how to process them.
- Using a text editor, create a file named fonts.css (you can call this anything you like, but you need to remember its name).
- In fonts.css, define each font and specify where the font is located. For this, you will need to know a little CSS and since I am not going to teach it in this article, here is an example of a fonts.css file I created for a recent project.
- Your CSS folder should now resemble the image below.
If you examine the image above, there is an additional CSS file (CPLibraryAll.css) that we have not yet modified. This the file that tells the project where to find all its CSS information. We will eventually add the location of our new font.css file to definitions within this file. But not just yet. Through trial and error, I have found that there is no value in modifying CPLibraryAll.css at this stage, as it seems as though this file is freshly generated for each published project, and any changes are overwritten. Therefore, I edit CPLibraryAll.css AFTER publishing the project.
Step 3: Add the Font to the Published Output
- After publishing your project, unzip it if necessary.
- Browse to the assets/css folder.
- Open CPLibraryAll.css and add the following code to the very start of the file:
@import URL("fonts.css"); - Save and close CPLibraryAll.css.
- Navigate back up to the main folder level and zip the files up again.
That’s it! It gets easier with practice!
In case you run into any problems, here are some troubleshooting tips I hope you will find helpful.
Troubleshooting
Live Preview
Live preview on devices will not display the new fonts. To the fonts on mobile devices, upload the course to your Web server or LMS.
The New Fonts Do Not Display in the Browser: 1
If you are like me, then the most likely mistake to avoid will be misspelling the font’s name within the fonts.css file. I have had this problem in the past when embedding fonts in Web pages. On this occasion, to avoid misspelling the font’s name, I just cut and pasted it directly from the font’s filename and then replaced dashes with spaces wherever necessary.
The New Fonts Do Not Display in the Browser: 2
Refresh the web page in your browser. I like to clear the browser history also to be sure that a cached version of the project is not being displayed.
SCORM Output No Longer Works — Unable to Locate imsmanifest.xml File!
When the file is unzipped, the imsmanifest.xml file should be at its root level.
Sometimes when re-zipping SCORM output, an extra folder level may be inadvertently created. If this is the case, rezip just the CONTENTS of the publish folder (do not include the actual publish folder) to avoid recreating the unneeded sub-folder.
Resources
- Flick Learning – How to Embed Fonts in Adobe Captivate:https://www.flicklearning.com/blog/how-to-embed-fonts-in-adobe-captivate
- Integrating Adobe Typekit Fonts: https://helpx.adobe.com/captivate/using/integrate-adobe-fonts.html
- Using Web Fonts in Adobe Captivate: https://elearning.adobe.com/2017/03/using-custom-fonts-in-adobe-captivate/
- Fonts and Adobe Captivate: https://elearning.adobe.com/2018/03/fonts-adobe-captivate/
You can find this and other articles I’ve written on my blog at toyinja.com.


You must be logged in to post a comment.
- Most Recent
- Most Relevant
Thanks, OP! This worked like a charm. Here’s a tip for others in my situation: transfonter.org can generate the CSS file for you and convert the font files to WOFF/WOFF2 (which is recommended).
Hi all,
I’m working on Mac, with Adobe Captivate 2019.
It’s only the trial version for now, but I don’t think it should make a difference for this topic.
I have a font called DINOT.otf
I used onlinefontconverter.com to convert it to the other font types.
The fonts are located in /Applications/Adobe Captivate 2019/HTML/assets/css/fonts
The fonts.css is located at /Applications/Adobe Captivate 2019/HTML/assets/css
I wrote the css in Text Editor, maybe there’s a mistake there…
@font-face {
font-family: ‘DIN OT’;
font-style: normal;
src: url(‘../fonts/DINOT.eot’);
src: url(‘../fonts/DINOT.eot?#iefix’) format(’embedded-opentype’),
local(‘DIN OT’),
local(‘DIN OT’),
url(‘../fonts/DINOT.woff2’) format(‘woff2’),
url(‘../fonts/DINOT.woff’) format(‘woff’),
url(‘../fonts/DINOT.ttf’) format(‘truetype’),
url(‘../fonts/DINOT.svg’) format(‘svg’);
}
In the same css folder from the Applications-root, I also have copied the CPLibraryAll.css from the project’s publish folder, and added @import url(“fonts.css”) at the beginning of the file.
I didn’t change anything in the project’s assets/css right?
So it is not working for me…
What am I doing wrong?
Also what is not clear for me: How will the font be available when I put it online? Since I only made changes is my local Applications folder?
