- Blogs
- Discussion
- Organize your eLearning Projects: Grouping Slides in Adobe Captivate 7
 This week I hosted Adobe Captivate Developer Anita Horsley in an eSeminar and was thrilled to learn a cool new tip. (Yup, even I didn’t realize that you could do this nifty little trick with your eLearning modules.)
Permit me to set the stage. You are building your latest learning module in Adobe Captivate. You know that the module is essentially four sections, one for each of three big topics and one for the final assessment. But it’s a long project, and you’ve got dozens, maybe even hundreds of slides. Every time you go to search for the start point of section 2 or three you find yourself scrolling the thumbnail section for days and days. Eventually you might have even tried tricks like putting in a blank slide or funny placeholder graphics just to be able to find that start of the section more quickly.
Or perhaps you have a module that is composed of lessons or chapters. It has a kind of index page for each unit, and there are many, many units. You’d like the table of contents to get smart about organizing these units, and give you a nested list of slides so that your learners can easily find any bit of content within a given unit.
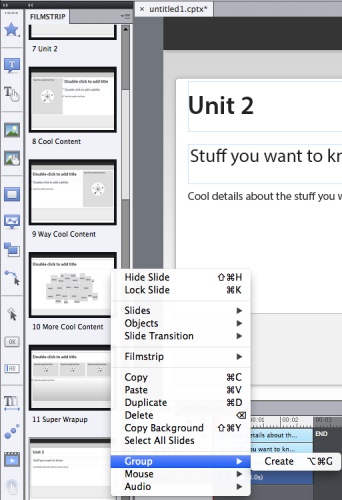
Either way, this cool little tip is for you. You can easily group your slides in Adobe Captivate 7. Just SHIFT Select the slides you want to join to a common group, and then Command Click (Mac) or CRTL Click (Win) and chose Group-Create. This will create a group containing all of the selected slides. It will give the group a special property panel to let you select a group color, and to name the group. It will also collapse the group of slides into a single box, with a convenient drop down menu to let you open and close the group. (This will also make it a lot simpler to see your units, and navigate your project.)
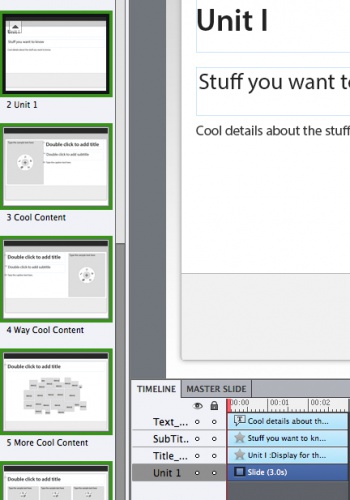
The group can easily be expanded or contracted to reveal the collection of slides.
The created groups now condense dozens of slides into just a few – easily expandible – unit placeholders.
As illustrated here, the Table of contents automatically builds nested TOC entries for each unit.
You can label the slides either in the property inspector or in the Table of Contents (Skin editor) directly.
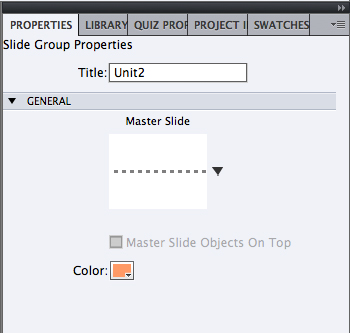
The property inspector for groups includes the option to set a special master slide for an entire group, the option to chose which color to select for a given group (the box that is drawn around group slides and the group preview thumbnail) and the name of the group. This group name will be used by the skin editor to name the unit slides, so you will want to name the groups properly.
Hopefully you’ll find this tip useful. Let me know. As always I’d love to hear from you – feel free to share your own tips and tricks, and your thoughts about this one in the comments section below.
- Most Recent
- Most Relevant
Thanks for sharing this content…
Hey Captivate community – Please HELP!!!!!
I am trying to determine a few things.
1) We have Captivate version 6.0. We are all relatively new to creating eLearning. Our company is switching to Windows 8 in a few months. Does anyone out there know if Captivate 6 will still work properly (both create and view) in Windows 8? I heard that it will no longer support flash.
2) I found a list of all of the enhancements between 6.0 and 7.0 to try to build a buisness case for the upgrade. I was wondering if anyone out there can tell me if there are additional features that save a lot of time? This is the list of upgrades that I found:
Drag-and-drop components
HTML5 support for Microsoft PowerPoint
Enhanced accessibility support
In-course YouTube videos
In-course web browsing
Learning notes
System audio recording and editing
Advanced Action Templates
Enhanced quizzing with HTML5
Support for GIFT format
System audio recording and editing
Support for GIFT format
Equation Editor
Improved social media engagement
Enhanced interactions library
Please let me know what you think!
THANK YOU
[…] Esta semana fui anfitrión de Adobe Captivate desarrollador Anita Horsley en un seminario electrónico y estaba encantado de aprender una nueva punta fría. (Sí, yo no me di cuenta que podía hacer este pequeño truco ingenioso con sus módulos de e-learning.) Permitir que yo … […]
I am using Captivate to create a quiz based on 3 different question pools. I am using Random Question slides so that it will randomly pull different questions from the pool each time the quiz is taken. Some of the distractors are long, so I want to format the master slide for multiple choice questions to put more space between each distractor. It will not allow me to do this. If I were to put a question slide in manually, I can separate each of the multiple choice answers, but I can’t do it in the master slide. Any suggestions? My distractors are getting cut off. And I don’t want to go any smaller on the font.
[…] This week I hosted Adobe Captivate Developer Anita Horsley in an eSeminar and was thrilled to learn a cool new tip. (Yup, even I didn't realize that you could do this nifty little trick with your eLearning modules.) Permit me to … […]
It was terrific to learn that Captivate can group slides and I merrily went about creating sections for my 200+ slide project–thanks Anita! I’m glad that you are letting more people know about this great feature. I do have some suggestions for additional features:
* Please make the TOC automatically update itself. Right now when you change the name of a slide in the Property Panel, the title in the TOC Skin Editor window does not reflect the change. I can’t think of any reason why this would be desirable. This would also solve the problem that I routinely have when I hit the Refresh button for the TOC (because I’ve changed slide labels) and all my carefully-selected checkmarks have been reset. (BTW: I would love for hidden slides to not show up in the TOC).
* While it’s very easy to group slides into sections (once you know it can be done and how!), I haven’t figured out how to move a slide out of a group into a different group. The only way I found to do this was by Removing both the source and target sections, and then re-creating the two sections. I’d love to know a better way.


