 Legend
639 posts
I had a viewer from my YouTube channel ask me about the Video Demo feature in Adobe Captivate. Specifically, this viewer was having trouble getting his video demo to play automatically within another Captivate project. In all likelihood he was using a video demo that had been published out to a video file, however, I thought I would blog about the options for inserting video demos into other project files.
The first method is the easiest way. Simply record your Video Demo project, save it as a CPVC file. From your target project, you could simply click on the Insert drop down menu and select CPVC Slide. This will allow you to insert your Video Demo as a slide within your target project.
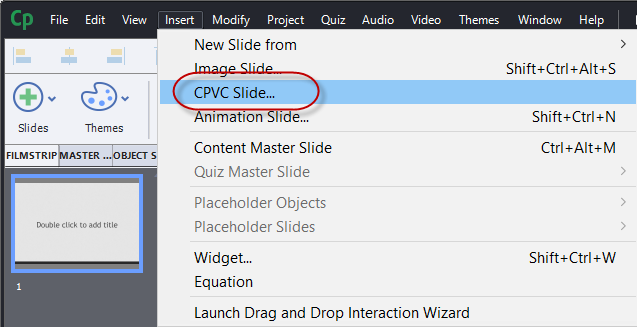
When your target project comes to that slide it simply plays your Video Demo movie. I usually include some explanation to the users as to what is about to happen on the previous slide so they don’t get confused by this. You can use this capability in either responsive design or standard (blank) projects, however, keep in mind that when your target project doesn’t match the size and aspect ratio of your Video Demo, the target project will leave some blank space on the sides of the CPVC slide. In this day and age of portrait selfies and videos, most users are not too distracted by this.
If you have published out your Video Demo as an MP4 movie, you have two additional ways you can insert the resulting MP4 video. In both cases, you would click on the Media drop down Icon from the Adobe Captivate toolbar and select the Video Icon.
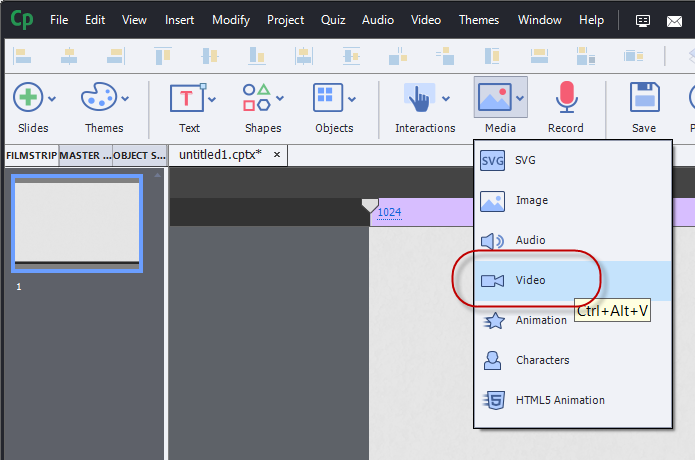
Once you have done that you have a choice to make.
The first choice is Event Video.
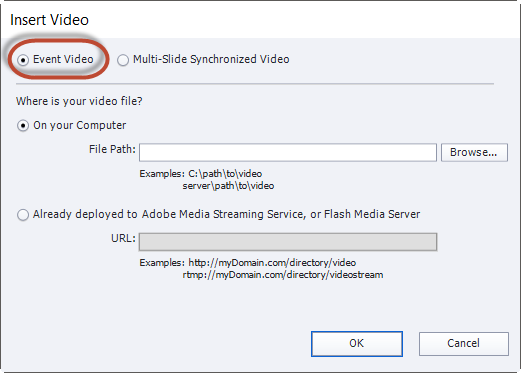
If you select Event Video you are inserting the video onto a blank slide where other Captivate objects could exist. This is an advantage of the previous method of inserting CPVC files as slides within your project. To have Event Video automatically play when your users reach that slide, be sure to select the video and check off the Auto Play check box in the video’s properties.
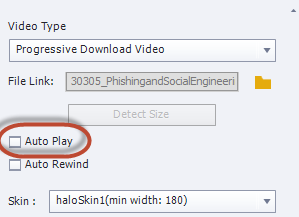
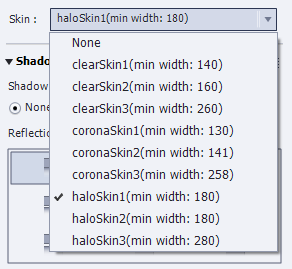
In addition, you can select one of the several skins for your video which gives your users playback controls that your users could use to control the video.
This is an asynchronous solution which means that the video’s timeline is separate and apart from your main project timeline. The actions of other objects on your timeline cannot by synchronised with Event Video. For example, you cannot use Adobe Captivate’s Closed Captioning features to add captions for Event Video. This could be a problem if your project needs to be accessible by persons with disabilities such as some or all hearing loss.
Alternatively, you could select Multi-Slide Synchronized Video which will play automatically when the user reaches that slide. Keep in mind that Multi-Slide Synchronized Video doesn’t have to be on multiple slides, that is just an option and I wish that Adobe would reconsider the name of this feature as many people get confused by it.
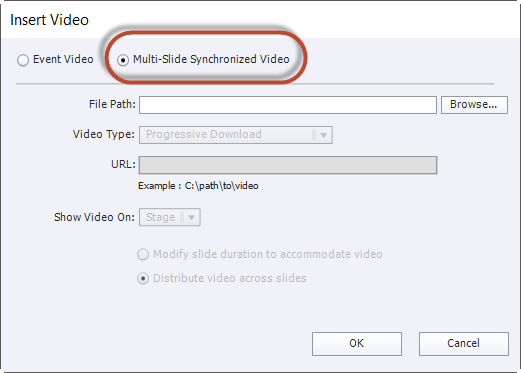
Multi-Slide Synchronized Video is synchronous with the rest of your target Captivate project so the video will automatically play when the user reaches that slide. You could also add Closed Captioning to Multi Slide Synchronized Video and synchronise other items on your timeline to occur at certain points during your video playback.
If you wish to take a look any of the 170 plus video tutorials I have created on Adobe Captivate. You can view them at https://YouTube.com/paulwilsonlearning
I had a viewer from my YouTube channel ask me about the Video Demo feature in Adobe Captivate. Specifically, this viewer was having trouble getting his video demo to play automatically within another Captivate project. In all likelihood he was using a video demo that had been published out to a video file, however, I thought I would blog about the options for inserting video demos into other project files.
The first method is the easiest way. Simply record your Video Demo project, save it as a CPVC file. From your target project, you could simply click on the Insert drop down menu and select CPVC Slide. This will allow you to insert your Video Demo as a slide within your target project.

When your target project comes to that slide it simply plays your Video Demo movie. I usually include some explanation to the users as to what is about to happen on the previous slide so they don’t get confused by this. You can use this capability in either responsive design or standard (blank) projects, however, keep in mind that when your target project doesn’t match the size and aspect ratio of your Video Demo, the target project will leave some blank space on the sides of the CPVC slide. In this day and age of portrait selfies and videos, most users are not too distracted by this.
If you have published out your Video Demo as an MP4 movie, you have two additional ways you can insert the resulting MP4 video. In both cases, you would click on the Media drop down Icon from the Adobe Captivate toolbar and select the Video Icon.

Once you have done that you have a choice to make.
The first choice is Event Video.

If you select Event Video you are inserting the video onto a blank slide where other Captivate objects could exist. This is an advantage of the previous method of inserting CPVC files as slides within your project. To have Event Video automatically play when your users reach that slide, be sure to select the video and check off the Auto Play check box in the video’s properties.

In addition, you can select one of the several skins for your video which gives your users playback controls that your users could use to control the video.

This is an asynchronous solution which means that the video’s timeline is separate and apart from your main project timeline. The actions of other objects on your timeline cannot by synchronised with Event Video. For example, you cannot use Adobe Captivate’s Closed Captioning features to add captions for Event Video. This could be a problem if your project needs to be accessible by persons with disabilities such as some or all hearing loss.
Alternatively, you could select Multi-Slide Synchronized Video which will play automatically when the user reaches that slide. Keep in mind that Multi-Slide Synchronized Video doesn’t have to be on multiple slides, that is just an option and I wish that Adobe would reconsider the name of this feature as many people get confused by it.

Multi-Slide Synchronized Video is synchronous with the rest of your target Captivate project so the video will automatically play when the user reaches that slide. You could also add Closed Captioning to Multi Slide Synchronized Video and synchronise other items on your timeline to occur at certain points during your video playback.
If you wish to take a look any of the 170 plus video tutorials I have created on Adobe Captivate. You can view them at https://YouTube.com/paulwilsonlearning
 Legend
639 posts
- Most Recent
- Most Relevant


