 Newbie
38 posts
Newbie
38 posts
Objects in Captivate are the building blocks of content. Let’s use the different types of objects in Captivate to add content to our project. In this section, we will use objects to add content in the form of text and images. We will also use smart shapes to provide interactivity for our users.
Assets and samples
The procedures in this document require you to use assets such as images and sample Adobe Captivate project files. You can choose to use your own assets and samples. However, it is recommended that you download and extract the following zip file to your computer: add-standard-objects.zip
Add text captions
Text captions allow us to add textual content that would be required on slides where you need to provide some details.
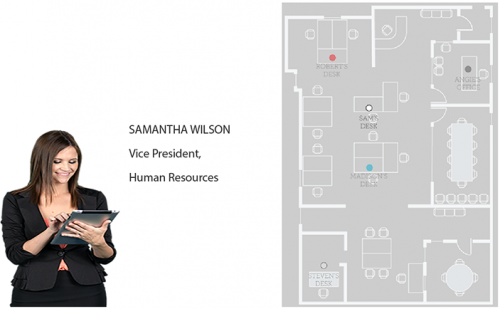
Let’s add a text caption to that slide to look like the following:
- In the add-standard-objects folder, navigate to the samples sub-folder and open:
add-standard-objects.cptx
Note: It is not mandatory that you download the project file that ships with this tutorial. You can still follow along with the steps in this procedure. However, you will need to create a new project in Captivate with a slide similar the slide as shown above. - In the Filmstrip, navigate to the slide titled Samantha.
- In the toolbar, click Text and then choose Text Caption.
As soon as you place a text caption on a slide, the placeholder text is selected, by default. This convenience allows you to immediately enter the text for the caption. - Enter or copy and paste the following text into the text caption:
SAMANTHA WILSON
Vice President,
Human Resources
Notice that the text flows over the viewable area of text caption. We will need to resize the text caption. Also, by default, the text caption object is placed on the center of the slide. We will also need to reposition it as shown in the image above. - Click outside the text caption and then click on the text caption.
The text caption now displays with handles on the corners and edges.

Note: When an object on a slide displays with handles as above, the object is in the mode where you can resize and reposition it. We will use these handles in later sections of this chapter. - Use the handles to resize the text caption to ensure that all the text we added is visible.
Also, reposition the text caption to place it to the right of the character.
Finally, let’s use the Properties Inspector to make formatting changes to the text caption. - If the Properties Inspector is not visible to the right of your work area, click Properties in the right corner of the toolbar.
- In the Style tab of the Properties Inspector:
- Change the Caption Type to transparent.
- Change the font size.
- Change the text alignment


The Style tab of the Properties Inspector for a text caption has a number of other formatting options such as changing the font family, making the text bold or italics. Remember that the Properties Inspector is contextual. This means that the available property options for an object depend on the object type.
Add images
In the slide that we updated in the previous section, let’s add an image of the location of Samantha’s desk in the office floor plan.
At the end of the procedure in this section, the slide will look like:
- In the add-standard-objects folder, navigate to the samples subfolder and open:
add-standard-objects.cptx
Note: It is not mandatory that you download the project file that ships with this tutorial. You can still follow along with the steps in this procedure. However, you will need to create a new project in Captivate with a slide similar the slide as shown above. - In the Filmstrip, navigate to the slide titled Samantha.
- Click Media on the toolbar and then choose Image.
A dialog box is displayed that allows you to select the image file from your computer. - In the add-standard-objects folder, navigate to the assets subfolder.
- Choose the file intro_sam_map and click Open.
The image is placed on the slide. - If required, use the handles described in the previous section to resize and reposition the image to the right side of the slide.
Set background images
Besides adding images to slides, you can also set images as background for slides in the project.Let’s set a background image for a slide in our project.
- In the add-standard-objects folder, navigate to the samples subfolder and open:
add-standard-objects.cptx
Note: It is not mandatory that you download the project file that ships with this tutorial. You can still follow along with the steps in this procedure. However, you will need to create a new project in Captivate with a slide similar the slide as shown above. - Navigate to the slide titled Start of Quiz.
- In the Properties Inspector, click the Background drop-down list and then choose Custom.
- Click Add Project Background.
- In the dialog box, choose abstract-paper-background and click OK.
If you don’t find the image in the list:- Click Import and then in the add-standard-objects folder, navigate to the assets subfolder.
- In the assets subfolder, choose abstract-paper-backgrounds-powerpoint.png.
The images that you see in the dialog box, are contained in the library for this project. All the assets that you add to a Captivate project (images, audio, video) are added to the Captivate library.
To view the library for this project, click Library
Add Smart Shapes
Captivate provides you with an array of shapes that you can easily customize to change their look-and-feel. You can add interactivity to shapes. And you can also add text labels to shapes.
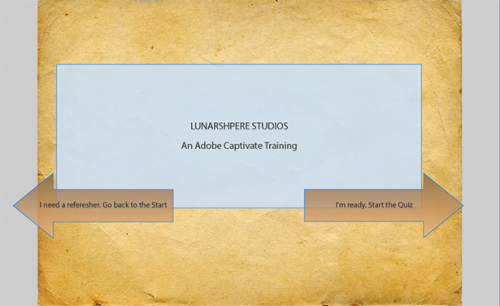
Let’s use smart shapes to create the following slide:
- In the add-standard-objects folder, navigate to the samples subfolder and open:
add-standard-objects.cptx
Note:It is not mandatory that you download the project file that ships with this tutorial. You can still follow along with the steps in this procedure. However, you will need to create a new project in Captivate with a slide similar the slide shown above. - In the Filmstrip, navigate to the slide titled Start of Quiz.
- Click Shapes.
The drop-down list displays all the available shapes. - Choose the rectangular shape from the Basic category.
- Click the cursor at the point to start the rectangle and then drag the cursor to complete the rectangle.
- Double-click inside the rectangle and add the following text:
LUNARSPHERE STUDIOS
An Adobe Captivate Training
- Note:Like all objects in Captivate, you can use the Properties Inspector to format the look-and-feel of the rectangle.
Next, let’s add the left and right arrows to the slide. - Select
 in the list of smart shapes and draw the left arrow.
 - Double-click inside the left arrow and add the following text:
Go back to the Start - In the Properties Inspector, click Use as Button.
The Actions tab is displayed. - Go to the Actions tab and click the On Success drop-down list.
- We want to navigate the user to the start of the presentation, so in the drop-down list, choose Jump to slide.
- In the Slide drop-down list, choose the second slide in our project.
- Repeat steps 6 through 11 to create the right arrow using .
It is the second arrow in the Arrows category.
Enter the following text: Start the Quiz
Choose: Use as Button
For the action, choose Jump to slide and chose the slide titled Start of Quiz
Preview and Publish
We have covered a lot in this section!
We worked with text captions, images, and Smart Shapes. By using the customization options available for these object types, we have greatly improved the look-and-feel of the slides in our project.
Let’s preview our progress.
Click Preview on the toolbar and then choose Project to preview the entire project.
If you see something missing, you can go over the appropriate section in this article and make the required updates to your project.
If everything looks fine, let’s publish the project to our computer.
- Click Publish on the toolbar and then choose Publish to Computer.
- Click OK to view the output.
Assets and samples
The procedures in this document require you to use assets such as images and sample Adobe Captivate project files. You can choose to use your own assets and samples. However, it is recommended that you download and extract the following zip file to your computer: add-standard-objects.zip
Add text captions
Text captions allow us to add textual content that would be required on slides where you need to provide some details.
Let’s add a text caption to that slide to look like the following:
- In the add-standard-objects folder, navigate to the samples sub-folder and open:
add-standard-objects.cptx
Note: It is not mandatory that you download the project file that ships with this tutorial. You can still follow along with the steps in this procedure. However, you will need to create a new project in Captivate with a slide similar the slide as shown above. - In the Filmstrip, navigate to the slide titled Samantha.
- In the toolbar, click Text and then choose Text Caption.
As soon as you place a text caption on a slide, the placeholder text is selected, by default. This convenience allows you to immediately enter the text for the caption. - Enter or copy and paste the following text into the text caption:
SAMANTHA WILSON
Vice President,
Human Resources
Notice that the text flows over the viewable area of text caption. We will need to resize the text caption. Also, by default, the text caption object is placed on the center of the slide. We will also need to reposition it as shown in the image above. - Click outside the text caption and then click on the text caption.
The text caption now displays with handles on the corners and edges.
Note: When an object on a slide displays with handles as above, the object is in the mode where you can resize and reposition it. We will use these handles in later sections of this chapter. - Use the handles to resize the text caption to ensure that all the text we added is visible.
Also, reposition the text caption to place it to the right of the character.
Finally, let’s use the Properties Inspector to make formatting changes to the text caption. - If the Properties Inspector is not visible to the right of your work area, click Properties in the right corner of the toolbar.
- In the Style tab of the Properties Inspector:
- Change the Caption Type to transparent.
- Change the font size.
- Change the text alignment
The Style tab of the Properties Inspector for a text caption has a number of other formatting options such as changing the font family, making the text bold or italics. Remember that the Properties Inspector is contextual. This means that the available property options for an object depend on the object type.
Add images
In the slide that we updated in the previous section, let’s add an image of the location of Samantha’s desk in the office floor plan.
At the end of the procedure in this section, the slide will look like:
- In the add-standard-objects folder, navigate to the samples subfolder and open:
add-standard-objects.cptx
Note: It is not mandatory that you download the project file that ships with this tutorial. You can still follow along with the steps in this procedure. However, you will need to create a new project in Captivate with a slide similar the slide as shown above. - In the Filmstrip, navigate to the slide titled Samantha.
- Click Media on the toolbar and then choose Image.
A dialog box is displayed that allows you to select the image file from your computer. - In the add-standard-objects folder, navigate to the assets subfolder.
- Choose the file intro_sam_map and click Open.
The image is placed on the slide. - If required, use the handles described in the previous section to resize and reposition the image to the right side of the slide.
Set background images
Besides adding images to slides, you can also set images as background for slides in the project.Let’s set a background image for a slide in our project.
- In the add-standard-objects folder, navigate to the samples subfolder and open:
add-standard-objects.cptx
Note: It is not mandatory that you download the project file that ships with this tutorial. You can still follow along with the steps in this procedure. However, you will need to create a new project in Captivate with a slide similar the slide as shown above. - Navigate to the slide titled Start of Quiz.
- In the Properties Inspector, click the Background drop-down list and then choose Custom.
- Click Add Project Background.
- In the dialog box, choose abstract-paper-background and click OK.
If you don’t find the image in the list:- Click Import and then in the add-standard-objects folder, navigate to the assets subfolder.
- In the assets subfolder, choose abstract-paper-backgrounds-powerpoint.png.
The images that you see in the dialog box, are contained in the library for this project. All the assets that you add to a Captivate project (images, audio, video) are added to the Captivate library.
To view the library for this project, click Library
Add Smart Shapes
Captivate provides you with an array of shapes that you can easily customize to change their look-and-feel. You can add interactivity to shapes. And you can also add text labels to shapes.
Let’s use smart shapes to create the following slide:
- In the add-standard-objects folder, navigate to the samples subfolder and open:
add-standard-objects.cptx
Note:It is not mandatory that you download the project file that ships with this tutorial. You can still follow along with the steps in this procedure. However, you will need to create a new project in Captivate with a slide similar the slide shown above. - In the Filmstrip, navigate to the slide titled Start of Quiz.
- Click Shapes.
The drop-down list displays all the available shapes. - Choose the rectangular shape from the Basic category.
- Click the cursor at the point to start the rectangle and then drag the cursor to complete the rectangle.
- Double-click inside the rectangle and add the following text:
LUNARSPHERE STUDIOS
An Adobe Captivate Training
- Note:Like all objects in Captivate, you can use the Properties Inspector to format the look-and-feel of the rectangle.
Next, let’s add the left and right arrows to the slide. - Select in the list of smart shapes and draw the left arrow.
- Double-click inside the left arrow and add the following text:
Go back to the Start - In the Properties Inspector, click Use as Button.
The Actions tab is displayed. - Go to the Actions tab and click the On Success drop-down list.
- We want to navigate the user to the start of the presentation, so in the drop-down list, choose Jump to slide.
- In the Slide drop-down list, choose the second slide in our project.
- Repeat steps 6 through 11 to create the right arrow using .
It is the second arrow in the Arrows category.
Enter the following text: Start the Quiz
Choose: Use as Button
For the action, choose Jump to slide and chose the slide titled Start of Quiz
Preview and Publish
We have covered a lot in this section!
We worked with text captions, images, and Smart Shapes. By using the customization options available for these object types, we have greatly improved the look-and-feel of the slides in our project.
Let’s preview our progress.
Click Preview on the toolbar and then choose Project to preview the entire project.
If you see something missing, you can go over the appropriate section in this article and make the required updates to your project.
If everything looks fine, let’s publish the project to our computer.
- Click Publish on the toolbar and then choose Publish to Computer.
- Click OK to view the output.


You must be logged in to post a comment.
- Most Recent
- Most Relevant
