360 slides are supported in Responsive and blank projects, as well as incorporates all the goodness of responsive projects with 360 experience.
How to add 360 slide in non-VR projects?
1. Open a blank/Responsive project
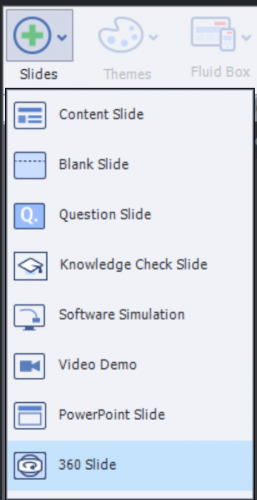
2. Click on slides and choose 360 Slide. (Figure 1)

Figure1
What can be achieved? (Sample project attached)

Figure2

Figure 3
How to achieve the above?
Slide 1 (refer to Figure 2) is a blank slide in a Responsive Project. It has four image buttons comprising of Bedroom, Living room, Kitchen, and Washroom.
On clicking each image, you will be taken to respective slides (Branching), which are 360 slides in order to explore each area of the house.
Slide 2 (refer to Figure 3)
- Insert a 360 slide
- Click on “Add 360 image/Video” (refer to Figure 4)
- Browse and insert a 360 image.
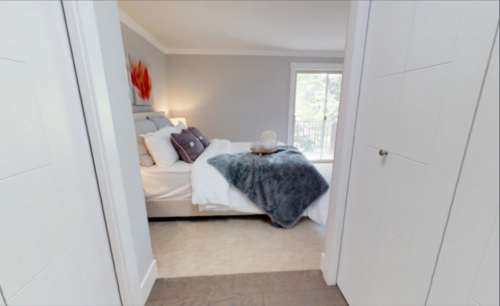
- Image added is a .png 360 image of a bedroom(refer to Figure 5)

Figure4

Figure5 5. Click on Text-> Label. You can add text and format it as required under Properties panel.
6. Click on Hotspots drop drown to select various hotspots. You can also choose any image as hotspot by clicking on Image.
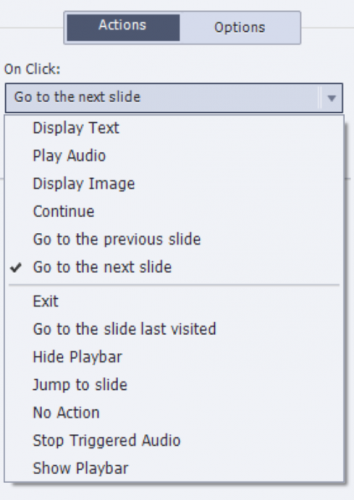
7. Actions can be assigned to Hotspots under Actions tab. You can configure On click actions for each Hotspot and assign any one of the following actions.(refer Figure6)

Figure6
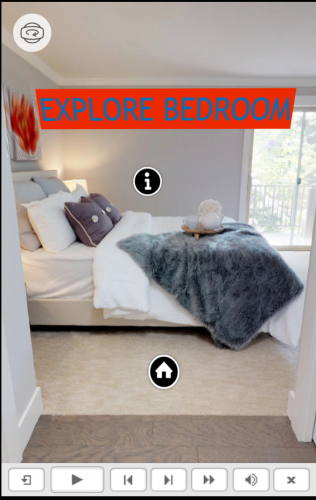
The Home hotspot(refer Figure3) takes you back to the First slide, which is a non-360 slide. One of the main advantages of 360 slide support is branching can be easily achieved between 360 and non-360 slides.
360 Experience on devices:
360 icon on top-left corner of 360 slide serves two purpose
- On desktop: It merely serves as an indicator to indicate the slide as 360 slide.
- On Devices: It serves as a Toggle button which enables gesture navigation on devices. By default, on 360 slides, Mobile palette gestures are off which allows you to explore the 360 world on devices(refer Figure7). It is just a click away from switching between 360 and non-360 gestures.

Figure7
Go ahead and explore the House!
Sample project:Sample_project
360 slides are supported in Responsive and blank projects, as well as incorporates all the goodness of responsive projects with 360 experience.
How to add 360 slide in non-VR projects?
1. Open a blank/Responsive project
2. Click on slides and choose 360 Slide. (Figure 1)

Figure1
What can be achieved? (Sample project attached)

Figure2

Figure 3
How to achieve the above?
Slide 1 (refer to Figure 2) is a blank slide in a Responsive Project. It has four image buttons comprising of Bedroom, Living room, Kitchen, and Washroom.
On clicking each image, you will be taken to respective slides (Branching), which are 360 slides in order to explore each area of the house.
Slide 2 (refer to Figure 3)
- Insert a 360 slide
- Click on “Add 360 image/Video” (refer to Figure 4)
- Browse and insert a 360 image.
- Image added is a .png 360 image of a bedroom(refer to Figure 5)

Figure4

Figure5 5. Click on Text-> Label. You can add text and format it as required under Properties panel.
6. Click on Hotspots drop drown to select various hotspots. You can also choose any image as hotspot by clicking on Image.
7. Actions can be assigned to Hotspots under Actions tab. You can configure On click actions for each Hotspot and assign any one of the following actions.(refer Figure6)

Figure6
The Home hotspot(refer Figure3) takes you back to the First slide, which is a non-360 slide. One of the main advantages of 360 slide support is branching can be easily achieved between 360 and non-360 slides.
360 Experience on devices:
360 icon on top-left corner of 360 slide serves two purpose
- On desktop: It merely serves as an indicator to indicate the slide as 360 slide.
- On Devices: It serves as a Toggle button which enables gesture navigation on devices. By default, on 360 slides, Mobile palette gestures are off which allows you to explore the 360 world on devices(refer Figure7). It is just a click away from switching between 360 and non-360 gestures.

Figure7
Go ahead and explore the House!
Sample project:Sample_project
You must be logged in to post a comment.
- Most Recent
- Most Relevant
Hi Lieve,
Fluid boxes are not supported on 360 slides. you can add 360 slides in responsive project, which functions the same way as in VR project.
Hotspots are only supported on 360 slides. They cannot be inserted on a normal slide/ in fluid box of any sort.
Hope this helps:)
How will that look, a 360 slide, when you change to other devices? I tried it out and would never recommend to add a 360 slide to a real responsive project myself, the experience will not be up to the level it deserves.
As for hotspots on non-360 slides, I posted a first workflow, more to come. The first one is replicating almost totally the hotspots in VR slides (with the exception of the Guided possiblity). Have a look at:
https://elearning.adobe.com/2018/10/hotspots-2d-image-worfklow-1/#comment-49681
I just published a post ‘thttps://elearning.adobe.com/2018/10/timeline-360-slide/ ‘explaining the Timeline in a 360 slide, either for a static image or for a video. It could provide some extra information for those who like to know more.
Just one question: I never used a 360 slide in a responsive project (fluid boxes?). Could you provide an example? I am wondering about that possibility because a normal synchronized video cannot be used in a fluid box. What about the hotspots which are stacked above the background image or video? Do you need to use a static fluid box?


