 Master
This blog highlights how Adobe Captivate’s carousel widget transforms static product displays into engaging, interactive experiences. It explains how to design and customize carousels to showcase product features effectively, enhance storytelling, and save space. The post also offers best practices and real-world use cases to boost learner engagement and retention.
When it comes to showcasing products in a digital learning or marketing experience, interactivity is key. Static slides and flat visuals can fall short in conveying the story, features, and benefits of your product. Enter the carousel component in Adobe Captivate-a dynamic, engaging way to showcase multiple products or features without overwhelming the learner. In this post, we’ll explore how to use the carousel effectively to create compelling product showcases that inform, impress, and convert.
What is a Carousel Component?
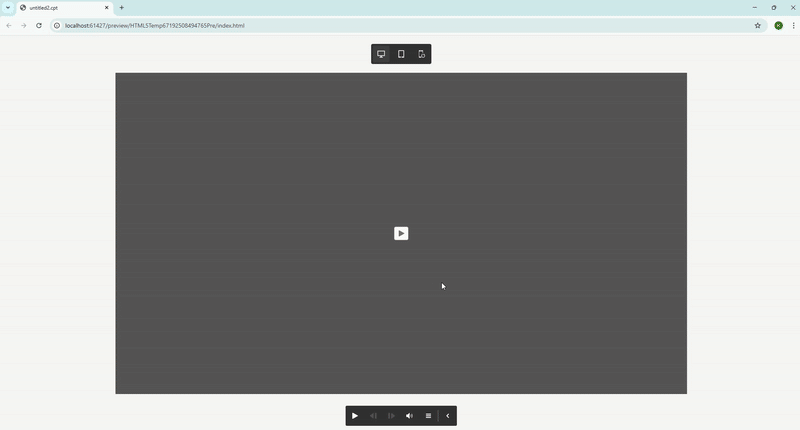
A carousel component is an interactive widget that allows learners or viewers to scroll through multiple pages (or slides) within a single content block. Think of it like a rotating banner or deck-each page can contain an image, headline, body text, and even interactive buttons. This feature is perfect for showcasing a series of related items, such as a product line, step-by-step instructions, or customer testimonials.
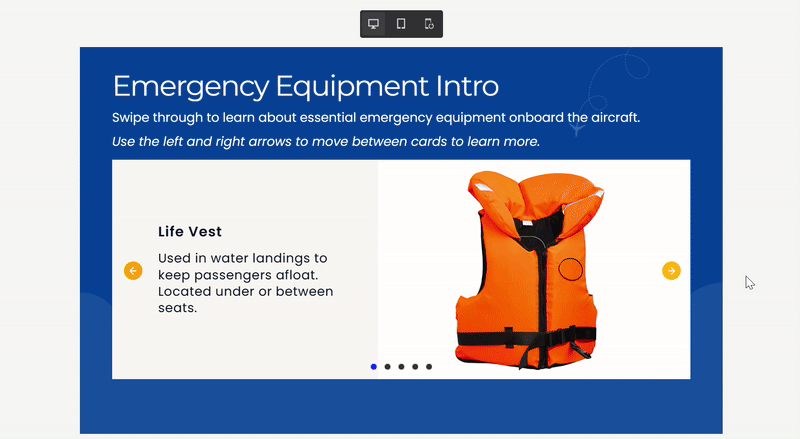
In Adobe Captivate, the carousel component can be added from the Widget Gallery with just a few clicks. It’s responsive by default, meaning it looks great across devices-from desktop to mobile-and provides intuitive navigation with arrows or indicators.
Why Use a Carousel for Product Showcases?
Here’s why the carousel is a game-changer for digital product storytelling:
- Interactive and Engaging: Instead of overwhelming the learner with everything at once, a carousel delivers content in digestible chunks.
- Visual Focus: Each slide allows space for high-resolution images and minimal text, perfect for emphasizing product aesthetics.
- Storytelling Flow: The carousel creates a natural left-to-right narrative, guiding the learner through key product features or benefits.
- Space-Saving: Instead of stacking multiple slides or screens, everything is embedded within a compact, elegant interface.
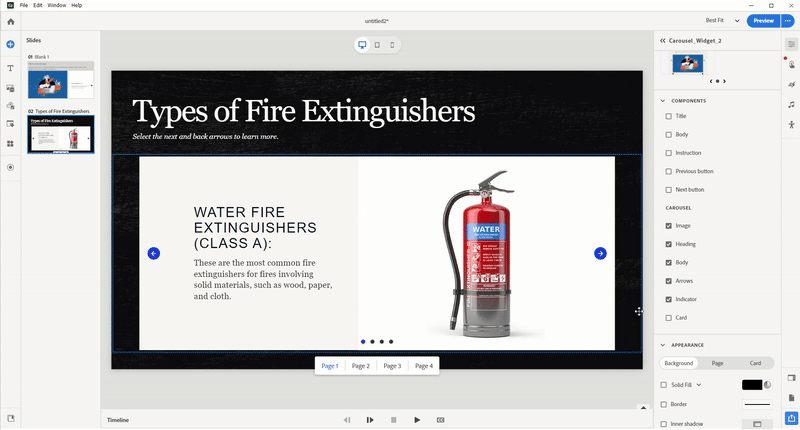
How to Build a Product Showcase Carousel in Adobe Captivate
Creating a carousel in Adobe Captivate is remarkably easy and highly customizable. Here’s a step-by-step outline:
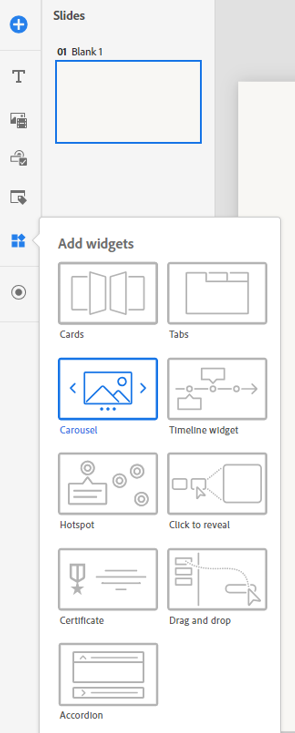
1. Add the Carousel Widget
- Navigate to Add New Widget > Carousel from the left toolbar.
- Choose from up to six pages to showcase different products or product features.
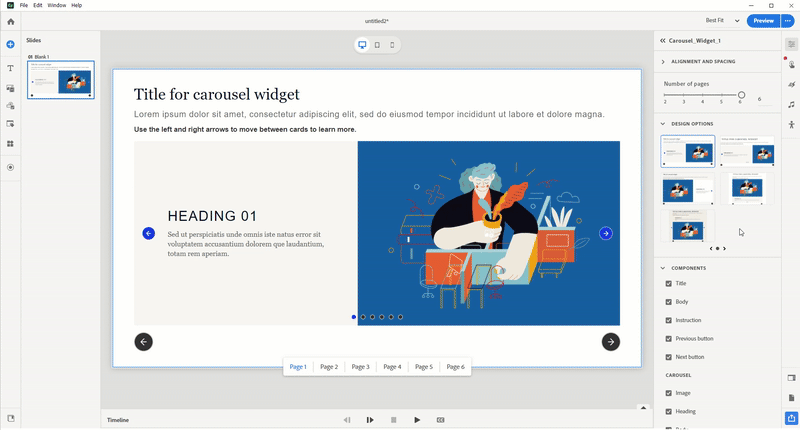
2. Design with Pre-Built Layouts
- Use Design Options to select a clean, visually appealing layout.
- Customize backgrounds using solid colors, gradients, or even branded imagery.
3. Add Media and Messaging
- Each carousel page supports:
- Images: Show product shots, packaging, or in-use scenarios.
- Headings and Body Text: Highlight product names and top features.
- Call-to-Action Buttons: Include buttons that guide to the next slide.
4. Customize Navigation
- Add arrows or indicator dots to help learners move between pages.
- You can position arrows at the top, center, or bottom depending on your layout.
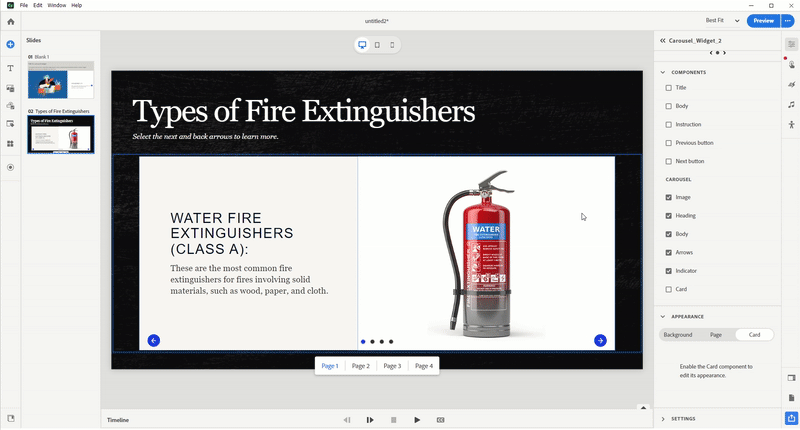
5. Optimize Appearance
- Use the Appearance panel to modify background, borders, shadows, and opacity.
- Add card-style containers to elevate visual structure and hierarchy on each page.
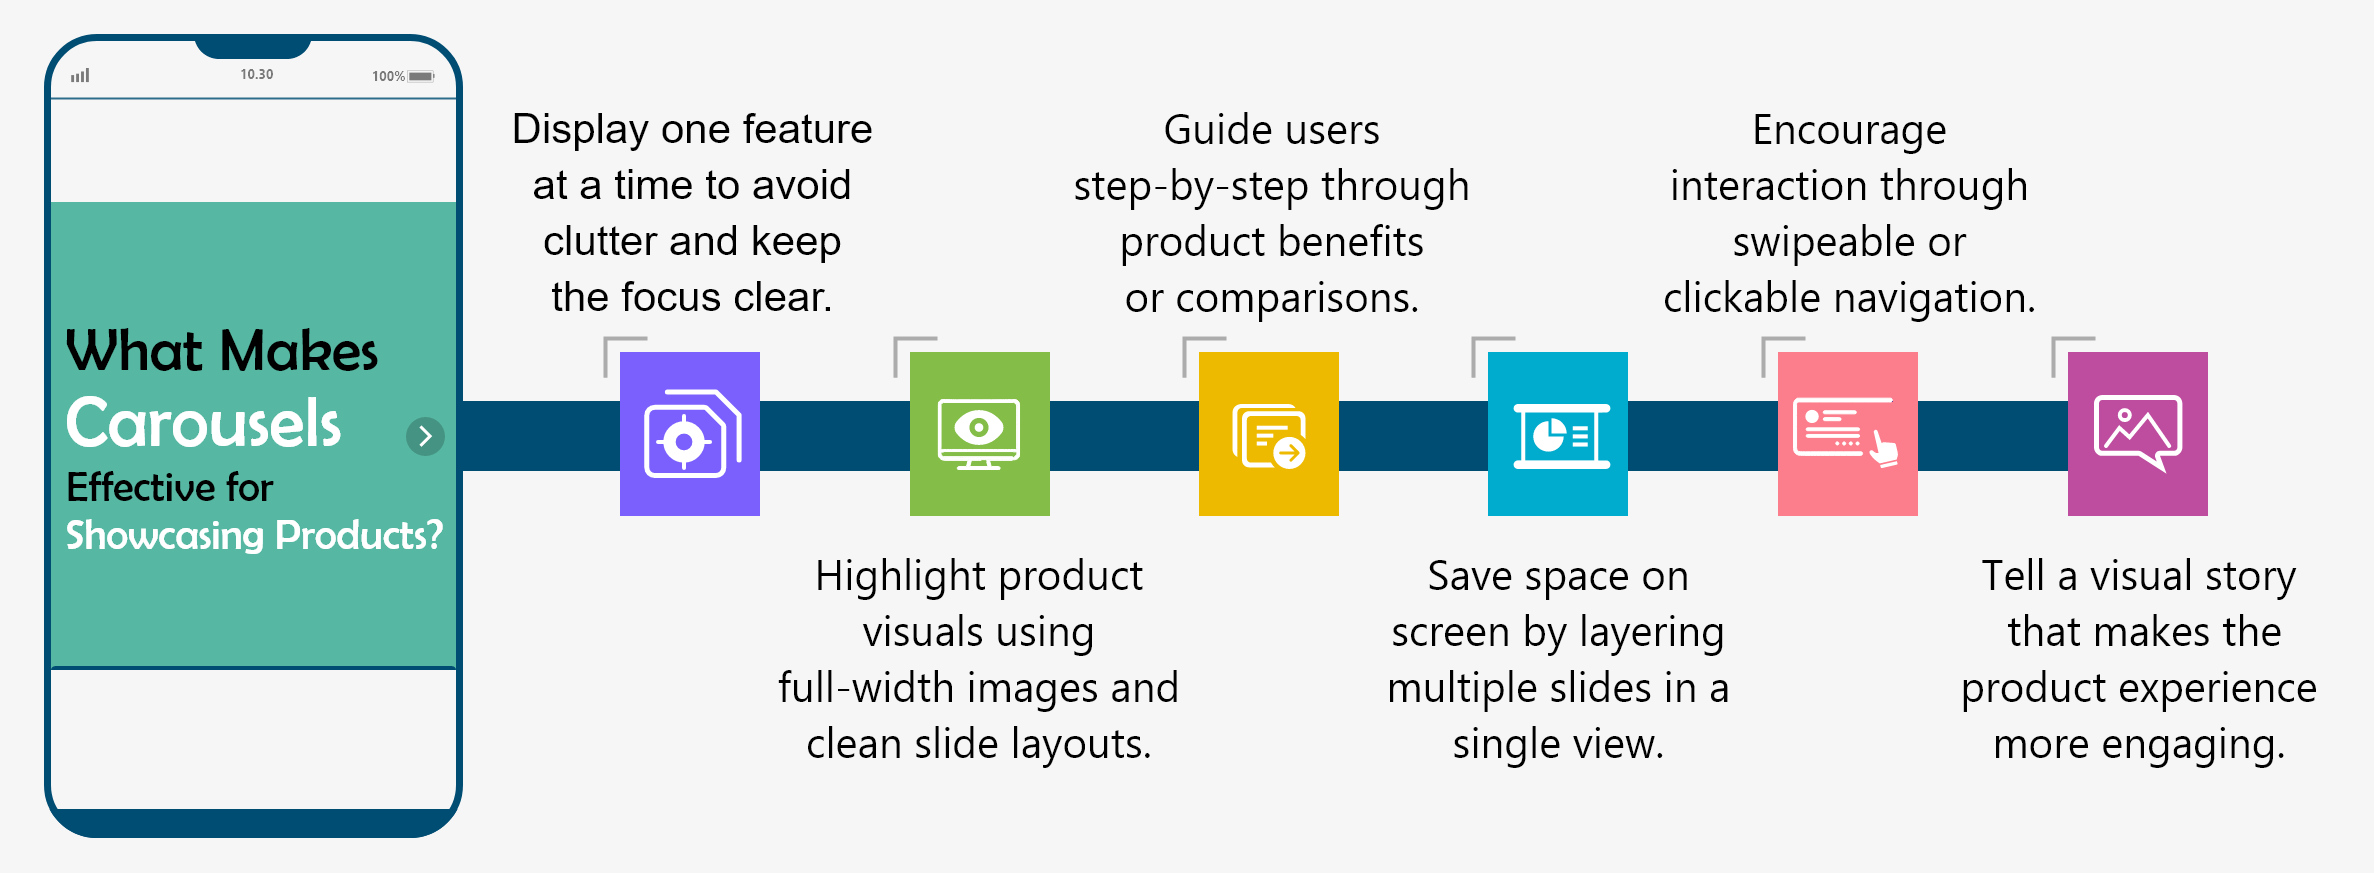
Pro Tips for Carousel-Based Product Showcases
- Stick to One Focus per Slide: Each carousel page should spotlight a single product or feature to avoid cognitive overload.
- Use Consistent Layouts: Uniform design across pages improves flow and brand professionalism.
- Incorporate Visual Cues: Arrows, highlights, and icons can guide users intuitively through the carousel.
- Make it Mobile-Friendly: Adobe Captivate’s responsive settings ensure your carousel looks great on smartphones and tablets.
Example Use Cases
Here are some practical ways companies are using carousels in Captivate for product showcases:
- Tech Company: Showcase different smartphone models in a rotating carousel with close-up shots and feature highlights.
- SaaS Product: Demonstrate key features of the software in sequence, paired with screenshots and customer testimonials.
- Automotive eLearning: Train dealership staff by rotating through car models, performance specs, and safety features.
Final Thoughts
In today’s competitive landscape, how you present your product can be just as important as the product itself. With the carousel widget in Adobe Captivate, you’re not just showcasing a product-you’re crafting an experience. Whether you’re building training modules, product walkthroughs, or customer education, using this interactive component can boost learner engagement, content recall, and overall user interaction.
Start experimenting with the carousel in your next Captivate project-and see how it transforms your product story into an immersive journey.
When it comes to showcasing products in a digital learning or marketing experience, interactivity is key. Static slides and flat visuals can fall short in conveying the story, features, and benefits of your product. Enter the carousel component in Adobe Captivate-a dynamic, engaging way to showcase multiple products or features without overwhelming the learner. In this post, we’ll explore how to use the carousel effectively to create compelling product showcases that inform, impress, and convert.
What is a Carousel Component?
A carousel component is an interactive widget that allows learners or viewers to scroll through multiple pages (or slides) within a single content block. Think of it like a rotating banner or deck-each page can contain an image, headline, body text, and even interactive buttons. This feature is perfect for showcasing a series of related items, such as a product line, step-by-step instructions, or customer testimonials.
In Adobe Captivate, the carousel component can be added from the Widget Gallery with just a few clicks. It’s responsive by default, meaning it looks great across devices-from desktop to mobile-and provides intuitive navigation with arrows or indicators.
Why Use a Carousel for Product Showcases?
Here’s why the carousel is a game-changer for digital product storytelling:
- Interactive and Engaging: Instead of overwhelming the learner with everything at once, a carousel delivers content in digestible chunks.
- Visual Focus: Each slide allows space for high-resolution images and minimal text, perfect for emphasizing product aesthetics.
- Storytelling Flow: The carousel creates a natural left-to-right narrative, guiding the learner through key product features or benefits.
- Space-Saving: Instead of stacking multiple slides or screens, everything is embedded within a compact, elegant interface.
How to Build a Product Showcase Carousel in Adobe Captivate
Creating a carousel in Adobe Captivate is remarkably easy and highly customizable. Here’s a step-by-step outline:
1. Add the Carousel Widget
- Navigate to Add New Widget > Carousel from the left toolbar.
- Choose from up to six pages to showcase different products or product features.
2. Design with Pre-Built Layouts
- Use Design Options to select a clean, visually appealing layout.
- Customize backgrounds using solid colors, gradients, or even branded imagery.
3. Add Media and Messaging
- Each carousel page supports:
- Images: Show product shots, packaging, or in-use scenarios.
- Headings and Body Text: Highlight product names and top features.
- Call-to-Action Buttons: Include buttons that guide to the next slide.
4. Customize Navigation
- Add arrows or indicator dots to help learners move between pages.
- You can position arrows at the top, center, or bottom depending on your layout.
5. Optimize Appearance
- Use the Appearance panel to modify background, borders, shadows, and opacity.
- Add card-style containers to elevate visual structure and hierarchy on each page.
Pro Tips for Carousel-Based Product Showcases
- Stick to One Focus per Slide: Each carousel page should spotlight a single product or feature to avoid cognitive overload.
- Use Consistent Layouts: Uniform design across pages improves flow and brand professionalism.
- Incorporate Visual Cues: Arrows, highlights, and icons can guide users intuitively through the carousel.
- Make it Mobile-Friendly: Adobe Captivate’s responsive settings ensure your carousel looks great on smartphones and tablets.
Example Use Cases
Here are some practical ways companies are using carousels in Captivate for product showcases:
- Tech Company: Showcase different smartphone models in a rotating carousel with close-up shots and feature highlights.
- SaaS Product: Demonstrate key features of the software in sequence, paired with screenshots and customer testimonials.
- Automotive eLearning: Train dealership staff by rotating through car models, performance specs, and safety features.
Final Thoughts
In today’s competitive landscape, how you present your product can be just as important as the product itself. With the carousel widget in Adobe Captivate, you’re not just showcasing a product-you’re crafting an experience. Whether you’re building training modules, product walkthroughs, or customer education, using this interactive component can boost learner engagement, content recall, and overall user interaction.
Start experimenting with the carousel in your next Captivate project-and see how it transforms your product story into an immersive journey.


You must be logged in to post a comment.
- Most Recent
- Most Relevant
