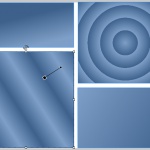
 CTRL SHIFT G While you have a gradient selected. That’s the shorthand version of today’s hot Captivate tip on Gradient Goodness. Gradient Fill was added to Adobe Captivate 5.5, and it’s so intuitive and easy to use that immediately I saw tons of people taking advantage of this quick, simple way to get more interesting looks in their projects. But one question that often comes up is what are those little “Pattern” elements in the drop down menu of the Gradients Dialog used for?
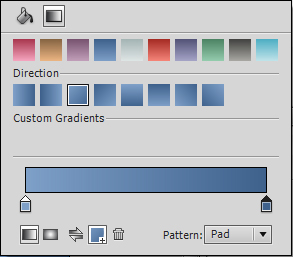
Down in the bottom right corner you’ll find a little drop down menu that says Pattern, and has three options, Pad, Reflect, and Repeat. But if you just grab them and start clicking you won’t usually see a visible result. Why not? Well the answer lies in the mysteries of “Edit Gradient.”
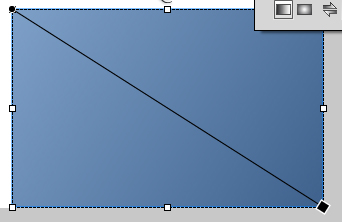
 You may either right click on a gradient (whether it’s in a shape or the whole stage area) and choose ‘Edit Gradient” or you can Press CTRL + SHIFT + G, in Captivate 5.5 while that gradient is selected. This will bring up a gradient editing tool, that looks like a black line with a pin (shown by a black dot) on one end of the line, and a vector(angle and length) control handle (represented by a black square) on the other end. This tool is pretty simple to use. The angle of the line represents the angle perpendicular to the gradient. Just grab the pin (black dot) to relocate the center (in the case of radial gradients) or end point of the gradient. Use the square shape end control to alter the angle, or to alter the length of the gradient fill.
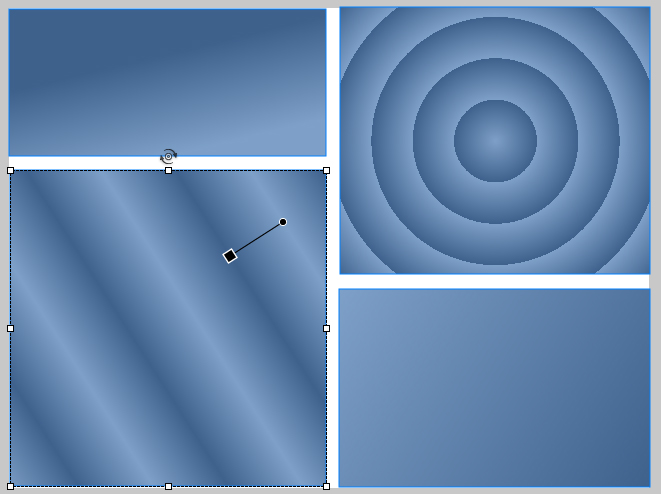
 Now in order to understand, Pad, Reflect and Repeat, you’ll want to make the gradient fill a little shorter than the default setting. Try making it about half the default length. Now when you change from Pattern: Pad (the default) to Pattern: Reflect you’ll see that the gradient is reflecting in repetition. With Reflect you get a kind of soft repetition because the colors are inverted along the perpendicular line represented by the gradient angle.
 If you choose Pattern: Repeat, you’ll get hard edges in a repeating pattern. This is because the gradient is repeating without the inversion, so as one color comes abruptly against the other, you see hard edges.
Hope you find this tidbit helpful. As always, feel free to leave comments and questions below. Or visit us on http://www.facebook.com/adobecaptivate.
 CTRL SHIFT G While you have a gradient selected. That’s the shorthand version of today’s hot Captivate tip on Gradient Goodness. Gradient Fill was added to Adobe Captivate 5.5, and it’s so intuitive and easy to use that immediately I saw tons of people taking advantage of this quick, simple way to get more interesting looks in their projects. But one question that often comes up is what are those little “Pattern” elements in the drop down menu of the Gradients Dialog used for?
Down in the bottom right corner you’ll find a little drop down menu that says Pattern, and has three options, Pad, Reflect, and Repeat. But if you just grab them and start clicking you won’t usually see a visible result. Why not? Well the answer lies in the mysteries of “Edit Gradient.”
 You may either right click on a gradient (whether it’s in a shape or the whole stage area) and choose ‘Edit Gradient” or you can Press CTRL + SHIFT + G, in Captivate 5.5 while that gradient is selected. This will bring up a gradient editing tool, that looks like a black line with a pin (shown by a black dot) on one end of the line, and a vector(angle and length) control handle (represented by a black square) on the other end. This tool is pretty simple to use. The angle of the line represents the angle perpendicular to the gradient. Just grab the pin (black dot) to relocate the center (in the case of radial gradients) or end point of the gradient. Use the square shape end control to alter the angle, or to alter the length of the gradient fill.
 Now in order to understand, Pad, Reflect and Repeat, you’ll want to make the gradient fill a little shorter than the default setting. Try making it about half the default length. Now when you change from Pattern: Pad (the default) to Pattern: Reflect you’ll see that the gradient is reflecting in repetition. With Reflect you get a kind of soft repetition because the colors are inverted along the perpendicular line represented by the gradient angle.
 If you choose Pattern: Repeat, you’ll get hard edges in a repeating pattern. This is because the gradient is repeating without the inversion, so as one color comes abruptly against the other, you see hard edges.
Hope you find this tidbit helpful. As always, feel free to leave comments and questions below. Or visit us on http://www.facebook.com/adobecaptivate.
You must be logged in to post a comment.
- Most Recent
- Most Relevant
Adobe is introducing a new feature. http://www.tatilotel.com http://www.ebebekanne.com http://www.globalarticles.net http://www.xbabu.com http://www.xjagger.com
Unrelated comment to this article – sorry, didn’t know where else to put this – but after clicking on “Download eLearning Examples” link on rightside of this page, noticed that the download for module 3 is actually module 2. These are great examples, and I’d really like to have an opportunity to examine module 3 (the Hospital example).
Thank you-Jim


