 When we create courses for global audience, oftentimes we come across a need for localized version of the course. The common workflow is to create the course in one language and then duplicate the course and then change the language for text/graphics/audio. This is the easiest way to localize content, but is an inefficient workflow for course maintenance, where you need to make the same edits in each version of the course.
To overcome this problem, Adobe Captivate provides you a way to create a single course with multiple language options. This can be done by using Advanced Actions and Variables.
Here’s an example of a course with multiple language options. Take a look…
If you know how to use advanced actions and variables in Adobe Captivate, it’s very easy to create such a course. The logic used here is that each language is associated with a variable. The default value of these variables is zero. When a learner clicks the button related to a particulate language, the value of the variable changes to one and he/she is taken to the next slide. On entering the next slide, Captivate checks for the value of the variable and shows/hides the captions accordingly.
Here are the detailed steps:
- Create the screen layout and add the common screen elements for the course.
- Add the buttons/click boxes related to each language on the first screen.
- Add text related to each language on the screen and label the text captions appropriately.
- Uncheck Visible for all the text captions.
- Select the text captions on the screen, right-click and select Align > Align and resize to the same size. This will place all the text captions on top of each other.
- Repeat this step for the rest of the screens.
- Click Project > Variables.
- Add a variable for each language and set their value to 0.

- Then define the advanced actions. Click Project > Advanced Actions.
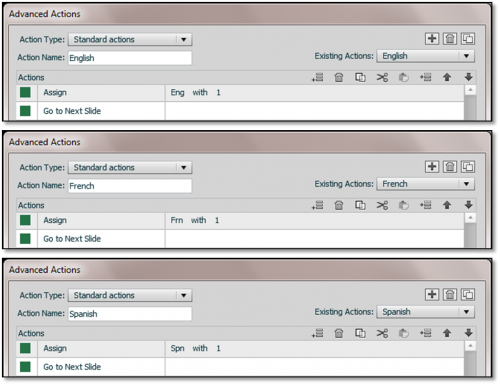
- Define standard actions for each language button where if the learner clicks on a button, the variable value related to the button should change to 1.

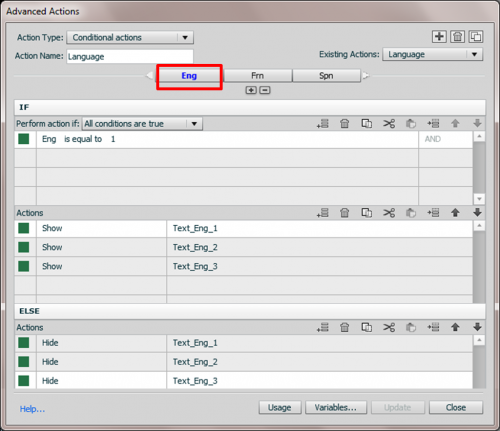
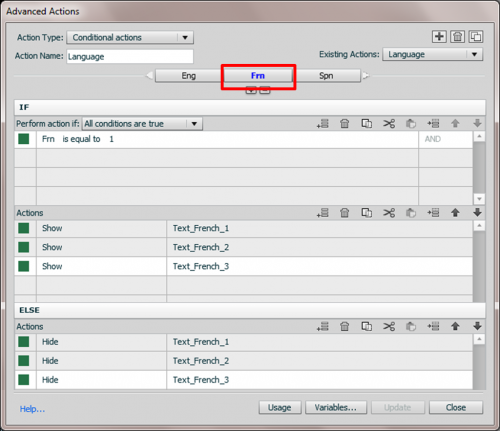
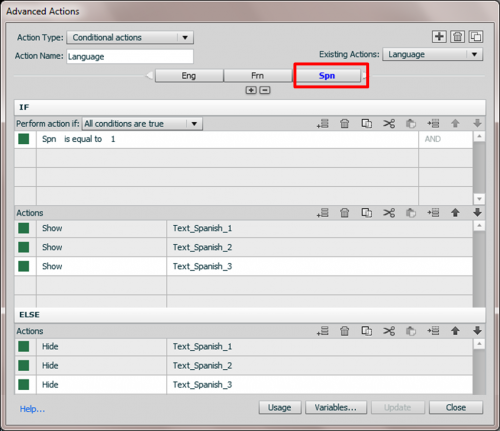
- Now define a conditional action which will check the value of variables and display the captions accordingly. The limitation with Advanced Actions is that you can show an object on a slide only if it is present on that particular slide. But we will use it for our advantage by creating just one conditional action for all the slides. 🙂
- The conditional action should check if the variable values are equal to one and show all text captions for that particular language else hide all.


- Select the English button on the slide. Set the On Success action to Execute Advanced Actions and select English as script.
- Select the French button on the slide. Set the On Success action to Execute Advanced Actions and select French as script.
- Select the Spanish button on the slide. Set the On Success action to Execute Advanced Actions and select Spanish as script.
- In the Filmstrip view, select slide 3, 4, and 5. Set the On Success action to Execute Advanced Actions and select Language as script.
Feel comfortable working if you have an example in front of you? Here’s the link to download the example project.
Happy captivating! 🙂
Update for captivate 8 please, and for full project (buttons, quiz, master slides text interchanging languages). How to create one module in different languages so that candidate choose his on start and learns and solves the quiz after on the chossen language.
Pooja, having created lot of courses in different languages, and despite being an advanced actions freak, I did not and will never use the approach you explain here. There is a lot more to be localized to offer the student an optimal experience: TOC and playbar have to be localized, quizzing environment has to be localized, those are only a few examples. Moreover this approach results in a file that is mostly way to big. If it is necessary to offer the language choice to the student, working with a menu file that offers the choice and linking to different files, each in their proper language, would be more efficient IMO. Sorry for my disagreement 🙂
Miles, this is not a native captivate function in this example. Just jumping to the first slide with the button Restart will not be sufficient, because you have to ‘reset’ the user variables Eng, Frn, Spn. This can be done with an advanced action triggered by the Reset button. Personally I would use an other approach (hope Pooja will not curse me): would trigger an advanced action on Entering the first slide, setting those variables to value=0. In that case you do not need to add a default value on defining those variables, which I find more convenient.
Even like to offer another approach: why use 3 variables, you can do it with one user variable v_lang which will store the language choice. If the user clicks on the button English, it will get the value 1 (or Eng if you prefer), for French value 2 (or Frn), for Spanish 3 (or Spn). Change the IF conditions in the conditional action to IF v_lang=1 (instead of IF Eng=1) etc… you get the same result. But you do not have to reset the variable v_lang, which is a timesaver. You can even add a button ‘Same choice’ to the first screen, so that the user keeps his first language choice?
Hi Bill, here are the links explaining the localization workflow for TOC and Playbar tooltips. In case you are using the TOC/Playbar, then you will have to create separate courses unlike demonstrated in this post.
https://elearning.adobe.com/2009/02/changing_default_captions_in_t.html
https://elearning.adobe.com/2009/03/localizing_playbar_tool_tips.html
You must be logged in to post a comment.


