 Legend
227 posts
Legend
227 posts
Guest Blog by: Bryan Jones, President of eLearningArt, a company that provides thousands of eLearning templates and images, and author of the Assets eLearning Blog.
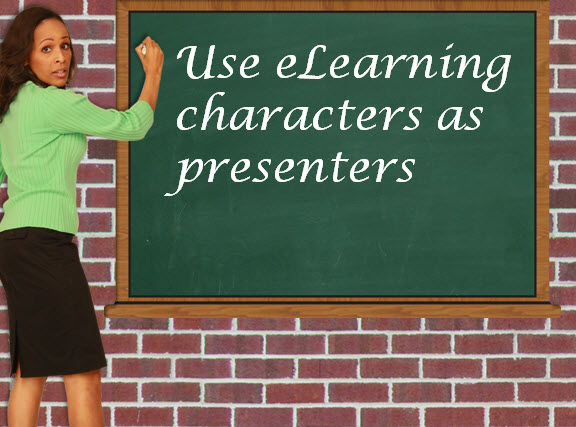
eLearning Characters make Great Presenters
In my last guest post, I talked about how you can use characters as eLearning avatars or guides in your eLearning courses. In addition to using characters as avatars, you can also use characters as presenters. For example, you could use a presenter as:
- A teacher in front of a blackboard
- A news anchor with a TV behind him
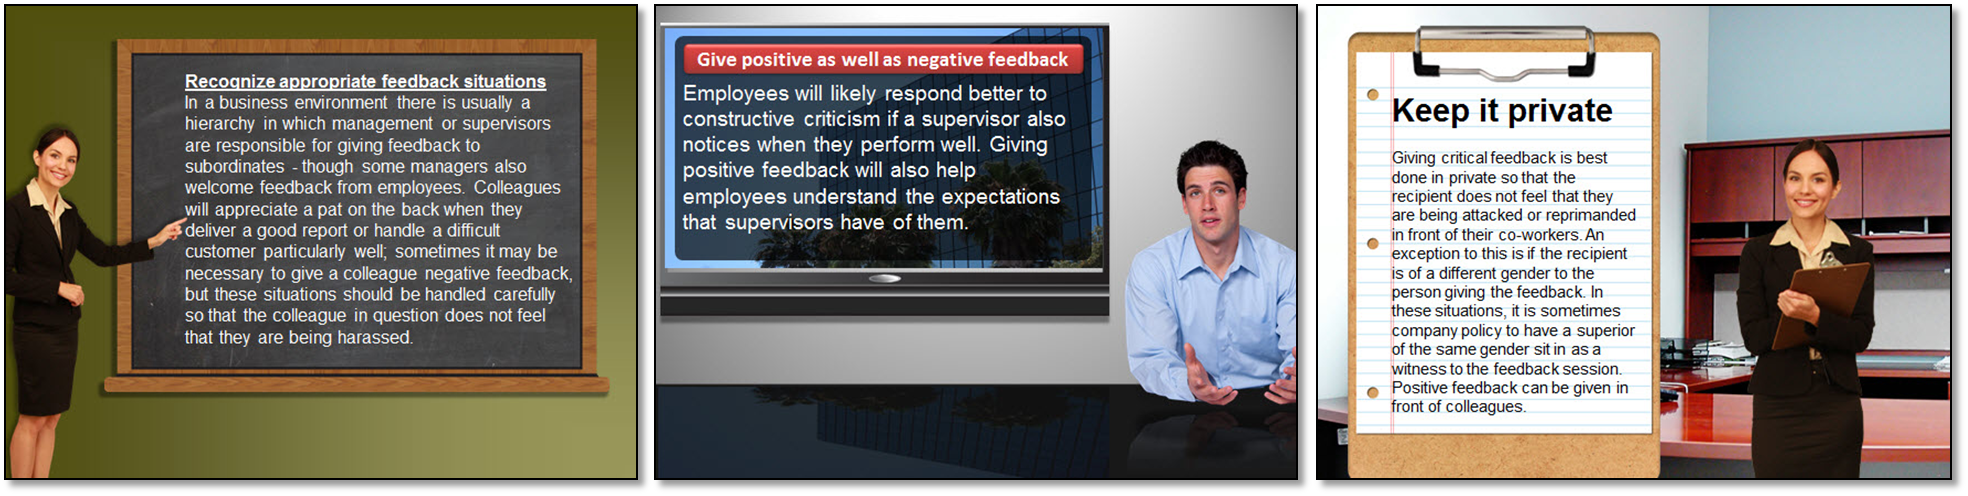
- An employee with a clipboard (or in front of a whiteboard or on a stage)
What differentiates an avatar from a presenter is that an avatar is acting more as a guide and speaks a lesson or tip directly to the learner; a presenter uses another medium, such as a board or screen, to display information to a wider audience.
Supporting Media
When I use characters as presenters, it’s very helpful to have various boards and screens to work with, such as chalkboards, whiteboards, easels, computer monitors, etc.
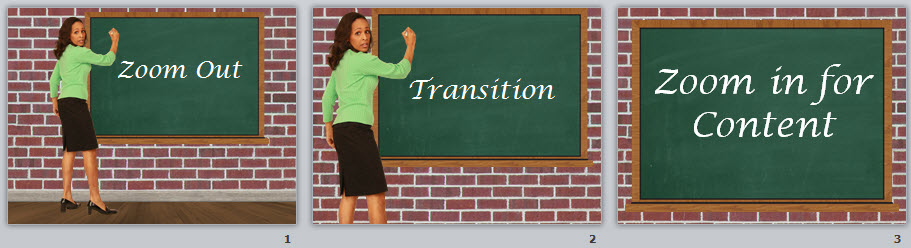
The 3 zooms
Additionally, when I work with characters as presenters, I like to create templates of the same scene in 3 different zoom levels: zoom out, transition, and close-up. The first two examples help set the context that the character is presenting information. The close-up allows me to take advantage of a large screen area to display my content.
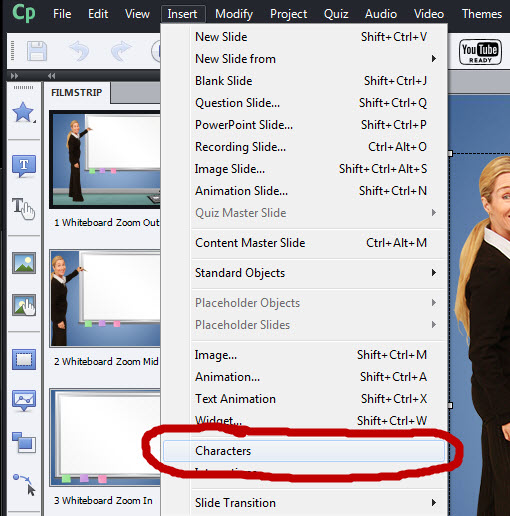
This is pretty easy to do within Captivate or Presenter. I basically follow these 4 steps:
1: Create your background environment: I consider the background environment to be everything except for the character and the content. You can build using any graphics tool, but I prefer to use PowerPoint. 3 videos, then bring the finished image into Captivate in the next step. Here’s a quick video explaining how to [create a display board eLearning background in PowerPoint].
2: Insert the background: Once you’ve created the background image in PowerPoint, it’s time to bring it into Captivate. There are two methods I use to do this. I either [import PowerPoint into Captivate] or I [save the PowerPoint slides as images]. I created a couple of videos to help explain the process.
3: Add a character: Within Captivate 6, you have a number of character options in the “insert character” feature. I like to treat the background image and character as separate assets to create flexibility in what character or pose I use.
4: Add content on the board: Now you can add your content to the board. Think of the content you’re putting on the board as how a presenter would use the board in real life. You could just put key points on the board and then have a longer audio narration; or if you aren’t using audio, you can put all of the text on the boards.
Conclusion
I hope you found this use of characters helpful. It’s just one of many ways you can use eLearning characters in your eLearning courses. Stay tuned for more lessons soon!
Guest Blog by: Bryan Jones, President of eLearningArt, a company that provides thousands of eLearning templates and images, and author of the Assets eLearning Blog.
eLearning Characters make Great Presenters
In my last guest post, I talked about how you can use characters as eLearning avatars or guides in your eLearning courses. In addition to using characters as avatars, you can also use characters as presenters. For example, you could use a presenter as:
- A teacher in front of a blackboard
- A news anchor with a TV behind him
- An employee with a clipboard (or in front of a whiteboard or on a stage)
What differentiates an avatar from a presenter is that an avatar is acting more as a guide and speaks a lesson or tip directly to the learner; a presenter uses another medium, such as a board or screen, to display information to a wider audience.
Supporting Media
When I use characters as presenters, it’s very helpful to have various boards and screens to work with, such as chalkboards, whiteboards, easels, computer monitors, etc.
The 3 zooms
Additionally, when I work with characters as presenters, I like to create templates of the same scene in 3 different zoom levels: zoom out, transition, and close-up. The first two examples help set the context that the character is presenting information. The close-up allows me to take advantage of a large screen area to display my content.
This is pretty easy to do within Captivate or Presenter. I basically follow these 4 steps:
1: Create your background environment: I consider the background environment to be everything except for the character and the content. You can build using any graphics tool, but I prefer to use PowerPoint. 3 videos, then bring the finished image into Captivate in the next step. Here’s a quick video explaining how to [create a display board eLearning background in PowerPoint].
2: Insert the background: Once you’ve created the background image in PowerPoint, it’s time to bring it into Captivate. There are two methods I use to do this. I either [import PowerPoint into Captivate] or I [save the PowerPoint slides as images]. I created a couple of videos to help explain the process.
3: Add a character: Within Captivate 6, you have a number of character options in the “insert character” feature. I like to treat the background image and character as separate assets to create flexibility in what character or pose I use.
4: Add content on the board: Now you can add your content to the board. Think of the content you’re putting on the board as how a presenter would use the board in real life. You could just put key points on the board and then have a longer audio narration; or if you aren’t using audio, you can put all of the text on the boards.
Conclusion
I hope you found this use of characters helpful. It’s just one of many ways you can use eLearning characters in your eLearning courses. Stay tuned for more lessons soon!


You must be logged in to post a comment.
- Most Recent
- Most Relevant
This was really helpful! Thanks! It gave me some great ideas and I learned a couple of things.
[…] See on blogs.adobe.com […]
