 Staff
44 posts
Staff
44 posts
 Whether you are working to impress the boss or to share your favorite game tips with friends, virtually everyone is looking to YouTube videos to catch and create the latest trends. In the past, creating great videos has been a difficult proposition, it’s difficult to imagine how you can go from average video surfer to top notch video creator, but it doesn’t have to be that difficult to make YouTube videos, thanks to a cool new tool from Adobe.
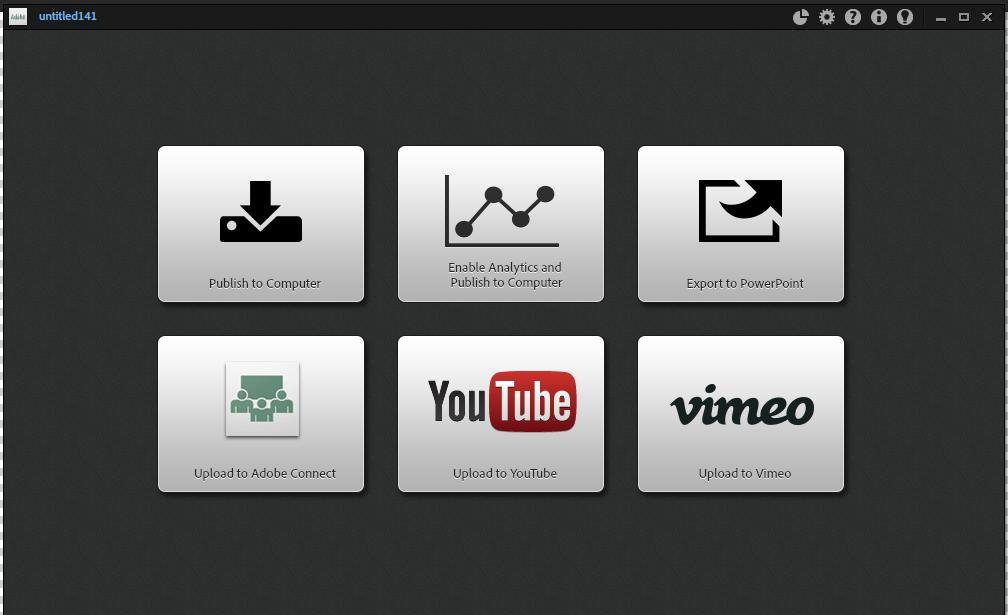
Adobe Presenter includes an amazing video recording tool that let’s anyone easily create amazing show and tell videos, by recording both a web cam and your computer screen at the same time. This means that you can create videos that feature yourself, or capture your voice and computer screen, or both – and easily blend them into very professional looking videos. You can easily upload them to YouTube and Vimeo, or even save them to your computer.
Here’s what you do to get started: Download Adobe Presenter (the trial is free for 30 days.) Install it on your Windows computer. (If you use a Mac, you can get the video tool for Mac at the App Store – just click this link.) Once you install the tool you will find Adobe Presenter inside your copy of Microsoft PowerPoint. It adds a ribbon, and you can click the record video button to get started.

If you don’t want to use any PowerPoint slides in your video, you can also find the video tool Adobe Presenter Video Creator, in your Windows Start Menu. Just click the Adobe Presenter Video Creator application directly in your start menu.
Using the video recording tool is simple, you just click the big red record button to begin. Then tell your story, and show your viewers anything you want them to see, right on your computer screen. When you finish, hold down the shift key and click the end button on your keyboard.

Now all that’s left is choosing when you want your video to show the webcam image, and when you want it to show the computer screen. Adobe Presenter Video Creator gives you three simple options – one to show the webcam, that’s the yellow button. The second option is the green button, and it displays the screen capture video. The last option is to display both the webcam and the screen capture side by side. Click either blue button to use this side-by-side method.
Here’s a simple video that shows the tool in action.
If you’re looking for a tool to help you make YouTube videos, quickly and easily – check out the new Adobe Presenter Video Creator – a part of Adobe Presenter. As always, let us know in the comments section below how it worked for you.
Whether you are working to impress the boss or to share your favorite game tips with friends, virtually everyone is looking to YouTube videos to catch and create the latest trends. In the past, creating great videos has been a difficult proposition, it’s difficult to imagine how you can go from average video surfer to top notch video creator, but it doesn’t have to be that difficult to make YouTube videos, thanks to a cool new tool from Adobe.
Adobe Presenter includes an amazing video recording tool that let’s anyone easily create amazing show and tell videos, by recording both a web cam and your computer screen at the same time. This means that you can create videos that feature yourself, or capture your voice and computer screen, or both – and easily blend them into very professional looking videos. You can easily upload them to YouTube and Vimeo, or even save them to your computer.
Here’s what you do to get started: Download Adobe Presenter (the trial is free for 30 days.) Install it on your Windows computer. (If you use a Mac, you can get the video tool for Mac at the App Store – just click this link.) Once you install the tool you will find Adobe Presenter inside your copy of Microsoft PowerPoint. It adds a ribbon, and you can click the record video button to get started.
If you don’t want to use any PowerPoint slides in your video, you can also find the video tool Adobe Presenter Video Creator, in your Windows Start Menu. Just click the Adobe Presenter Video Creator application directly in your start menu.
Using the video recording tool is simple, you just click the big red record button to begin. Then tell your story, and show your viewers anything you want them to see, right on your computer screen. When you finish, hold down the shift key and click the end button on your keyboard.
Now all that’s left is choosing when you want your video to show the webcam image, and when you want it to show the computer screen. Adobe Presenter Video Creator gives you three simple options – one to show the webcam, that’s the yellow button. The second option is the green button, and it displays the screen capture video. The last option is to display both the webcam and the screen capture side by side. Click either blue button to use this side-by-side method.
Here’s a simple video that shows the tool in action.
If you’re looking for a tool to help you make YouTube videos, quickly and easily – check out the new Adobe Presenter Video Creator – a part of Adobe Presenter. As always, let us know in the comments section below how it worked for you.


You must be logged in to post a comment.
- Most Recent
- Most Relevant
OMG FIRST TIME EVER!!!!!!!!!!!!!!!!!!!!!!!!!!!!!!!!!!!!!!!!!!!!!!!!!!!! X0
Pretty cool right? 😉
I MADE A VIEDO!!!!!
Fec books YouTube ve bio ac tiveti
How to do a video
When will there be a Mac version of Presenter?
I believe there is a Mac version of Presenter Video. You get it from the Apps store. Allen talked about this at the DevLearn conference in October 2013, although I haven’t gone out to look for it yet. If you are a school teacher or student, there may be discounts available.
Hi Richard,
You go to App store from mac and search for “Presenter”, its the first one to show up. Thanks
