 Staff
44 posts
Staff
44 posts

Power in the Box
What is a Lightbox?
A Lightbox is a user interface convention – simply put it is when you darken or blur the main application in the background, and pop something up in the foreground – usually an informational or interactive dialog. It is essentially a modal dialog – a small area of the screen that blocks all or some of the parent (main) application, and that must be acknowledged with at least one click before you can return to the main application. The Lightbox is thus named, because the surrounding area is ‘dark.’
[wpspoiler name=”Mechanics” ]The mechanics of a Lightbox are fairly simple. Once triggered the application area is made darker or blurred, and the dialog is shown to the viewer.[/wpspoiler] In most cases a Lightbox may be closed by clicking anywhere on the screen – even off the dialog itself. Though you can decide how you want yours to work.
Adobe Captivate makes creating this kind of thing simple, because you can take advantage of groups to link together many different items, and then show or hide the entire group with just a simple command. Here’s a breakdown and an example.
Step by Step
Step 1: On the top layer(s) of a typical slide, add a simple rectangle with a black color and a transparency around 70%. This will darken the application when the lightbox is triggered.

Step 2: On the top of the dark shape, add the lightbox and any content you want.

Step 3: Select all of the newly created elements, including both the shade rectangle and all of the layers in your lightbox.
Step 4: Press CTRL + G (on Windows) or CMD + G (On Mac) to Group all of the selected items together. You’ll see the group shift into a collapsible folder in the timeline, and the property inspector will now show the name property for the new group.
Step 5: Change the name of the group in the property inspector to something you’ll remember, like ‘LB_Popup.’ This will make it easier to show / hide the lightbox. Just below the name field you’ll see a check box labeled, ‘Visible in output’ – uncheck this box. This will set the initial visibility of your lightbox group to be invisible.

Step 6: Choose or create some item on the screen that will be used as a button or trigger to open the lightbox. In my case I used this little text button.

Step 7: Associate the ACTION of the button with making the LB_Popup group visible. The action you will choose is ‘Show’ because you want to show the dialog and dim the background when the button is pressed. When you use the ‘Show’ action it will ask you what item you want to show. Just choose your group (LB_Popup) as the item to show.

Step 8: You’ll want to be able to hide your group as well. For that you’ll need to select the semi-transparent black shape inside your group. Just double click to select the rectangle. Because the rectangle is a smart shape, it can be easily converted into a button. Do that now, by checking the ‘Use as Button’ checkbox in the property inspector.
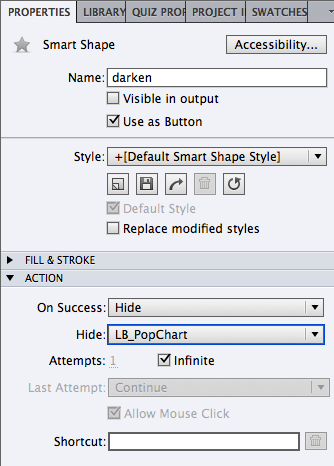
Step 9: Add an ACTION to the smart shape rectangle. This one will be a HIDE action, because you want to hide the lightbox when any click is made on the screen.
Tada! Hit preview project and admire your brilliance. One word of caution: When you create a simple action – the ones using the dropdown menu under ACTION in the playbar, Captivate actually restarts the paused timeline. This is only true with simple actions, but if you use this simple method, you’ll want to use some other mechanism to ensure that you stay on the active slide. You can avoid this indiscriminate restarting of the playback by using Advanced actions instead. Just chose ‘Execute Advanced Action’ and then give the single command to Show or Hide the relevant group for each respective element.
Why not give this a try and share your results? As always, I look forward to your comments and questions in the area below.
Power in the Box
What is a Lightbox?
A Lightbox is a user interface convention – simply put it is when you darken or blur the main application in the background, and pop something up in the foreground – usually an informational or interactive dialog. It is essentially a modal dialog – a small area of the screen that blocks all or some of the parent (main) application, and that must be acknowledged with at least one click before you can return to the main application. The Lightbox is thus named, because the surrounding area is ‘dark.’
[wpspoiler name=”Mechanics” ]The mechanics of a Lightbox are fairly simple. Once triggered the application area is made darker or blurred, and the dialog is shown to the viewer.[/wpspoiler] In most cases a Lightbox may be closed by clicking anywhere on the screen – even off the dialog itself. Though you can decide how you want yours to work.
Adobe Captivate makes creating this kind of thing simple, because you can take advantage of groups to link together many different items, and then show or hide the entire group with just a simple command. Here’s a breakdown and an example.
Step by Step
Step 1: On the top layer(s) of a typical slide, add a simple rectangle with a black color and a transparency around 70%. This will darken the application when the lightbox is triggered.
Step 2: On the top of the dark shape, add the lightbox and any content you want.
Step 3: Select all of the newly created elements, including both the shade rectangle and all of the layers in your lightbox.
Step 4: Press CTRL + G (on Windows) or CMD + G (On Mac) to Group all of the selected items together. You’ll see the group shift into a collapsible folder in the timeline, and the property inspector will now show the name property for the new group.
Step 5: Change the name of the group in the property inspector to something you’ll remember, like ‘LB_Popup.’ This will make it easier to show / hide the lightbox. Just below the name field you’ll see a check box labeled, ‘Visible in output’ – uncheck this box. This will set the initial visibility of your lightbox group to be invisible.
Step 6: Choose or create some item on the screen that will be used as a button or trigger to open the lightbox. In my case I used this little text button.
Step 7: Associate the ACTION of the button with making the LB_Popup group visible. The action you will choose is ‘Show’ because you want to show the dialog and dim the background when the button is pressed. When you use the ‘Show’ action it will ask you what item you want to show. Just choose your group (LB_Popup) as the item to show.
Step 8: You’ll want to be able to hide your group as well. For that you’ll need to select the semi-transparent black shape inside your group. Just double click to select the rectangle. Because the rectangle is a smart shape, it can be easily converted into a button. Do that now, by checking the ‘Use as Button’ checkbox in the property inspector.
Step 9: Add an ACTION to the smart shape rectangle. This one will be a HIDE action, because you want to hide the lightbox when any click is made on the screen.
Tada! Hit preview project and admire your brilliance. One word of caution: When you create a simple action – the ones using the dropdown menu under ACTION in the playbar, Captivate actually restarts the paused timeline. This is only true with simple actions, but if you use this simple method, you’ll want to use some other mechanism to ensure that you stay on the active slide. You can avoid this indiscriminate restarting of the playback by using Advanced actions instead. Just chose ‘Execute Advanced Action’ and then give the single command to Show or Hide the relevant group for each respective element.
Why not give this a try and share your results? As always, I look forward to your comments and questions in the area below.


You must be logged in to post a comment.
- Most Recent
- Most Relevant
Hi all, wanting to bring this concept back from the dead…
I’m looking to do a similar thing with Captivate 9. Essentially I want a launch page with multiple buttons that launch a video of a procedure and then returns to the launch page. Ideally I’d like to use a lightbox style so that the learner doesn’t feel that they leave the page and are encouraged to look at the other procedures.
I’ve successfully managed to develop one lightbox with a video using group/show/hide action, however I’m not convinced I’m doing it the correct way.
Lieve or anyone else can you share your insight or any examples of anyone doing this before? It’s very easy to do with a certain other authoring tool…
Hi Allen. Thanks so much for your wonderful article. I am new to Captivate and thinking through my project, I really wanted to something like this to show the readers (students) extra bits of information, separate from the main content. So this is absolutely perfect. Thanks again! Jo . )
[…] Originally posted here: Power in the Box – Learn to easily create custom lightbox dialogs for your Adobe Captivate pro… […]
Have explained already a couple of times (DevLearn – webinar about mobile), that shared actions are to be preferred over advanced actions for the creation of light boxes. And never use simple actions of course.
Lieve — What would your advanced action be if you were doing a light box using your preferred way?
Lieve, I appreciate your insight, and I trust your instincts. If you have a link to the webinar you are talking about, I’d love to see it. I think this is a great concept, but I certainly want to make sure I’m doing the best/most efficient way. One concern that I have – I’m creating SCORM courses for use in an LMS…so I know there are come actions/widgets/etc that are not going to work once they are packaged that way. Would your method still work if I am publishing as a SCORM course?
