 Staff
44 posts
Staff
44 posts
Creating Drag and Drop interactions in Adobe Captivate is fun and easy, but what if you want to really harness the power of Captivate’s Advanced and Shared Actions in conjunction with Drag and Drop? In this article I’ll explain and demonstrate how to trigger an action when a drag and drop event occurs.
Here is a sample of the project that I’ll be explaining. You can also download the complete source code of this project here, and are of course free to use it as a learning aid.
As you can see in the sample above, the challenge here is simply to drag tires onto the model car design. When you chose a tire style, it will automatically paint the tires both on front and back of the car – and put both into perspective.

Custom Shape: Edit Points
One of the techniques I used in this project is fairly simple. I found that I wanted to drop onto both front and rear tires, but I needed to use only one drop target. So I created a round shape – using smart shapes. I then chose to edit the points of the smart shape and modified the basic circle into this strange green bow tie. This way I was able to create a nice drop target for my tires. I then made the fill and line of the shape invisible, so that it would not be seen. (Yup, the target to drop things on is actually invisible.)
Groups
One of the features I take advantage of in this project is groups. In Adobe Captivate you can group together more than one on-screen image or object. This is particularly handy if you want a simple way to hide or show more than one thing at a time. Because we want to change the style of both front and back tires at the same time, we can combine those two tires into a single group – and then hide and show the whole group in order to reveal both tires at the same time.
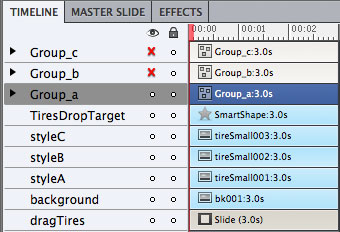
You’ll see little triangles next to the groups. Toggle these in order to see the small perspective tires that are members of each group.
Drag and Drop
Adobe Captivate includes a drag and drop interaction that is as easy to use as 1-2-3. Simply put, you select the drag item, then the drop target, and finally associate the two to declare the right answer. There are many things that can be customized for these drag and drop elements, but for this project our primary concern is in the Accept properties of the drop target.
Each drop target item has Accept properties. You access them from the little button marked Accept in the drag and drop property inspector when the drop target object is selected.
When you select the Accept button, you’ll see the dialog pictured below.

All of the drag sources that you have associated with the drop target (by dragging the little green arrow from each drag source to the drop target) will initially appear here.
You can choose to accept all- the default, or you can choose to select any of them. In addition you can choose whether you want to allow more than one draggable items to drop onto the target, and if the limit is less than the number of acceptable items, then you can choose what to do with the originally added item(s.)
In this case I want the second dragged tire style to replace the tire style that is already associated with the drop target. So I set the count to 1, and select the Replace button.
Advanced and Shared Actions
Now to the right of each draggable item is a hyperlinked phrase – initially this link just says ‘No Action.’ By clicking it, you are able to select from various possible actions to perform when that specific drag item is dropped on this specific drop target. You can perform different actions for each one. In my case, I want to Hide the styles of tire (groups) that are not selected, and show the style of tire that is selected.

This is an Advanced Action. In Adobe Captivate it is possible to do more than one thing at a time by using an advanced action. Notice the commands on the left hand side? Show, Hide, Hide, Hide, Show, Show. Their behavior is simple – they simply make an image on the screen either disappear or appear. In our case we want to make two tire groups (remember that’s the front and the back tires as a group) disappear. We want to hide the two groups that represent the unused style of tire. We also want to show the group that matches the style. Then we want to Hide the big sample tire (the one that was dragged) for the selected style. (Otherwise it would block the fancy perspective tires.) Finally we show the unselected drag tires – so people can find them again to keep trying different styles.
The second column just shows what thing we will show or hide.
Now if we had to make one of these scripts for each potential action on drop – it would quickly get really repetitive and tedious. So Captivate solves this problem with Shared Actions. A shared action is created based on an Advanced action. See the little Save as Shared Action button? All we do to create a shared action is save the template from the advanced action. When you do that, a dialog appears that will ask you to name parameters.
What the heck is a Parameter?
A parameter is like a placeholder. Think of it this way – sometimes when you use this script you’ll want to hide group a. Other times you’ll want to hide group b. You don’t know yet which item or group you’ll want to hide – in fact it will differ each time you use a shared action.
That’s the real power of a shared action. You can use the same script over and over, pointing to different stuff – but getting the right solution. Shared actions are similar because they share the common template. They differ in what items on screen they are influencing.
Once you have named the parameters you are free to associate a shared action with each of the drag triggers. Once you do, a dialog like the one below will appear.

This one is configured to show group a and to hide draggable style a. The next would show group b and the last show group c.
Taking it to the next step
It’s loads of fun to use this simple script for hot swapping tires. But could it go further? Absolutely. Here’s a challenge: Can you come up with modifications on this script that do any of the following?
1. When the submit button is pressed, show a results slide that features the last selected tire.
2. Use popup windows to give custom information each time a style is chosen?
3. Associate costs with each tire and add up the per tire cost using Advanced Actions?
4. Trigger a JavaScript or GetURL that sends a message to a php script / database with the selected tire style.
As always, I look forward to your comments and questions in the space below.
Creating Drag and Drop interactions in Adobe Captivate is fun and easy, but what if you want to really harness the power of Captivate’s Advanced and Shared Actions in conjunction with Drag and Drop? In this article I’ll explain and demonstrate how to trigger an action when a drag and drop event occurs.
Here is a sample of the project that I’ll be explaining. You can also download the complete source code of this project here, and are of course free to use it as a learning aid.
As you can see in the sample above, the challenge here is simply to drag tires onto the model car design. When you chose a tire style, it will automatically paint the tires both on front and back of the car – and put both into perspective.
Custom Shape: Edit Points
One of the techniques I used in this project is fairly simple. I found that I wanted to drop onto both front and rear tires, but I needed to use only one drop target. So I created a round shape – using smart shapes. I then chose to edit the points of the smart shape and modified the basic circle into this strange green bow tie. This way I was able to create a nice drop target for my tires. I then made the fill and line of the shape invisible, so that it would not be seen. (Yup, the target to drop things on is actually invisible.)
Groups
One of the features I take advantage of in this project is groups. In Adobe Captivate you can group together more than one on-screen image or object. This is particularly handy if you want a simple way to hide or show more than one thing at a time. Because we want to change the style of both front and back tires at the same time, we can combine those two tires into a single group – and then hide and show the whole group in order to reveal both tires at the same time.
You’ll see little triangles next to the groups. Toggle these in order to see the small perspective tires that are members of each group.
Drag and Drop
Adobe Captivate includes a drag and drop interaction that is as easy to use as 1-2-3. Simply put, you select the drag item, then the drop target, and finally associate the two to declare the right answer. There are many things that can be customized for these drag and drop elements, but for this project our primary concern is in the Accept properties of the drop target.
Each drop target item has Accept properties. You access them from the little button marked Accept in the drag and drop property inspector when the drop target object is selected.
When you select the Accept button, you’ll see the dialog pictured below.
All of the drag sources that you have associated with the drop target (by dragging the little green arrow from each drag source to the drop target) will initially appear here.
You can choose to accept all- the default, or you can choose to select any of them. In addition you can choose whether you want to allow more than one draggable items to drop onto the target, and if the limit is less than the number of acceptable items, then you can choose what to do with the originally added item(s.)
In this case I want the second dragged tire style to replace the tire style that is already associated with the drop target. So I set the count to 1, and select the Replace button.
Advanced and Shared Actions
Now to the right of each draggable item is a hyperlinked phrase – initially this link just says ‘No Action.’ By clicking it, you are able to select from various possible actions to perform when that specific drag item is dropped on this specific drop target. You can perform different actions for each one. In my case, I want to Hide the styles of tire (groups) that are not selected, and show the style of tire that is selected.
This is an Advanced Action. In Adobe Captivate it is possible to do more than one thing at a time by using an advanced action. Notice the commands on the left hand side? Show, Hide, Hide, Hide, Show, Show. Their behavior is simple – they simply make an image on the screen either disappear or appear. In our case we want to make two tire groups (remember that’s the front and the back tires as a group) disappear. We want to hide the two groups that represent the unused style of tire. We also want to show the group that matches the style. Then we want to Hide the big sample tire (the one that was dragged) for the selected style. (Otherwise it would block the fancy perspective tires.) Finally we show the unselected drag tires – so people can find them again to keep trying different styles.
The second column just shows what thing we will show or hide.
Now if we had to make one of these scripts for each potential action on drop – it would quickly get really repetitive and tedious. So Captivate solves this problem with Shared Actions. A shared action is created based on an Advanced action. See the little Save as Shared Action button? All we do to create a shared action is save the template from the advanced action. When you do that, a dialog appears that will ask you to name parameters.
What the heck is a Parameter?
A parameter is like a placeholder. Think of it this way – sometimes when you use this script you’ll want to hide group a. Other times you’ll want to hide group b. You don’t know yet which item or group you’ll want to hide – in fact it will differ each time you use a shared action.
That’s the real power of a shared action. You can use the same script over and over, pointing to different stuff – but getting the right solution. Shared actions are similar because they share the common template. They differ in what items on screen they are influencing.
Once you have named the parameters you are free to associate a shared action with each of the drag triggers. Once you do, a dialog like the one below will appear.
This one is configured to show group a and to hide draggable style a. The next would show group b and the last show group c.
Taking it to the next step
It’s loads of fun to use this simple script for hot swapping tires. But could it go further? Absolutely. Here’s a challenge: Can you come up with modifications on this script that do any of the following?
1. When the submit button is pressed, show a results slide that features the last selected tire.
2. Use popup windows to give custom information each time a style is chosen?
3. Associate costs with each tire and add up the per tire cost using Advanced Actions?
4. Trigger a JavaScript or GetURL that sends a message to a php script / database with the selected tire style.
As always, I look forward to your comments and questions in the space below.


You must be logged in to post a comment.
- Most Recent
- Most Relevant
In Captivate 8, I’ve set up a single drop target with multiple drag sources. I also have several incorrect drag sources that have no target; when dragged to the target, they bounce back. The tricky part: when the user clicks submit with the correct sources in place, the failure text appears because the incorrect drag sources have no target. In other words, all sources seem to require a target for success. Ideas?
Hi there,
Have you configured correct answers for your Drag and drop interaction? In other words, Are you seeing correct answer lines in edit area when the Drag and drop view in on?
How do you make your drag sources bounce back automatically?
I have Captivate 7. After I publish, after dragging a tire to the hotspot, a 3d tire shows up in the target area, and I can’t figure out how to make it go away. Thanks
This has been bugging me to death, and it seems so simple, but I swear Captivate 7 doesn’t do it. Can you use a Group as a Drag Source. That is, a smart shape and an image, grouped together, as a Source. So you Insert Interaction, try to Select a Drag Source, but that Group I mention will not show up under the Select dropdown box to be used as a drag source. Just want to be sure I’m not missing anything. I scoured the Forums too, nothing. And in your example Alan, you SHOW the Group. I want to use it as a source. I know it seems minor, but I have to make a graphic that does the same thing a simple group of smartshape/image would do. Extra step, times 6 images. Thanks.
Thanks for sharing the source file!
I really like using the drag and drop feature in Captivate 7 but I am trying to figure out the best way to use the submit button.
I would like the ability to have the user 6 objects to 6 targets then hit the submit button and check their answers. It seems like this should be an easy thing to do but from what I can tell it looks like I need to use a widget.
Perfect! Thanks for sharing source file, so I can discover and learn. I love Cp7 and Pn9 for everyday working.
Wish the best to Adobe eLearning team.
Yarik
Cool! I look forward to trying something like this in one of my projects. Thanks for sharing!
Since shared actions can be used also in other projects, and this action not necessary has to be linked to a D&D slide I would have labeled it just like this: Hide3Show3. This would mean: hide 3 items and show 3 items. That item can be anything: one object or a group of objects. And for the same reason, I would have added a description of the shared action. A library with shared actions could start with such sequences of simple Hide/Show statements in different numbers (Hide2Show1…) because they can be used everywhere.
Thanks, now can skip a planned post about shared actions in combination with D&D in my series about shared actions.
I like that approach Lieve.
Terrific!
Awesome stuff! You all are really making advanced actions superior to any other authoring tool. Well done.
