 Staff
44 posts
Staff
44 posts
 One of the most compelling new features in Adobe Captivate 8 is the ability to create location based learning, thanks to the added support for Geolocation. In this article I’ll describe my most recent adventure creating a simple location based learning example at the Australia Zoo, just outside of Brisbane.
I spent the last week in Australia. I arrived in Brisbane on Saturday, the first of June at about 7:30 in the morning with a mission in mind. I had high hopes that I might
be able to find my way to the famed Australia Zoo (home of the Crocodile Hunter) before the day was done. Fortunately for me CC’s Croc Connections runs daily tours to the zoo from hotels in Brisbane. I was able to hop on the last seat for the days small tour and enjoyed the transportation the tips and made my way to the zoo without any difficulty.
You can view the zoo app that I created for this project here.

 I had set the zoo in mind to test creation of a location aware learning project to demonstrate the new technology for EduTech – where I was set to speak on Wednesday.
Basic Concepts
Now before I explain how to create a Location Aware learning module, let’s take a moment to cover some basic concepts that you’ll need to understand first. The foundation of location aware learning is the idea that we can make the learning module ‘aware’ of exactly where the device is located. So, how does that work?
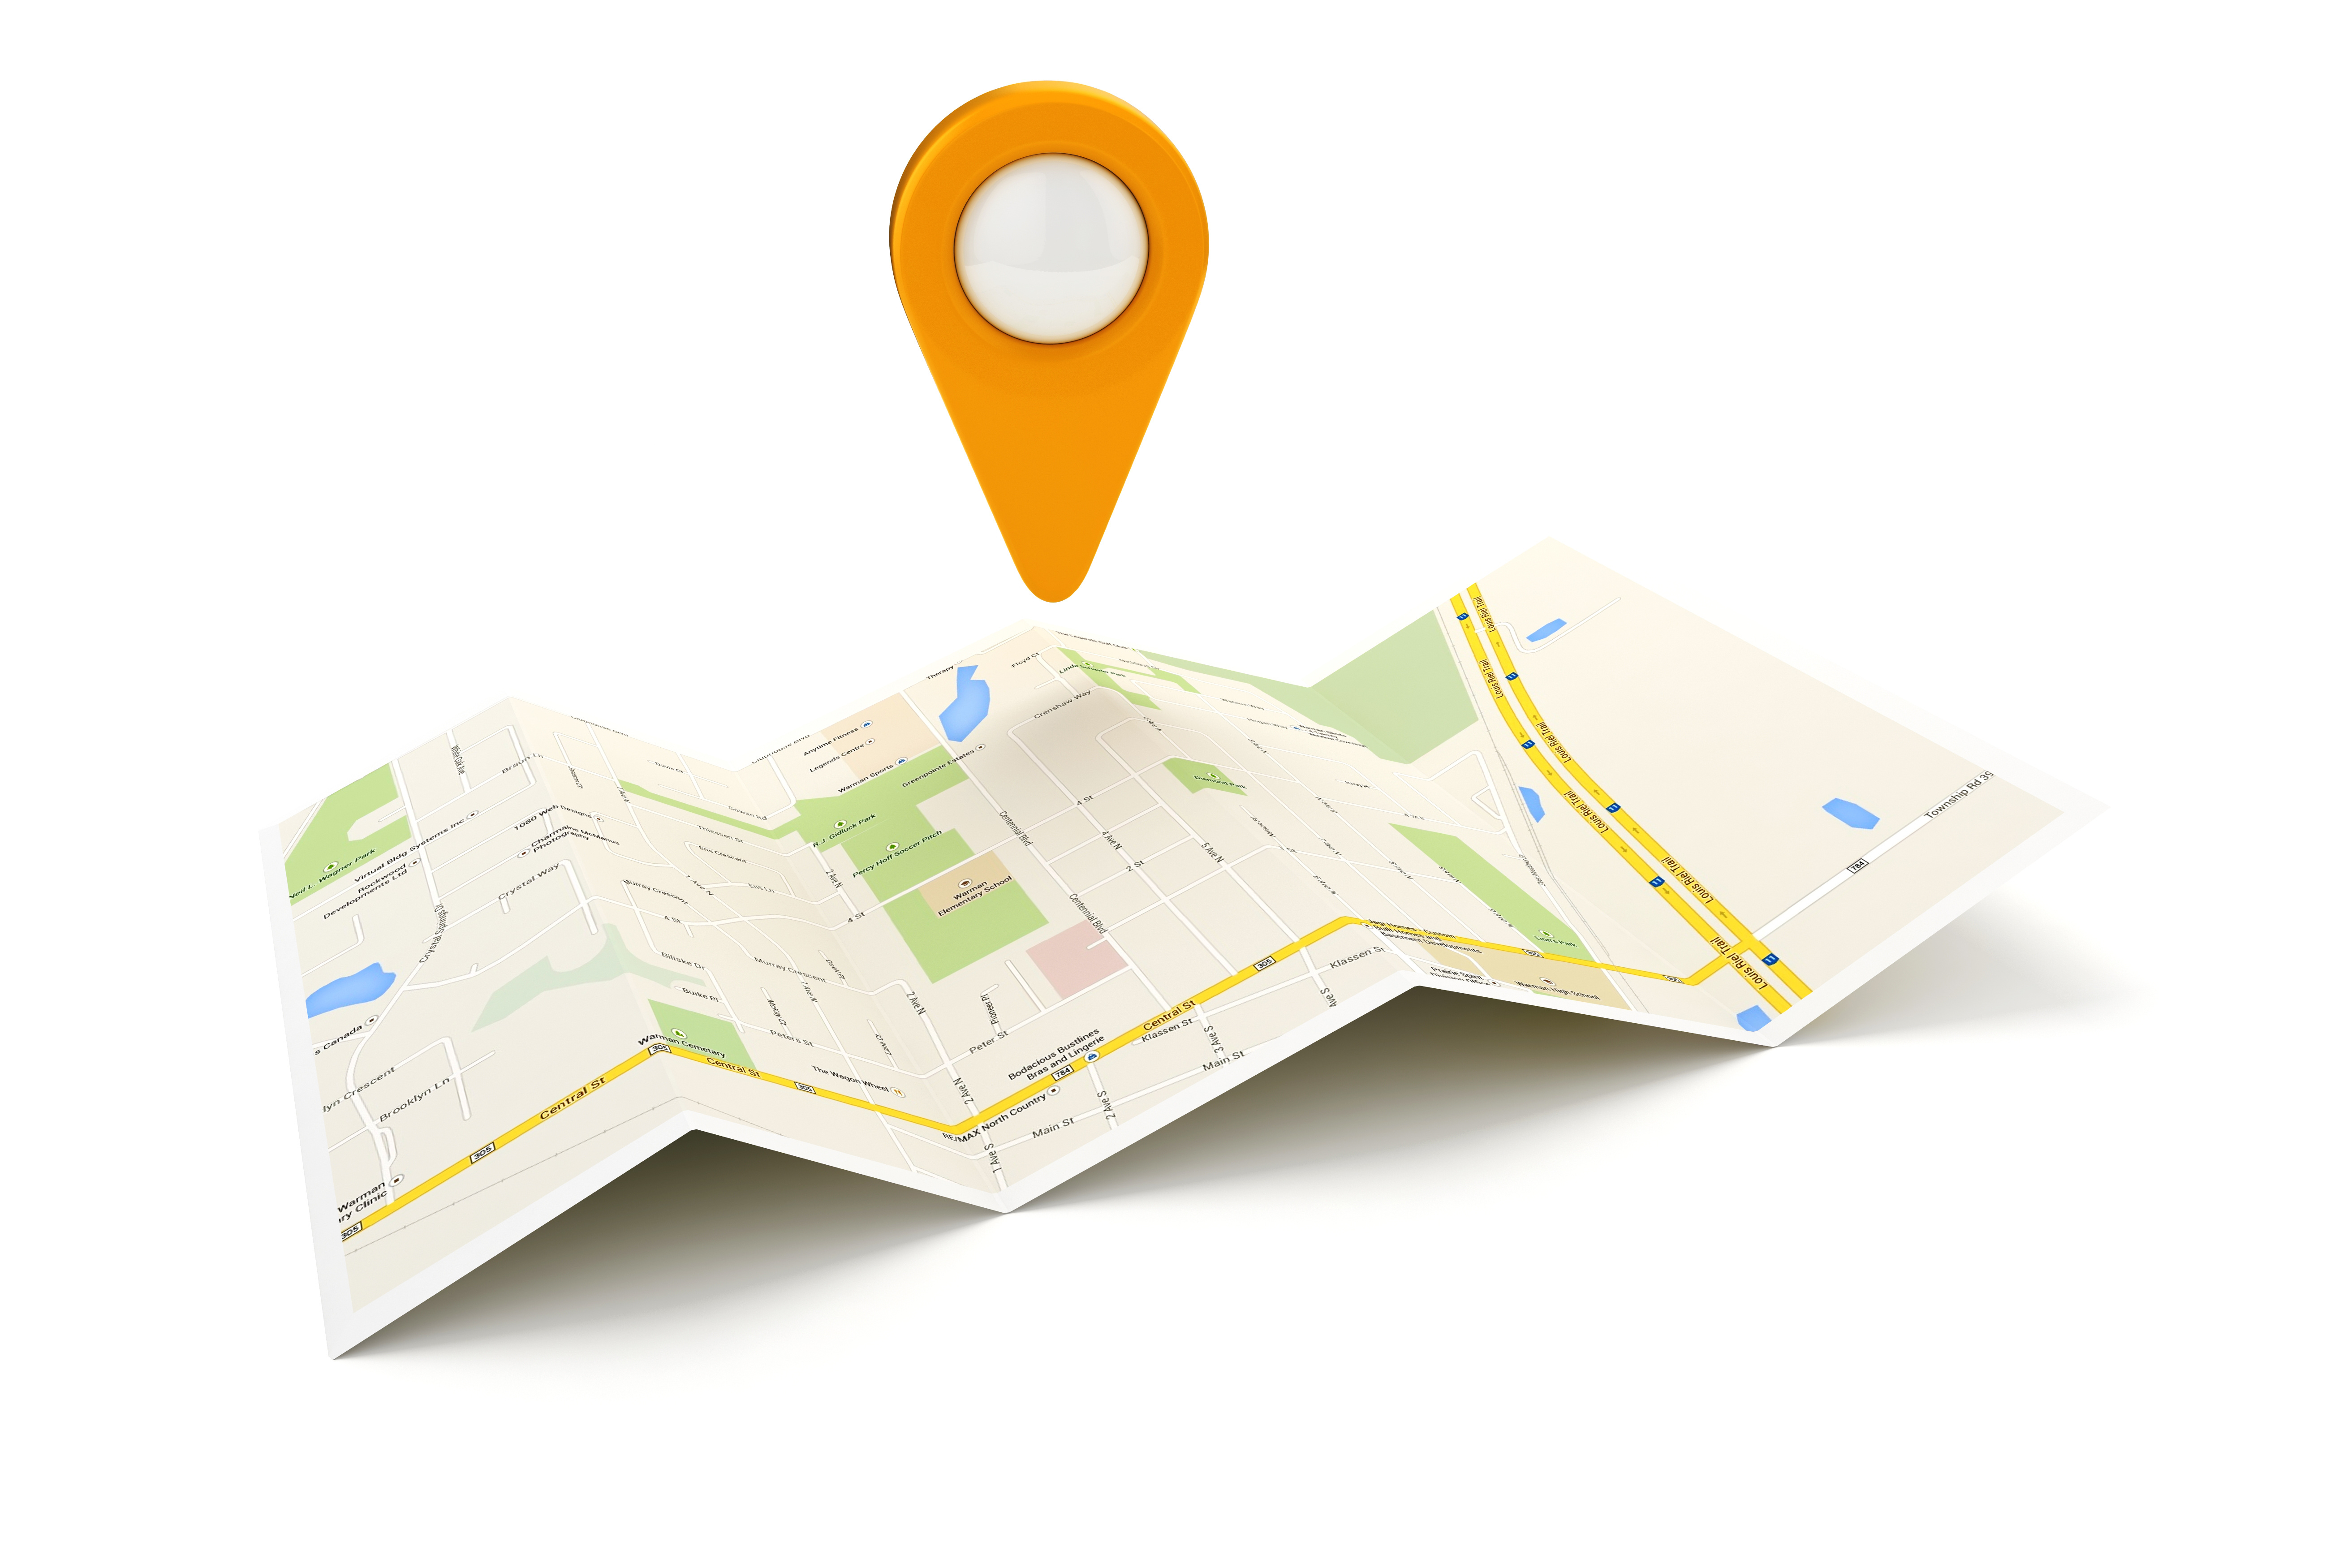
A location is basically a two part number – expressed as a longitude and a latitude. If you fell asleep during 5th grade science when longitude and latitude was explained, it is a simple number that tells you how far from the equator and the prime meridian a given point is on the surface of the earth. Here’s an interesting web site that let’s you enter an address and search for the corresponding GPS location in longitude and latitude.
 In Captivate a location can be expressed and saved as a variable. If you haven’t worked with variables in Adobe Captivate before, a variable is like a container. You can use one to hold or save a value – like a number, or a bit of text. You can now also use it to hold a GPS location – the longitude and latitude of some place. Captivate GPS variables also hold a third value – it is the accuracy or range you want to detect for the location. This third number is expressed in meters – and represents the diameter of a circle radiating out from the exact point in the location. Think of Accuracy this way, if you want to specify a small area – you would define a small area, just a few meters to require the device to be within a vary narrow area. If you wanted to simply detect that a person were in a city, or a village, you’d want to detect a quite large area (thousands of meters) in order to ensure that anywhere within that big circle would count as within the city.
You might also think at this point, how about the ‘accuracy’ of detecting the actual position of the mobile device? I had to turn to pizza delivery experts to determine this one. It turns out that most mobile devices today are accurate to about 10 meters. This means that as you build your location aware learning, you should plan on using locations that are at least 20 meters or so apart from one another. Things like the zoo, public parks, or separate rooms / buildings will be more effective projects.
Step 1: Find the target location(s)
To find the target locations I built a simple GPS reporting application using Adobe Captivate 8. There is a system variable in Captivate called cpInfoGeoLocation. This variable contains the actual location data, and is available whenever Geolocation is enabled for a Captivate project. (To enable Geolocation, select Window: Mobile Palette and then check the Geolocation box.) You can see the content of any Captivate variable simply by inserting that variable into a text element in the project. Let’s do that now with Geolocation.

1. Create a new blank project.
2. Using the default text element (either the title or subtitle) double click to select the text item for editing.
3. In the property inspector – locate the insert variable option. Click to Insert a variable.
4. Select the ‘System’ variable option from the variable type drop down menu at the top of the insert dialog.
5. Select the ‘cpInfoGeoLocation’ variable.
6. Note that the text that appears in the text item is just the variable name with $$ on either side of it (front and back.) In fact you can just type $$cpInfoGeoLocation$$ directly into a text field to get the variable. (If you attempt to preview this be certain to accept your browser’s request to enable location reporting.)
7. Once you have the project that reports your GPS, you can simply publish this project and use it to determine where you are, as you gather GPS points for your project. I simply texted myself the numbers along with a brief description of each – that way I had a running record of the geolocation of each animal enclosure. My GPS reporting app is located here if you want to have a look. http://www.p0qp0q.com/getGPS/
Step 2: Building the Zoo App
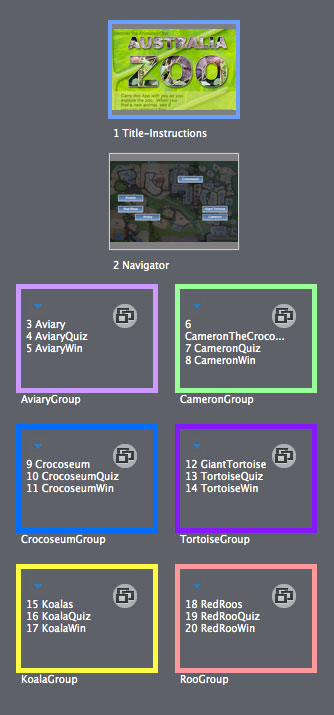 The zoo app is very simple. The structure is as follows; First, a single slide with a title and instructions. Learners are told to wander around the zoo while holding the application, and expect the application to let them know when there is something more to do. I also gave learners buttons for each zone – presuming that some learners might not have GPS capability and aware that many people would want to test the application even though they were not at the zoo. Once a learner has read the instructions, they move to the second slide of the project – which I consider the primary navigation slide.
The second slide contains a map of the zoo, and buttons that link directly to the various sub-sections. If you are at the zoo, the subsections will automatically appear – no need for the buttons. If you are not at the zoo, you’ll want to use the buttons for navigation.
The remaining slides are all simple groups that identify the animal in the discovered enclosure, then prompt the learner with a simple interactive quiz game and finally reinforce the correct answer with some additional information. Each animal subsection is 3 slides long. I created one sample, and then copied it for each animal.
Let’s have a deeper look at the navigation slide as it is where most of the ‘logic’ in the project is located.

1. The project will ‘loop’ on this slide. To do that we’ll grab the frame number as we start the navigation slide. Once we have this frame number we’ll use it to return to the first frame after the start of this slide every time we reach the end of the slide. The key here is that we will plan to just loop in circles on this slide forever if nothing is done by the learner. If however they move to a new location – thus triggering the GPS to change, or they push one of the navigation buttons, then the project will move to the corresponding animal section.

2. To loop, we will use advanced actions. One on the enterSlide event and one advanced action on the exitSlide event. Note that if you’ve never used advanced actions – don’t panic. These examples of advanced actions are quite simple – and a good place to start learning about them. Our enterSlide event is triggered when the learner first enters the navigation slide. Here’s the advanced action.
You’ll note that it just stores the current frame number in a variable. You can call the variable anything you like. I like to name it something that refers to the slide, and that refers to its purpose – in this case it is used to store the startFrame of this navigation slide.
The second part of this loop has been combined with a conditional advanced action. A conditional action is one that evaluates whether some value is true and only runs a command when that condition is met. In Adobe Captivate you can check several values in a series. (Programmers would generally think of this as a case or a switch function.) In our case we want to check to see if the current location of the device is inside the target location of any of the animal enclosures. So we’ll check each condition (or case) one at a time to see if we are in an animal enclosure. First we check the Aviary. Have a look at the conditional action for testing to see if our current GPS is in the Aviary below.
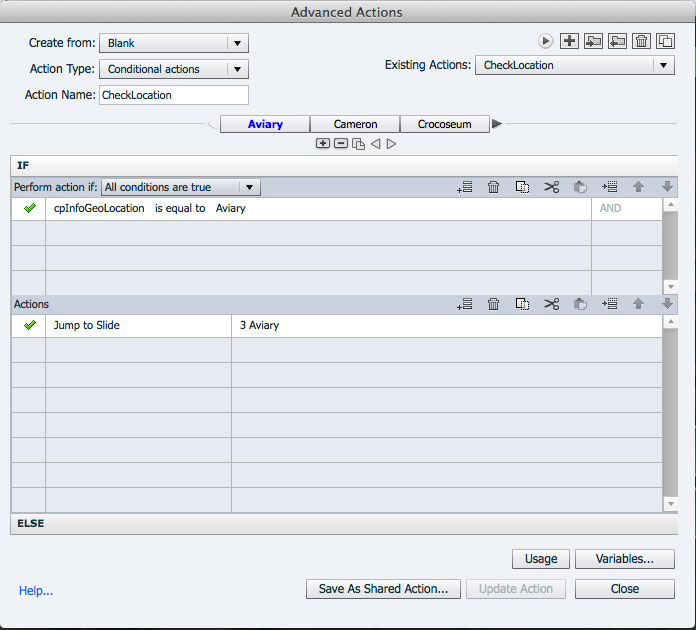
Notice that it’s very simple. If the location = the Aviary then jump to the Aviary slide. In fact this is the same logic we will use for testing each enclosure. The only change in any of these is that at the very end – after all of the enclosures have been tested, we will add an else statement. If we reach the last condition and still haven’t jumped to another slide – then we will want to go back to the beginning of the navigation slide (loop.) So at the very end we use the else to goToFrameAndPlay – which is a long funky way of saying – go to some frame in the project. We already know what frame to go to, because we stored it in a variable on the enterSlide event at the beginning of the navigation slide.
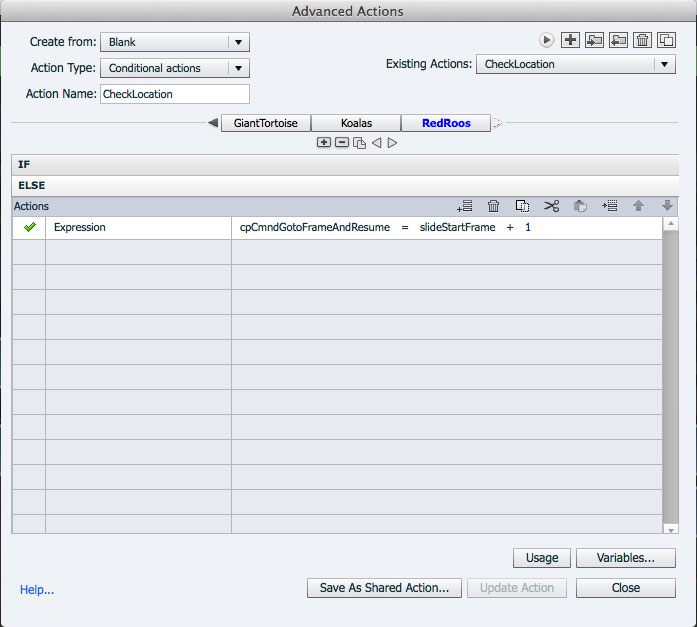
So the logic here is simple. If we are in any of the locations, the project will navigate (jumpTo) the relevant slide for that animal. If we are not in any location, the project will loop around in circles waiting. After that the only challenge is to add buttons so that people who want to can just jump to slides directly using the buttons.
In a nutshell, that’s location aware learning. Here’s the source project for this tutorial so that you can tinker and create your own variations. I’ll do an eSeminar on this topic as well. As always, I’d love to hear how you will use this new feature, how it works for you, and any tips or tricks you’ve found to create location aware learning.
One of the most compelling new features in Adobe Captivate 8 is the ability to create location based learning, thanks to the added support for Geolocation. In this article I’ll describe my most recent adventure creating a simple location based learning example at the Australia Zoo, just outside of Brisbane.
I spent the last week in Australia. I arrived in Brisbane on Saturday, the first of June at about 7:30 in the morning with a mission in mind. I had high hopes that I might
be able to find my way to the famed Australia Zoo (home of the Crocodile Hunter) before the day was done. Fortunately for me CC’s Croc Connections runs daily tours to the zoo from hotels in Brisbane. I was able to hop on the last seat for the days small tour and enjoyed the transportation the tips and made my way to the zoo without any difficulty.
You can view the zoo app that I created for this project here.
I had set the zoo in mind to test creation of a location aware learning project to demonstrate the new technology for EduTech – where I was set to speak on Wednesday.
Basic Concepts
Now before I explain how to create a Location Aware learning module, let’s take a moment to cover some basic concepts that you’ll need to understand first. The foundation of location aware learning is the idea that we can make the learning module ‘aware’ of exactly where the device is located. So, how does that work?
A location is basically a two part number – expressed as a longitude and a latitude. If you fell asleep during 5th grade science when longitude and latitude was explained, it is a simple number that tells you how far from the equator and the prime meridian a given point is on the surface of the earth. Here’s an interesting web site that let’s you enter an address and search for the corresponding GPS location in longitude and latitude.
In Captivate a location can be expressed and saved as a variable. If you haven’t worked with variables in Adobe Captivate before, a variable is like a container. You can use one to hold or save a value – like a number, or a bit of text. You can now also use it to hold a GPS location – the longitude and latitude of some place. Captivate GPS variables also hold a third value – it is the accuracy or range you want to detect for the location. This third number is expressed in meters – and represents the diameter of a circle radiating out from the exact point in the location. Think of Accuracy this way, if you want to specify a small area – you would define a small area, just a few meters to require the device to be within a vary narrow area. If you wanted to simply detect that a person were in a city, or a village, you’d want to detect a quite large area (thousands of meters) in order to ensure that anywhere within that big circle would count as within the city.
You might also think at this point, how about the ‘accuracy’ of detecting the actual position of the mobile device? I had to turn to pizza delivery experts to determine this one. It turns out that most mobile devices today are accurate to about 10 meters. This means that as you build your location aware learning, you should plan on using locations that are at least 20 meters or so apart from one another. Things like the zoo, public parks, or separate rooms / buildings will be more effective projects.
Step 1: Find the target location(s)
To find the target locations I built a simple GPS reporting application using Adobe Captivate 8. There is a system variable in Captivate called cpInfoGeoLocation. This variable contains the actual location data, and is available whenever Geolocation is enabled for a Captivate project. (To enable Geolocation, select Window: Mobile Palette and then check the Geolocation box.) You can see the content of any Captivate variable simply by inserting that variable into a text element in the project. Let’s do that now with Geolocation.
1. Create a new blank project.
2. Using the default text element (either the title or subtitle) double click to select the text item for editing.
3. In the property inspector – locate the insert variable option. Click to Insert a variable.
4. Select the ‘System’ variable option from the variable type drop down menu at the top of the insert dialog.
5. Select the ‘cpInfoGeoLocation’ variable.
6. Note that the text that appears in the text item is just the variable name with $$ on either side of it (front and back.) In fact you can just type $$cpInfoGeoLocation$$ directly into a text field to get the variable. (If you attempt to preview this be certain to accept your browser’s request to enable location reporting.)
7. Once you have the project that reports your GPS, you can simply publish this project and use it to determine where you are, as you gather GPS points for your project. I simply texted myself the numbers along with a brief description of each – that way I had a running record of the geolocation of each animal enclosure. My GPS reporting app is located here if you want to have a look. http://www.p0qp0q.com/getGPS/
Step 2: Building the Zoo App
The zoo app is very simple. The structure is as follows; First, a single slide with a title and instructions. Learners are told to wander around the zoo while holding the application, and expect the application to let them know when there is something more to do. I also gave learners buttons for each zone – presuming that some learners might not have GPS capability and aware that many people would want to test the application even though they were not at the zoo. Once a learner has read the instructions, they move to the second slide of the project – which I consider the primary navigation slide.
The second slide contains a map of the zoo, and buttons that link directly to the various sub-sections. If you are at the zoo, the subsections will automatically appear – no need for the buttons. If you are not at the zoo, you’ll want to use the buttons for navigation.
The remaining slides are all simple groups that identify the animal in the discovered enclosure, then prompt the learner with a simple interactive quiz game and finally reinforce the correct answer with some additional information. Each animal subsection is 3 slides long. I created one sample, and then copied it for each animal.
Let’s have a deeper look at the navigation slide as it is where most of the ‘logic’ in the project is located.
1. The project will ‘loop’ on this slide. To do that we’ll grab the frame number as we start the navigation slide. Once we have this frame number we’ll use it to return to the first frame after the start of this slide every time we reach the end of the slide. The key here is that we will plan to just loop in circles on this slide forever if nothing is done by the learner. If however they move to a new location – thus triggering the GPS to change, or they push one of the navigation buttons, then the project will move to the corresponding animal section.
2. To loop, we will use advanced actions. One on the enterSlide event and one advanced action on the exitSlide event. Note that if you’ve never used advanced actions – don’t panic. These examples of advanced actions are quite simple – and a good place to start learning about them. Our enterSlide event is triggered when the learner first enters the navigation slide. Here’s the advanced action.
You’ll note that it just stores the current frame number in a variable. You can call the variable anything you like. I like to name it something that refers to the slide, and that refers to its purpose – in this case it is used to store the startFrame of this navigation slide.
The second part of this loop has been combined with a conditional advanced action. A conditional action is one that evaluates whether some value is true and only runs a command when that condition is met. In Adobe Captivate you can check several values in a series. (Programmers would generally think of this as a case or a switch function.) In our case we want to check to see if the current location of the device is inside the target location of any of the animal enclosures. So we’ll check each condition (or case) one at a time to see if we are in an animal enclosure. First we check the Aviary. Have a look at the conditional action for testing to see if our current GPS is in the Aviary below.
Notice that it’s very simple. If the location = the Aviary then jump to the Aviary slide. In fact this is the same logic we will use for testing each enclosure. The only change in any of these is that at the very end – after all of the enclosures have been tested, we will add an else statement. If we reach the last condition and still haven’t jumped to another slide – then we will want to go back to the beginning of the navigation slide (loop.) So at the very end we use the else to goToFrameAndPlay – which is a long funky way of saying – go to some frame in the project. We already know what frame to go to, because we stored it in a variable on the enterSlide event at the beginning of the navigation slide.
So the logic here is simple. If we are in any of the locations, the project will navigate (jumpTo) the relevant slide for that animal. If we are not in any location, the project will loop around in circles waiting. After that the only challenge is to add buttons so that people who want to can just jump to slides directly using the buttons.
In a nutshell, that’s location aware learning. Here’s the source project for this tutorial so that you can tinker and create your own variations. I’ll do an eSeminar on this topic as well. As always, I’d love to hear how you will use this new feature, how it works for you, and any tips or tricks you’ve found to create location aware learning.


You must be logged in to post a comment.
- Most Recent
- Most Relevant
Fantastic post Allan. Thanks
The only thing that I’m stuck on is the ‘on entery’ settings for the navigation slide. I understand how to set the on exit, but I’m a little stuck on the looping the navigation slide. Specifically I’m wondering how to get the frame number I need. Its probably something easy but I’m just a little unsure of how to find it.
Nevermind, I forgot to add the ‘or else’ function
I’m wondering what I’m doing wrong. In Captivate 9, you can emulate a location from a preview window dropdown. When I set a location, the script is not jumping to the correct page, it still sits there on the map. Any advice?
Hi James, can you please share your project with us at CaptivateHelp@adobe.com
great article!!!
one question: can I use any button (that by default stop the slide) in the navigator slide instead of using the loop effect?
Never mind…I figured it out. 🙂
Hi Allen,
How to configure your GPS reporting app to display a user’s current location?
Thanks.
Scott
Nice Thanks For Posting. THis.
PLEASE let me know when you do an eSeminar on this. I am trying to follow your steps but I still can’t get the app to do what it’s supposed to. I’m really new to Captivate and to creating actions but I’m trying to design an app that opens the website of the attraction that you are closest to. I know it’s just something stupid that I’m not doing but it’s driving me crazy. Please help.
Could you use something along the lines of creating a responsive project to collect various plants, or flowers around the world. A user would take a photo add a bit of text with GPS and this data would then populate showing the different locations of rare flowers and plants around the world?
John,
I like the approach. Right now you would have to create some extra widget functionality to integrate the camera / picture element. I think you’re on the right track in terms of what kinds of things we should be looking for. I’ll be interested to see if widget developers start to explore extending various mobile device capabilities into the new responsive workflow.
–Allen
Lieve, thanks for the comments. Yes – you are correct, cpInfoGeoLocation is only available in responsive projects. (To clarify, if you’re testing the variable as I describe above, make sure you create a new responsive project.)
Re the slideStartFrame – yes you could just as easily have assigned the variable rather than use an expression. I didn’t really need to add 1 to the loop. (I’m claiming jet lag, but it’s more likely senility.) For those following along, you don’t need to add 1 frame to the jump back point both at the frame save call and at the jump. Because of that you could use an assign command rather than an expression. So the jump command would become;
Assign cpCmdGoToFrameAndResume slideStartFrame
Allen, thanks for showing some advanced actions, and explaining how to use the new system variable, cpInfoGeoLocation. Just to clarify: that system variable is only available in Responsive projects, has its proper category ‘Mobile’.
For users who want to learn more about navigation, looping between frames, long time ago I blogged about ‘micro navigation’ http://blog.lilybiri.com/micro-navigation-in-adobe-captivate.
Just one question: I understand why you incremented the value of cpInfoCurrentFrame by 1 to store the number of the first frame of the slide in the user variable slideStartFrame, because the system variable starts with index=0. You are probably also aware that mostly, due to delay, not the first but the second (or even third) frame number will be stored (like 92 instead of 91 in this example, first frame of second slide). However I don’t understand why you are using that increment again for the loop? Was ‘Assign cpCmndGotoFrameAndResume with slideStartFrame’ not sufficient? Is there a reason why you want to go to the next frame?
Fantastic post Allan 🙂 was looking for this to build some lessons for instructing soldiers in the usage of military GPS devices. They will get instructions in the application on how to navigate to a point by using the milspec GPS device, whenn they reach the correct location they will receive new instructions in operating the device in different modes. Video and interactive graphics (using popups and lightboxes) will make the soldier clear on HOW to operate the device. Thanks again for explaining this great feature in CP8.
Glad to hear it’s useful Vico. Let me know how your project goes. The source is there as well via the link above – if the project isn’t classified, i’d love to see how it comes out.
