 Legend
227 posts
Legend
227 posts
 Adobe Captivate is a powerful eLearning authoring tool which allows you to create several types of engaging and interactive eLearning courses. To make the most of this tool, here are the top 5 productivity tips I’ve followed over the years. Go ahead and use them if you like. 🙂
1. Take my advice — Always begin with Photoshop
I’m an avid user of stock images from Fotolia.com. They help me bring my courses to life. But these images are huge in size. If you try to import these images as-it-is in Captivate, it will bloat your project. Moreover, if you wish to tweak the image, merge it with another image, crop the pesky background, or apply some wonderful effects to the image, you need to use a specialized photo-editing tool.
Adobe Photoshop being my favorite photo-editing tool, I start creating my course layout in Photoshop using the exact eLearning course dimensions and then start importing and editing the stock images in it.

Once all the interface elements and graphics are ready, I create an Adobe Captivate project and import the PSD file in it. All my layers/layer comps in the PSD file are imported as individual graphics and they are saved in the Captivate project library. I can reuse these graphics as many times in my project. The best part is that the PSD file for my eLearning course is a live document, I can make changes to the PSD file anytime and sync the changes in the Captivate project.
2. Let’s color!
Using the right set of colors is utmost important for creating any artwork, and that stands true for your eLearning courses as well. You need to comply with your company/customer style guide and use the specified colors mentioned in it. Or you might have your favorite color shades that you want to use.

 The best way to work with colors in Adobe Captivate is to use the Swatch Manager. This dialog allows you to import color swatches from other applications such as Adobe Photoshop, Adobe Illustrator, and Adobe Color; or add your own color swatch to the Swatch Manager by using the eyedropper or color picker tool. These colors also appear in your Fill and Stroke dialog and makes it easy for you to use them. Icing on the cake is that if you use these colors as a part of your theme color palette, you will get a set of lighter and darker shades of the color swatch you add.
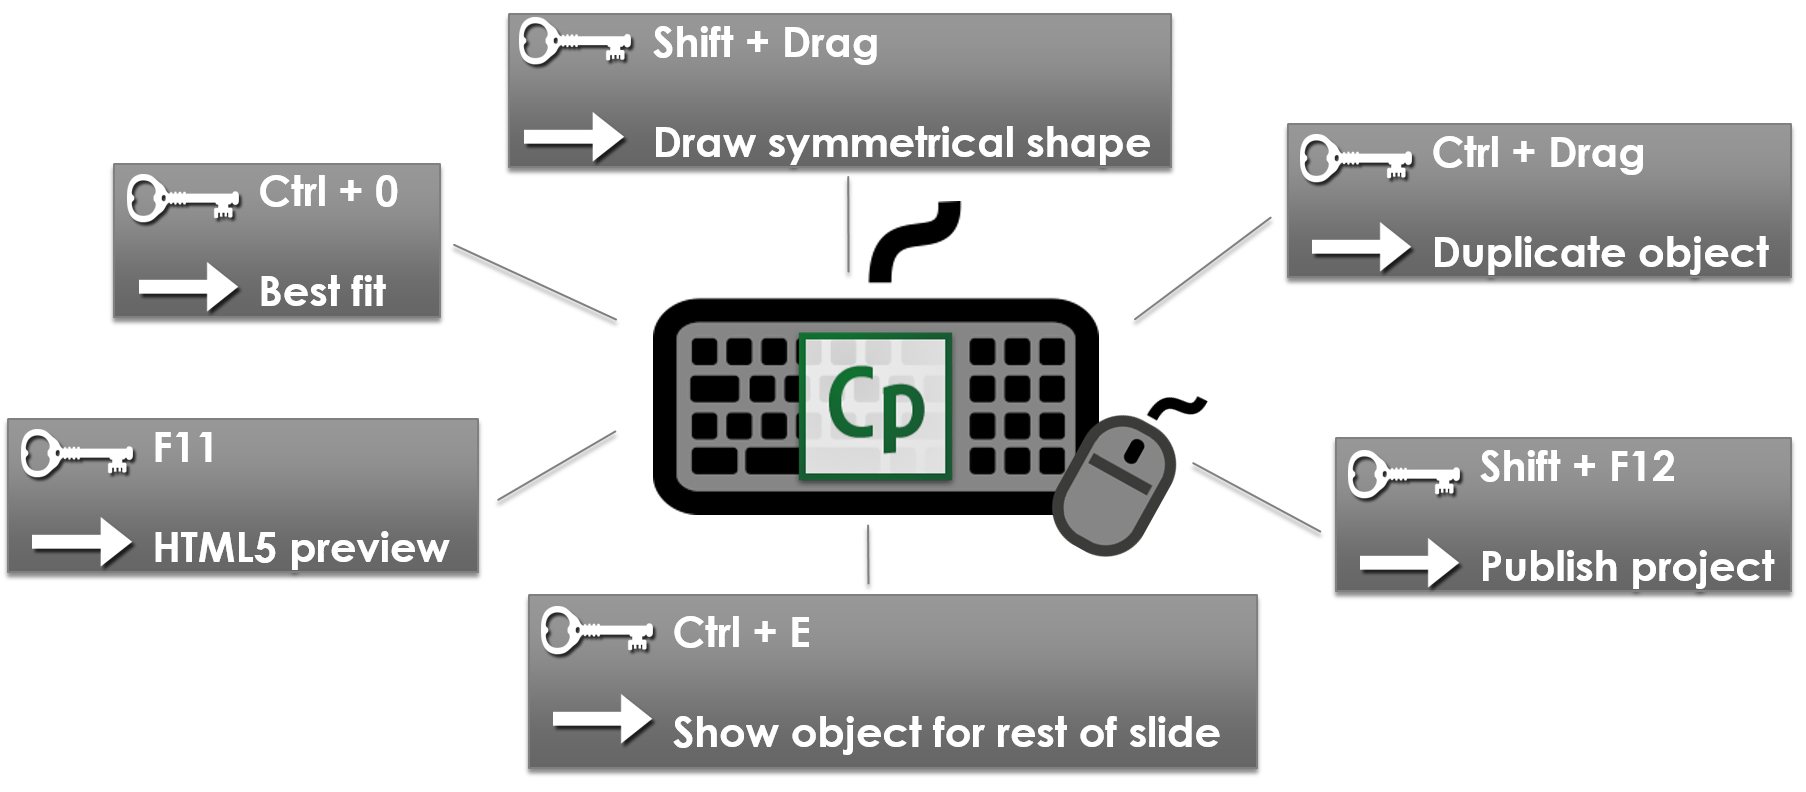
3. Smart shortcuts for my busy friends!
If you’re like me, who loves using keyboard shortcuts, here are some of the most useful shortcut keys to help you be more productive while creating captivate projects.
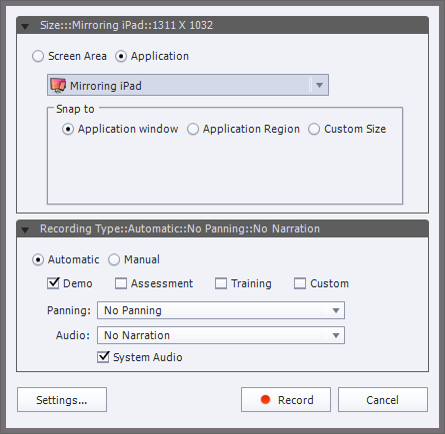
4. iPad/iPhone simulation
If you need to create a simulation capturing your iPad or iPhone screen, don’t sweat by manually creating it using several screenshots. Use a software to mirror the iDevice on your PC/Mac and capture it using Adobe Captivate. My favorite software for screen mirroring is Reflector.
Here are the simple steps to capture a simulation using Captivate and Reflector:
- Make sure your computer and iPad/iPhone are on the same Wi-Fi network.
- Start Reflector application on your computer.
- Enable Airplay on your iPad/iPhone and select mirroring option for your computer.

- Your iPad/iPhone screen will start projecting on your computer.
- Start Adobe Captivate on your computer.
- Start recording software simulation with iPad/iPhone as the application to be recorded.
- End recording.
Your iPad/iPhone simulation is ready!
5. Share and care!
Advanced actions in Adobe Captivate give you a lot of power and customization options but it’s quite painful to write scripts again and again for creating similar interactions. This New Year make a resolution to save your advanced actions as shared actions and reuse them across objects, slides, and projects. And be generous and share it with you fellow eLearning professionals as well.
Any other Captivate productivity tips crossing your mind? Feel free to share them here by adding a comment.
Happy captivating! 🙂
Adobe Captivate is a powerful eLearning authoring tool which allows you to create several types of engaging and interactive eLearning courses. To make the most of this tool, here are the top 5 productivity tips I’ve followed over the years. Go ahead and use them if you like. 🙂
1. Take my advice — Always begin with Photoshop
I’m an avid user of stock images from Fotolia.com. They help me bring my courses to life. But these images are huge in size. If you try to import these images as-it-is in Captivate, it will bloat your project. Moreover, if you wish to tweak the image, merge it with another image, crop the pesky background, or apply some wonderful effects to the image, you need to use a specialized photo-editing tool.
Adobe Photoshop being my favorite photo-editing tool, I start creating my course layout in Photoshop using the exact eLearning course dimensions and then start importing and editing the stock images in it.
Once all the interface elements and graphics are ready, I create an Adobe Captivate project and import the PSD file in it. All my layers/layer comps in the PSD file are imported as individual graphics and they are saved in the Captivate project library. I can reuse these graphics as many times in my project. The best part is that the PSD file for my eLearning course is a live document, I can make changes to the PSD file anytime and sync the changes in the Captivate project.
2. Let’s color!
Using the right set of colors is utmost important for creating any artwork, and that stands true for your eLearning courses as well. You need to comply with your company/customer style guide and use the specified colors mentioned in it. Or you might have your favorite color shades that you want to use.
The best way to work with colors in Adobe Captivate is to use the Swatch Manager. This dialog allows you to import color swatches from other applications such as Adobe Photoshop, Adobe Illustrator, and Adobe Color; or add your own color swatch to the Swatch Manager by using the eyedropper or color picker tool. These colors also appear in your Fill and Stroke dialog and makes it easy for you to use them. Icing on the cake is that if you use these colors as a part of your theme color palette, you will get a set of lighter and darker shades of the color swatch you add.
3. Smart shortcuts for my busy friends!
If you’re like me, who loves using keyboard shortcuts, here are some of the most useful shortcut keys to help you be more productive while creating captivate projects.
4. iPad/iPhone simulation
If you need to create a simulation capturing your iPad or iPhone screen, don’t sweat by manually creating it using several screenshots. Use a software to mirror the iDevice on your PC/Mac and capture it using Adobe Captivate. My favorite software for screen mirroring is Reflector.
Here are the simple steps to capture a simulation using Captivate and Reflector:
- Make sure your computer and iPad/iPhone are on the same Wi-Fi network.
- Start Reflector application on your computer.
- Enable Airplay on your iPad/iPhone and select mirroring option for your computer.
- Your iPad/iPhone screen will start projecting on your computer.
- Start Adobe Captivate on your computer.
- Start recording software simulation with iPad/iPhone as the application to be recorded.
- End recording.
Your iPad/iPhone simulation is ready!
5. Share and care!
Advanced actions in Adobe Captivate give you a lot of power and customization options but it’s quite painful to write scripts again and again for creating similar interactions. This New Year make a resolution to save your advanced actions as shared actions and reuse them across objects, slides, and projects. And be generous and share it with you fellow eLearning professionals as well.
Any other Captivate productivity tips crossing your mind? Feel free to share them here by adding a comment.
Happy captivating! 🙂


You must be logged in to post a comment.
- Most Recent
- Most Relevant
SUCCESS!
Thanks…
Learn, Grow, & Be Successful!
Respectfully,
Clg :)!
Great tips! Didn’t know you could import a PSD file and retain layers. Very helpful. What are you using for your pixels per inch? I’m working with a responsive project and know the width and height of the project but am having a hard time sorting out the ideal resolution.
Hi, I am a designer, relatively new to Captivate 8. We are switching from exclusively using Flash for eLearning over to Captivate so that we don’t need developer support and so we can ultimately output responsive html5 products.
We want to be able to create courses that allow the kinds of creative freedom that we are used to in Flash, so we are bypassing as much of the inbuilt templates as possible.
One or two annoying issues have cropped up as I have been exploring Captivate and I wonder if a resolution will be available in a future update for Captivate, or indeed if a workaround is currently available?
The TOC is a very useful part of Captivate, but it is very inflexible, looks awful, doesn’t work the way I would like etc. Unfortunately the tools to edit the TOC are very limited. I would like to be able to use the technology behind the TOC but create something that stylistically fits in with my design… For example we wanted to make a pictorial navigation system for a current project, but getting this to record data in the way we need for the LMS seems impossible without someone to write code.
I need to be able to design my own TOC/navigation, have it look exactly as I would like and to be able to place it wherever I want… will this ever be possible?
My second annoyance with Captivate concerns the use of assets that appear on every page… I know that things can be placed on Master pages etc. however I need to be able to reuse buttons and graphics and to be able to place them anywhere on the page, not have them fixed by a Master page, so if it would be possible to set a button or other graphic device up on the Master page complete with an action and then to have the ability to move it wherever needed on each child page, with minimal editing of the action (a shared action perhaps) would be great.
Advanced actions are great and very powerful… I can see the potential for my work, but the laborious process of having to give every page asset a unique name to be targeted by an action is a pain… It would be great if Captivate had an intelligent naming convention based upon the page identifier and an asset name and used this automatically whenever that asset is placed onto the page… For example if I make a button and call it ‘backButton’, each time I copy that to a page the name ‘back Button’ should be there automatically, but prefixed by the page name or number so that it is a unique instance of the button ready to be targeted by the action… In fact I would go further and suggest that when creating a shared action, why can’t the shared action be automatically populated with the pre-named assets?
The timeline… It is essential to have this, but again it is inflexible and limited. It would be great to be able to control this so that individual frames can be targeted easily and the play-head movement can be controlled fully within the page…
Drawing/animation tools… there aren’t any!
I could go on, but basically I would like Captivate to have more of the functionality of Flash, without the need to write actionscript!
I use PowerPoint to do the things Captivate can’t do and I really do not like coding.
Nice Thanks For Sharing.
I am using a certificate of completion in 8 and can’t seem to change the color. I can only change the font and its color. Is there a way to change the color?
Also – I need to have the certificate contain several pieces of information, but when I use the text entry box, it only always me to have one text box to one submit button. Is there a way in which I can have several text boxes tied to 1 submit button?
Is there anything in Captivate that can convert voice to text?
No Mcresa, we don’t have speech-to-text feature available in Captivate. But we have this feature available in Presenter Video Express.
Can you please share some use cases for Speech to text in Captivate?
I am typing questions into a question pool and have about 1,000 questions to enter. Thought speaking it may be a little quicker.
Hi there, actually, the best time savers for me are the new prebuilt noise reduction filters in Cp8 an Pn10 while audio recording. This is the first versions of my lovely softs, I can really record audio using primary Cp or Pn and the audio quality is nearly every time acceptable. So I can skip audioworkflow included Audition editing. Not every time, but usually.
Hope, Cp 9 will bring full Pen tool and some better functionality for basic image editing. Also my dream – key frames for animating objects. Such as Flash or Aftereffects. And the last wish – next level of advanced and shared actions system.
Ouu, christmas time….
Hi Yarik,
I’m glad you find the noise reduction filters useful in Captivate and Presenter. And i will pass on your enhancement requests to the engineering team 🙂
I really like the notion of Key Frames. Creating custom effects in Flash and importing them to Captivate is just too clunky and lacks flexibility.
While I agree that large images may bloat the project (and oddly, the output too), I’m failing to see how importing a stock image from fotolia (which I understand Adobe now owns) would provide “layers” that would be imported into Captivate later.
Hi Rick .. It will not . Fotolia images are Flat images . Pooja means that she would bring multiple images she wants to use in a project inside PS , manage their size and then bring them as single psd , each layer having a different image altogether.
Dr. I use Adobe Kuler to select CP project pallet based on Company logo or relevant photo. Can be used inside PS or AI 🙂
Isn’t that cool! 🙂
Ed, it is no longer Adobe Kuler, but Adobe Color (since October) and a great way to have nice color schemes, they can be imported directly in the Captivate Swatches panel.
Pooja, I totally agree about 3 of your tips: I’m using Photoshop roundtripping daily. About that tip want to add that importing Illustrator objects as smart objects in Photoshop will give you also an indirect roundtripping with Illustrator. But also Audition roundtripping is something I would add to that first tip, it is such a great audio editor with a lot more functionality than the native Captivate audio editing. The better color management in CP8 is something I always will mention, even though I’d love to have even better integration between the Swatches panel, Adobe Color and the theme colors. When will we have access to the new Libraries feature in the Creative Cloud? I’m using my Color themes easily in all applications, even on the iPad, but for Captivate have to use the old ‘import’ feature.
I am a shortcut freak, and would love to see more shortcut keys, that integrate with those used in Photoshop, Illustrator etc.
For those who know my blog, it is no secret that Shared actions, together with shapes, are my absolute favourites. I have been sharing a lot ‘Dare to Share’.
Personally I would have replaced tip 4 by a tip about creating/editing a Theme when starting a Captivate project, after setting up the Preferences. That means: editing the object styles (lot has changed in CP8) in its manager, tweaking the master slides and the skin editor. It is the biggest time saver, and includes the setup of the theme colors, and the creating of shape styles (including the states for eventual use as buttons).
Crossing my fingers, that this time the comment is accepted 🙂
Thanks for sharing these tips Lieve.
I agree that Audition is a great audio recording and editing tool and is my preferred tool for recording narration. And setting the theme is also a must-do-step for creating a project. Wish i had named the post as Top 6 tips and included this one as well 😉
Will plan another post for it soon.
I’ll pass on the rest of your requests to the engineering team. Thanks again.
