 Staff
3 posts
Staff
3 posts
Please make sure you have read the article – “Using Fluid boxes: Knowledge Facts – 1“, to understand this article better.
In this article, I will be discussing some facts you need to know for creating a fluid box layout. This will basically involve giving an overview on what approach needs to be followed for creating a layout with fluid boxes, how to use it and how to insert and handle objects within the layout.
So, let us get started!
Download the sample project here to try it yourself and follow along: Using_fluid_boxes_2
How to Create your Fluid Box Layout:
Since we know creating a fluid box layout is necessary before we start placing our actual content, let us try to create one like shown below:

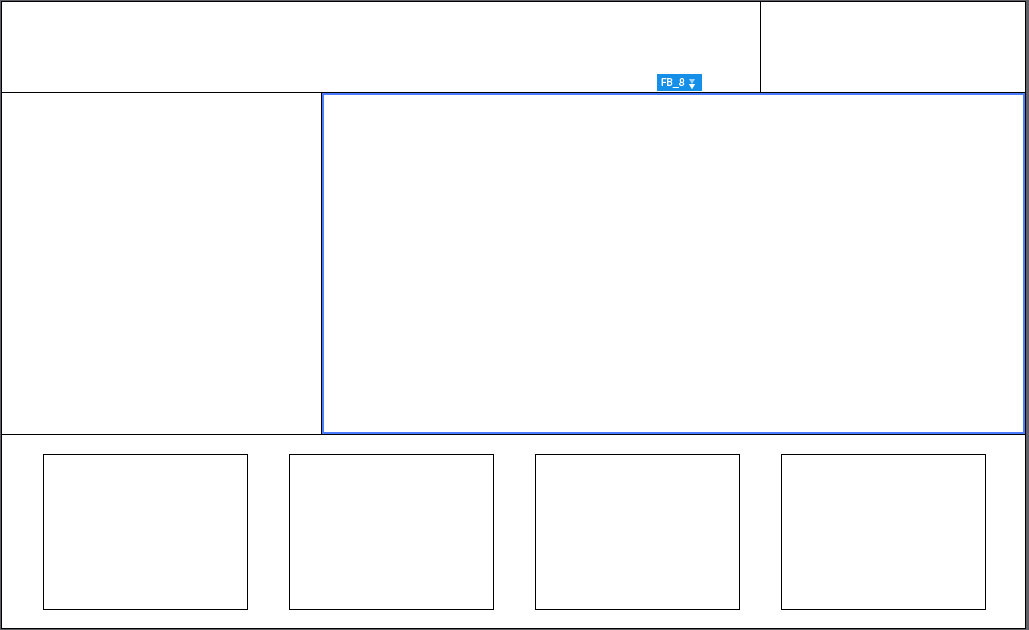
- Total number of fluid boxes used in above layout are 12.
- FB_1 is the Root Flex box which comprises of all other fluid boxes.
- FB_2, FB_3 and FB-4 are the immediate child fluid boxes of FB_1.
- FB_5, FB_6 are immediate child of FB_2.
- FB_7, FB_8 are immediate child of FB_3.
- FB_9, FB_10, FB_11 and FB_12 are immediate child of FB_4.
Here is how you create them:
- Click on Fluid box option
 in the Toolbar.
 - Select 3 fluid boxes to be inserted from the vertical insertion option

- This will insert 4 Fluid boxes. Root Fluid box (FB_1) and three child fluid boxes FB_2, FB_3 and FB_4.
- Since Root Fluid box, FB_1 is selected, you can resize the child FB_2, FB_3 and FB_4 using the visible resize handle between their common boundary. Move the top resize handle to a bit more top.
- Select FB_2 and insert two horizontal fluid boxes again using the above-mentioned method. Remember, this time only two child fluid boxes FB_5 and FB_6 will be inserted as a child to FB_2. Parent Fluid box is only added if it is not present on the slide for child fluid boxes to be inserted.
- Since FB-2 is selected, you can resize the child FB_5 and FB_6 using the visible resize handle between their common boundary. Move the resize handle to right to achieve desired layout.
- Select FB_3 and insert two horizontal fluid boxes again using the above-mentioned method.
- Since FB_3 is selected, you can resize the child FB_7 and FB_8 using the visible resize handle between their common boundary. Move resize handle to left to achieve desired layout.
- Select FB_4 and insert 4 horizontal fluid boxes again using the above-mentioned method.
- After inserting FB_4 will be selected. Uncheck Stretch to Fit option from the PI for both horizontal and vertical option.
- Select horizontal alignment option from the PI and chose “Space around” as an alignment option.
 in the Toolbar.
Your layout is ready. ![]()
How to Add objects to a Fluid box:
After your layout is ready, next step is placing your course content within the fluid box.
There are multiple ways of adding content to a fluid box. We will talk about few of them below:
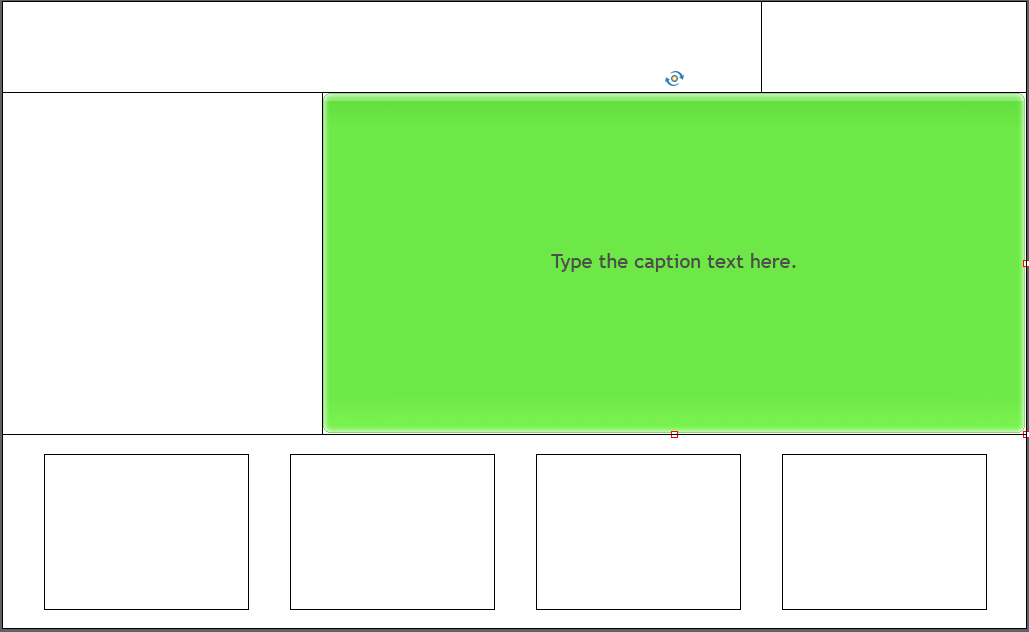
- Select the fluid box and insert an object using Captivate tool bar.
For example: Let us select FB_8 from the layout we created
Go to Toolbar and insert a text caption or press ctrl+shift+C on your keyboard. Text Caption gets inserted to the fluid box. (I have changed color of Text Caption to make it more evident)
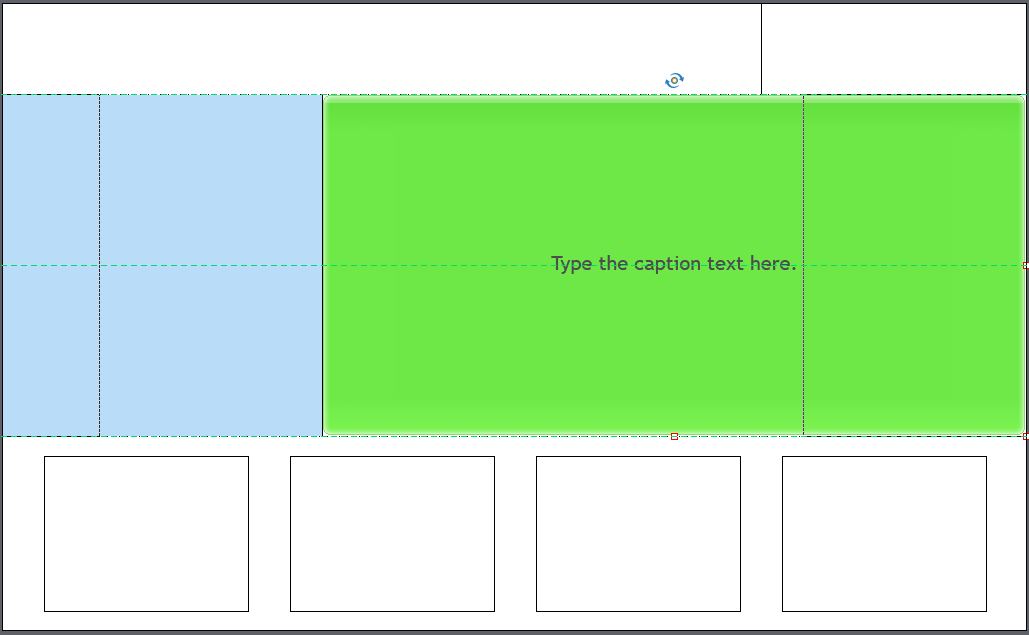
- Drag and drop the objects from one fluid box to another
Select the Text caption added in above step and move it from FB_8 to FB_7 (to the left fluid box). When dragging, and dropping an object to fluid box, target fluid box is highlighted in blue color. (In below figure, you can see FB_7 is highlighted)
Text caption is moved from FB_8 to FB_7.

- Copy pasting an object works similarly as mentioned in first method after you have selected a fluid box. You can add multiple objects at the same time by pasting objects in to selected fluid box.
- Importance of Unlock from fluid box: If you want to make any object as a slide object, which is currently part of fluid box, you can enable unlock from fluid box for that object from the PI, upon selecting the object. Other important usage of Unlock from Fluid box can be if you want to do some editing to your object which is not allowed as part of Fluid box, you can choose to unlock the object.
Remember, objects which have got “unlock from fluid box” checked cannot be added to any fluid box, unless you disable/uncheck “unlock from fluid box” for those objects.
Important Tip: Always remember Fluid boxes and objects cannot be siblings at the same time at same hierarchal level.
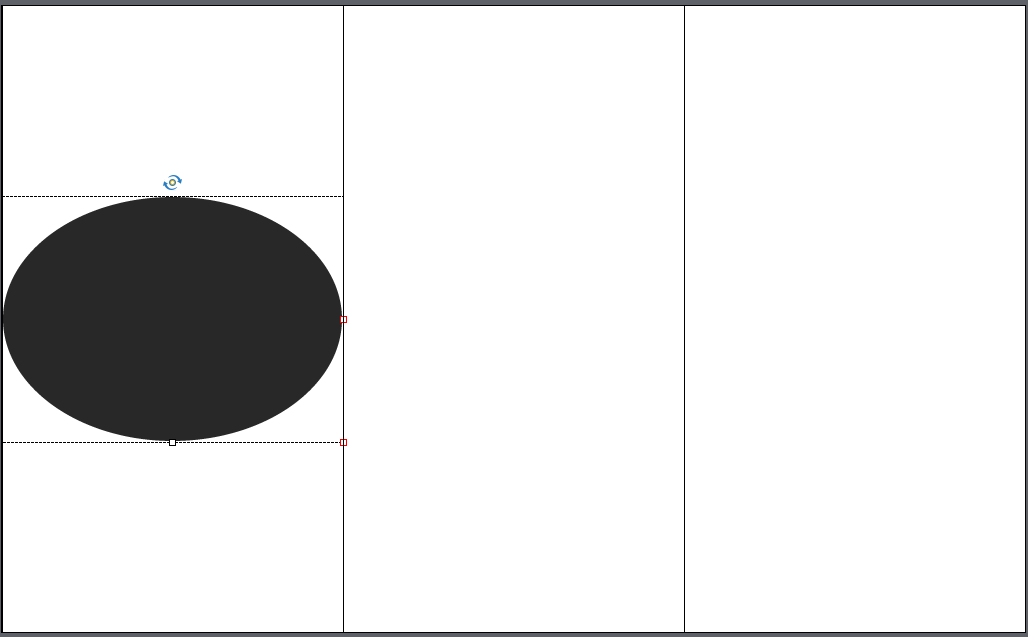
For example, if you have a layout something like below, where FB_1 is the root fluid box and its child are FB_2, FB_3 and FB_4:

You cannot add Objects to FB_1. Reason- FB_2, FB_3 and FB_4 are already present as a child to FB_1. You can add more fluid boxes within FB_1, but not objects.
Also, if you would have added a smart shape to FB_2 like below, you will not be allowed to add any fluid boxes within FB_2. If you want to build nested layout within FB_2, you can either delete the smart shape or unlock it from fluid box.
Check out Knowledge Fact – 3
Have you started using Fluid Boxes, please share your experience & any questions you have around this new feature…
Please make sure you have read the article – “Using Fluid boxes: Knowledge Facts – 1“, to understand this article better.
In this article, I will be discussing some facts you need to know for creating a fluid box layout. This will basically involve giving an overview on what approach needs to be followed for creating a layout with fluid boxes, how to use it and how to insert and handle objects within the layout.
So, let us get started!
Download the sample project here to try it yourself and follow along: Using_fluid_boxes_2
How to Create your Fluid Box Layout:
Since we know creating a fluid box layout is necessary before we start placing our actual content, let us try to create one like shown below:
- Total number of fluid boxes used in above layout are 12.
- FB_1 is the Root Flex box which comprises of all other fluid boxes.
- FB_2, FB_3 and FB-4 are the immediate child fluid boxes of FB_1.
- FB_5, FB_6 are immediate child of FB_2.
- FB_7, FB_8 are immediate child of FB_3.
- FB_9, FB_10, FB_11 and FB_12 are immediate child of FB_4.
Here is how you create them:
- Click on Fluid box option in the Toolbar.
- Select 3 fluid boxes to be inserted from the vertical insertion option
- This will insert 4 Fluid boxes. Root Fluid box (FB_1) and three child fluid boxes FB_2, FB_3 and FB_4.
- Since Root Fluid box, FB_1 is selected, you can resize the child FB_2, FB_3 and FB_4 using the visible resize handle between their common boundary. Move the top resize handle to a bit more top.
- Select FB_2 and insert two horizontal fluid boxes again using the above-mentioned method. Remember, this time only two child fluid boxes FB_5 and FB_6 will be inserted as a child to FB_2. Parent Fluid box is only added if it is not present on the slide for child fluid boxes to be inserted.
- Since FB-2 is selected, you can resize the child FB_5 and FB_6 using the visible resize handle between their common boundary. Move the resize handle to right to achieve desired layout.
- Select FB_3 and insert two horizontal fluid boxes again using the above-mentioned method.
- Since FB_3 is selected, you can resize the child FB_7 and FB_8 using the visible resize handle between their common boundary. Move resize handle to left to achieve desired layout.
- Select FB_4 and insert 4 horizontal fluid boxes again using the above-mentioned method.
- After inserting FB_4 will be selected. Uncheck Stretch to Fit option from the PI for both horizontal and vertical option.
- Select horizontal alignment option from the PI and chose “Space around” as an alignment option.
Your layout is ready. ![]()
How to Add objects to a Fluid box:
After your layout is ready, next step is placing your course content within the fluid box.
There are multiple ways of adding content to a fluid box. We will talk about few of them below:
- Select the fluid box and insert an object using Captivate tool bar.
For example: Let us select FB_8 from the layout we created
Go to Toolbar and insert a text caption or press ctrl+shift+C on your keyboard. Text Caption gets inserted to the fluid box. (I have changed color of Text Caption to make it more evident)
- Drag and drop the objects from one fluid box to another
Select the Text caption added in above step and move it from FB_8 to FB_7 (to the left fluid box). When dragging, and dropping an object to fluid box, target fluid box is highlighted in blue color. (In below figure, you can see FB_7 is highlighted)
Text caption is moved from FB_8 to FB_7.
- Copy pasting an object works similarly as mentioned in first method after you have selected a fluid box. You can add multiple objects at the same time by pasting objects in to selected fluid box.
- Importance of Unlock from fluid box: If you want to make any object as a slide object, which is currently part of fluid box, you can enable unlock from fluid box for that object from the PI, upon selecting the object. Other important usage of Unlock from Fluid box can be if you want to do some editing to your object which is not allowed as part of Fluid box, you can choose to unlock the object.
Remember, objects which have got “unlock from fluid box” checked cannot be added to any fluid box, unless you disable/uncheck “unlock from fluid box” for those objects.
Important Tip: Always remember Fluid boxes and objects cannot be siblings at the same time at same hierarchal level.
For example, if you have a layout something like below, where FB_1 is the root fluid box and its child are FB_2, FB_3 and FB_4:
You cannot add Objects to FB_1. Reason- FB_2, FB_3 and FB_4 are already present as a child to FB_1. You can add more fluid boxes within FB_1, but not objects.
Also, if you would have added a smart shape to FB_2 like below, you will not be allowed to add any fluid boxes within FB_2. If you want to build nested layout within FB_2, you can either delete the smart shape or unlock it from fluid box.
Check out Knowledge Fact – 3
Have you started using Fluid Boxes, please share your experience & any questions you have around this new feature…


You must be logged in to post a comment.
- Most Recent
- Most Relevant
When using fluid boxes I have used the option “unlock from fluid box” to change size and manipulate objects in a fluid box, I wonder if using this option cancel the properties of the fluid box… thanks for your attention.
Carolina,
For multiple objects, you do not have to use static fluid boxes. Static fluid boxes shall be used if you want to have overlapping objects on your slide or other requirements that regular fluid boxes limit.
“Optional” is a property which can be enabled at fluid box / object level. It allows you to make a particular object/fluid box disappear if it is taking too much space on lower screen size devices like (tablet portrait view or mobile phones).
thank you for anwer my question, what do I have to do in a fluid box to have multiple objects? I am using static but you say this is not the right way to use.
Hello,Thank you for all the information about fluid boxes, I want to know what´s the use for the “optional” option that is above “static”, I have used static when I need to put more than one object in a fluid box but I´m not clear about “optional”.
Zeeshan I also did see same complaint in the forum. What you forgot to mention is that the slide should use a Blank Master slide, not any of the content slides including the Title master slide.
Thanks for sharing this information! Do you have a video demo or walkthrough available for this? I’ve tried to replicate and have had very little luck. I’m not sure what I’m missing.
Cheers,
Hi Fahima,
Please have a look at the attached cptx files. If you still face any issues, please reach out to CaptivateHelp@adobe.com and request for a connect session.
Regards,
Zeeshan
Hey Zeeshan,
I will look this over. Many thanks!
