 Newbie
12 posts
Newbie
12 posts
Hello, all! I recently realized that when creating a project in Captivate, it can be rather burdensome to find just the right colors to match your full brand spectrum. Thankfully, Adobe Captivate has you covered!
Follow these simple steps to customize the built-in Swatch Manager, and make the default palette walk the plank!
1. Open a Captivate project file.
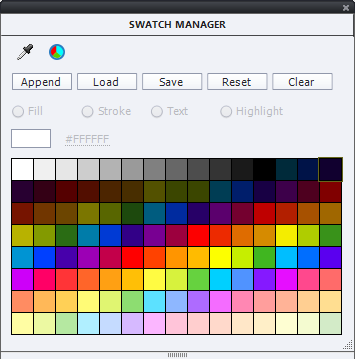
2. From the top menu bar, select Window, and scroll down to Swatch Manager. The default should look like this.
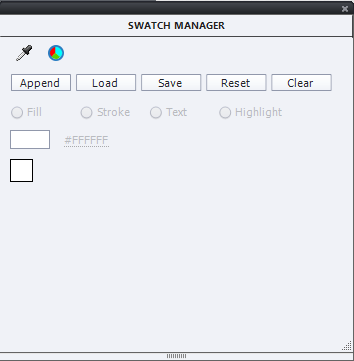
3. From the Swatch Manager viewing pane, click on Clear.
4. Click ‘OK’ in the subsequent warning box that appears (Don’t worry, your project itself won’t lose any colors, only the Swatch Manager color selector will be affected). Swatch Manager should now look this.
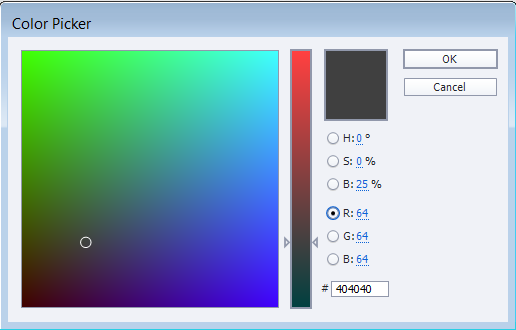
5. Next, click the small color wheel icon in the top left corner of the Swatch Manager to begin customizing the palette (you could also use the eye dropper icon to do this, but this tutorial will use the color wheel). See image below.
6. For this tutorial, I’ll be making a Primary Colors palette, but feel free to choose any colors you like from this point forward.
7. Select a color and click ‘OK’.
8. You will be prompted to give the swatch a name (NOTE: This name applies to that single color only, not the entire palette we are creating. So for my example, I’ll name this one ‘Primary Red’. Click ‘OK’ and you should see something similar to the image below.
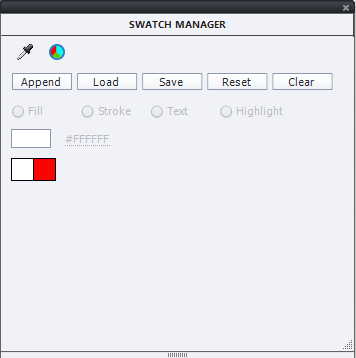
9. Repeat steps 7 and 8 until you have added all of your custom colors. Once complete, move on to the next step.
10. When all is said and done, your Swatch Manager should look the image below (I like to have black and white bookends around my custom colors because it’s incredibly rare to not find a need for their use in a project).
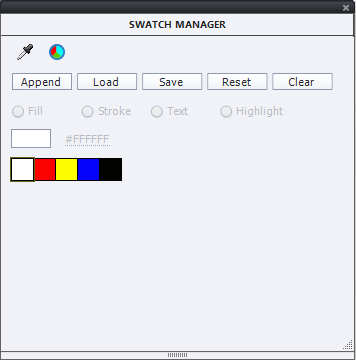
11. Click ‘Save’ and give this palette a distinctive name (For mine? You guessed it…PrimaryColors), and save it in a location you won’t have trouble remembering in the future – I keep all of mine in a folder called, ‘Cp Custom Palettes’.
12. To check your work, click on any shape in the open Captivate file.
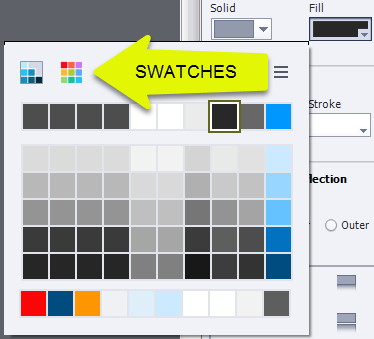
13. From the Properties panel click Fill and choose the Swatches icon marked in the image below to begin using your newly customized color swatches!
14. Finally, give yourself a nice pat on the back. You are now a Captivate Swatch-buckler!
NOTE: You will need to load the saved file into each new project you open (see the ‘Load’ button in the above images). Also, I like housing these saved palette files in my project assets folder for efficient future use. If you are looking for something a bit more permanent, however, stay tuned for my blog on customizing Captivate themes which have a considerably broader reach!
Pro Tip: The file extension, .ase, stands for Adobe Swatch Exchange, and is compatible with other Adobe products. So what are you waiting for? Import away!
Until next time folks, “Go be the yond!”
Adam
P.S. This blog was originally posted on my website at: elearningprose.com/blog
Hello, all! I recently realized that when creating a project in Captivate, it can be rather burdensome to find just the right colors to match your full brand spectrum. Thankfully, Adobe Captivate has you covered!
Follow these simple steps to customize the built-in Swatch Manager, and make the default palette walk the plank!
1. Open a Captivate project file.
2. From the top menu bar, select Window, and scroll down to Swatch Manager. The default should look like this.
3. From the Swatch Manager viewing pane, click on Clear.
4. Click ‘OK’ in the subsequent warning box that appears (Don’t worry, your project itself won’t lose any colors, only the Swatch Manager color selector will be affected). Swatch Manager should now look this.
5. Next, click the small color wheel icon in the top left corner of the Swatch Manager to begin customizing the palette (you could also use the eye dropper icon to do this, but this tutorial will use the color wheel). See image below.
6. For this tutorial, I’ll be making a Primary Colors palette, but feel free to choose any colors you like from this point forward.
7. Select a color and click ‘OK’.
8. You will be prompted to give the swatch a name (NOTE: This name applies to that single color only, not the entire palette we are creating. So for my example, I’ll name this one ‘Primary Red’. Click ‘OK’ and you should see something similar to the image below.
9. Repeat steps 7 and 8 until you have added all of your custom colors. Once complete, move on to the next step.
10. When all is said and done, your Swatch Manager should look the image below (I like to have black and white bookends around my custom colors because it’s incredibly rare to not find a need for their use in a project).
11. Click ‘Save’ and give this palette a distinctive name (For mine? You guessed it…PrimaryColors), and save it in a location you won’t have trouble remembering in the future – I keep all of mine in a folder called, ‘Cp Custom Palettes’.
12. To check your work, click on any shape in the open Captivate file.
13. From the Properties panel click Fill and choose the Swatches icon marked in the image below to begin using your newly customized color swatches!
14. Finally, give yourself a nice pat on the back. You are now a Captivate Swatch-buckler!
NOTE: You will need to load the saved file into each new project you open (see the ‘Load’ button in the above images). Also, I like housing these saved palette files in my project assets folder for efficient future use. If you are looking for something a bit more permanent, however, stay tuned for my blog on customizing Captivate themes which have a considerably broader reach!
Pro Tip: The file extension, .ase, stands for Adobe Swatch Exchange, and is compatible with other Adobe products. So what are you waiting for? Import away!
Until next time folks, “Go be the yond!”
Adam
P.S. This blog was originally posted on my website at: elearningprose.com/blog


You must be logged in to post a comment.
- Most Recent
- Most Relevant
Hi Adam, I have been blogging quite a while ago about the use of Theme colors as start for the creation of any custom theme. I am an avid user of Adobe Color since many years as well. Have a look at:
http://blog.lilybiri.com/colorful-2015-with-adobe-captivate
http://blog.lilybiri.com/theme-colors
http://blog.lilybiri.com/whats-in-a-theme-a-template
