by Kevin Siegel, COTP
Inserting and editing video in Adobe Presenter is as easy as accessing the Adobe Presenter tab on the Ribbon and then clicking the Video tool. Once videos have been added to a PowerPoint slide, they can be manipulated just like any other PowerPoint object.
I received an email recently from a new Presenter developer. He wanted to insert a video, but instead of adding the video to the slide, he wanted it to appear to the left of the slide, above the Table of Contents. He had heard such a thing was possible but had been unable to find the feature.
The feature he was looking for is called Sidebar video and it’s shown in the image below. Adding Sidebar video to a project is simple and I was able to talk him through it with a quick email. If you’d like to learn how, follow these steps.

To begin, select a PowerPoint slide and then, on the Adobe Presenter tab, Insert group, click the Video tool and choose Import. (This will open the Adobe Presenter – Import Video dialog box.)


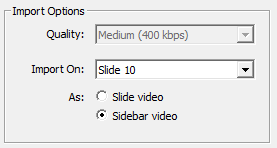
Select the video you’d like to use in the Sidebar and, from the lower right of the dialog box, select Sidebar video.

By default, the Sidebar video will appear at the left of the Presenter playback window (as shown in the first image above). You can hide the Sidebar or change its location by clicking the Theme tool and deselecting Show Sidebar (to hide it) or selecting Right or Left from the Location drop-down menu.


If you’d like to see the Sidebar video feature in action, check out this sample Adobe Presenter eLearning project. And if you’d like to learn how to use Adobe Presenter, check out our skills and drills workbook.
***
 Kevin Siegel, CTT, COTP, is the founder and president of IconLogic. Following a career in Public Affairs with the U.S. Coast Guard and in private industry, Kevin has spent decades as a technical communicator, classroom and online trainer, public speaker, and has written hundreds of computer training books for adult learners. He has been recognized by Adobe as one of the top trainers world-wide.
by Kevin Siegel, COTP
Inserting and editing video in Adobe Presenter is as easy as accessing the Adobe Presenter tab on the Ribbon and then clicking the Video tool. Once videos have been added to a PowerPoint slide, they can be manipulated just like any other PowerPoint object.
I received an email recently from a new Presenter developer. He wanted to insert a video, but instead of adding the video to the slide, he wanted it to appear to the left of the slide, above the Table of Contents. He had heard such a thing was possible but had been unable to find the feature.
The feature he was looking for is called Sidebar video and it’s shown in the image below. Adding Sidebar video to a project is simple and I was able to talk him through it with a quick email. If you’d like to learn how, follow these steps.

To begin, select a PowerPoint slide and then, on the Adobe Presenter tab, Insert group, click the Video tool and choose Import. (This will open the Adobe Presenter – Import Video dialog box.)


Select the video you’d like to use in the Sidebar and, from the lower right of the dialog box, select Sidebar video.

By default, the Sidebar video will appear at the left of the Presenter playback window (as shown in the first image above). You can hide the Sidebar or change its location by clicking the Theme tool and deselecting Show Sidebar (to hide it) or selecting Right or Left from the Location drop-down menu.


If you’d like to see the Sidebar video feature in action, check out this sample Adobe Presenter eLearning project. And if you’d like to learn how to use Adobe Presenter, check out our skills and drills workbook.
***
 Kevin Siegel, CTT, COTP, is the founder and president of IconLogic. Following a career in Public Affairs with the U.S. Coast Guard and in private industry, Kevin has spent decades as a technical communicator, classroom and online trainer, public speaker, and has written hundreds of computer training books for adult learners. He has been recognized by Adobe as one of the top trainers world-wide.
You must be logged in to post a comment.
- Most Recent
- Most Relevant


