Introduction to navigation within frames instead of slides: macro- versus micro-navigation. Includes a fun exercise to reinforce the learning, as preparation for advanced use cases.
Intro micro-navigation
Slides versus Frames
Slides
- Go to the next slide
- Go to the previous slide
- Jump to slide …
- Go to last slide visited

-
cpCmndGotoSlide can be used to replace the simple command ‘Jump to Slide’; beware: index starts with 0, whereas the index of cpInfoCurrentSlide starts with 1 (exceptional to make it possible to use in a progress indicator). If you want to restart a slide without re-entering the slide, you can use “Expression cpCmndGotoSlide = cpInfoCurrentSlide – 1”
-
cpCmndNextSlide is a Boolean variable with a default value of 0. With ‘Assign cpCmndNextSlide with 1″ has the same result as Go to the next slide
-
cpCmndPrevious is a Boolean variable with a default value of 0. With ‘Assign cpCmndPrevious with 1″ has the same result as Go to the previous slide
Frames

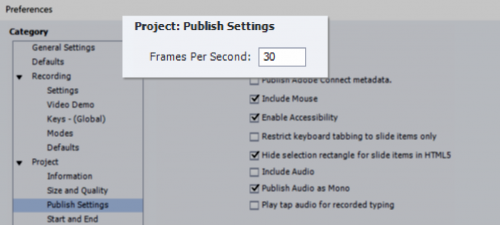
It is possible to change FPS rate in Preferences, Project Publish settings.

-
cpInfoCurrentFrame: your best friend when exploring Captivate’s timeline, debugging projects with advanced actions, micro-navigation etc. You’ll find that variable inserted in a text container quite often in my tutorials. You can watch an example in this interactive movie
-
cpInfoFPS: returns the FPS rate, by default set to 30 as explained above. This variable can be used in calculations (with Expression) to convert from seconds to frames.
-
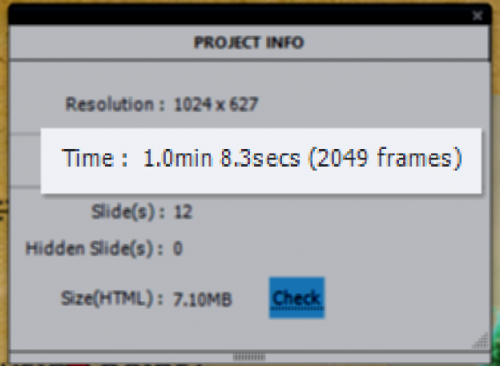
cpInfoFrameCount: similar to cpInfoSlideCount (total number of slides in project) it returns the total number of frames in the project. It can be used in combination with the previous variales to calculate to the total duration of the project (as shown in the TOC).
-
cpCmndGotoFrame can be used to jump to a frame using its frame number (similar to cpCmndGotoSlide); playhead will not be released, project remains paused.
-
cpCmndGotoFrameAndResume can be used to jump to a frame using its frame number and to release the playhead at the same time, project will continue.
Testing?
It is just a proposal: test out what you learned by creating a one-slide project, similar to the one visible at the start of this post and as thumbnail. Design is up to you, but this is required for the ‘exercise’:
- Replace ‘No action’ for the On Enter event of the slide by ‘Pause‘; the slide shouldn’t start playing automatically.
- Insert the system variable cpInfoCurrentFrame in a text container (example has it bottom right); that will allow you to track the location of the playhead. When starting the slide it will pause immediately, it will show 1 (although the system variable starts with 0, there is a small delay).
- You need two buttons: one for navigation forward, and one for navigation backwards. I used two shape buttons from the category Buttons, but replaced the action (see below). In the example they are at bottom center.
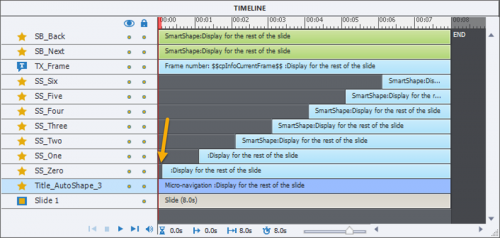
- A number of objects staggered on the timeline. In the example I have 7 shapes aligned in a row. They appear 1 second later than the previous one. All objects are timed for the Rest of the Slide. Result will be that the slide itself will have a duration that is longer (8secs in my case). To move an object on the timeline one second to the right: select the timeline of that object and use shortcut key CTRL-right (see Colors and Keys for Timeline). Here is a screenshot of the Timeline in my example:
 You see a small gap (0,1 sec) before the first object. Reason is the delay I mentioned before: playhead is stopped at frame 1, I don’ want that shape to appear immediately. Because this is a one slide project, I didn’t need to pause the slide at all, not even at the end. Both buttons have no pausing point as you can see in the Timeline.
Three events are used on this slide for actions:

- I already mentioned the On Enter event of the slide, which is set to ‘Pause’.
- The button SB_Next triggers a one-line advanced action that should look like this:

- The button SB_Back triggers a one-line advanced action similar to the previous one, but with the math operator for subtracting instead of adding.

Test! You’ll be ready for more advanced workflows with micronavigation. Watch out for a shared action that can be used in different situations: forcing full view of a slide on first visit, but not on later visits is one of the use cases.
Intro micro-navigation
Slides versus Frames
Slides
- Go to the next slide
- Go to the previous slide
- Jump to slide …
- Go to last slide visited

-
cpCmndGotoSlide can be used to replace the simple command ‘Jump to Slide’; beware: index starts with 0, whereas the index of cpInfoCurrentSlide starts with 1 (exceptional to make it possible to use in a progress indicator). If you want to restart a slide without re-entering the slide, you can use “Expression cpCmndGotoSlide = cpInfoCurrentSlide – 1”
-
cpCmndNextSlide is a Boolean variable with a default value of 0. With ‘Assign cpCmndNextSlide with 1″ has the same result as Go to the next slide
-
cpCmndPrevious is a Boolean variable with a default value of 0. With ‘Assign cpCmndPrevious with 1″ has the same result as Go to the previous slide
Frames

It is possible to change FPS rate in Preferences, Project Publish settings.

-
cpInfoCurrentFrame: your best friend when exploring Captivate’s timeline, debugging projects with advanced actions, micro-navigation etc. You’ll find that variable inserted in a text container quite often in my tutorials. You can watch an example in this interactive movie
-
cpInfoFPS: returns the FPS rate, by default set to 30 as explained above. This variable can be used in calculations (with Expression) to convert from seconds to frames.
-
cpInfoFrameCount: similar to cpInfoSlideCount (total number of slides in project) it returns the total number of frames in the project. It can be used in combination with the previous variales to calculate to the total duration of the project (as shown in the TOC).
-
cpCmndGotoFrame can be used to jump to a frame using its frame number (similar to cpCmndGotoSlide); playhead will not be released, project remains paused.
-
cpCmndGotoFrameAndResume can be used to jump to a frame using its frame number and to release the playhead at the same time, project will continue.
Testing?
It is just a proposal: test out what you learned by creating a one-slide project, similar to the one visible at the start of this post and as thumbnail. Design is up to you, but this is required for the ‘exercise’:
- Replace ‘No action’ for the On Enter event of the slide by ‘Pause‘; the slide shouldn’t start playing automatically.
- Insert the system variable cpInfoCurrentFrame in a text container (example has it bottom right); that will allow you to track the location of the playhead. When starting the slide it will pause immediately, it will show 1 (although the system variable starts with 0, there is a small delay).
- You need two buttons: one for navigation forward, and one for navigation backwards. I used two shape buttons from the category Buttons, but replaced the action (see below). In the example they are at bottom center.
- A number of objects staggered on the timeline. In the example I have 7 shapes aligned in a row. They appear 1 second later than the previous one. All objects are timed for the Rest of the Slide. Result will be that the slide itself will have a duration that is longer (8secs in my case). To move an object on the timeline one second to the right: select the timeline of that object and use shortcut key CTRL-right (see Colors and Keys for Timeline). Here is a screenshot of the Timeline in my example:
 You see a small gap (0,1 sec) before the first object. Reason is the delay I mentioned before: playhead is stopped at frame 1, I don’ want that shape to appear immediately. Because this is a one slide project, I didn’t need to pause the slide at all, not even at the end. Both buttons have no pausing point as you can see in the Timeline.
Three events are used on this slide for actions:

- I already mentioned the On Enter event of the slide, which is set to ‘Pause’.
- The button SB_Next triggers a one-line advanced action that should look like this:

- The button SB_Back triggers a one-line advanced action similar to the previous one, but with the math operator for subtracting instead of adding.

Test! You’ll be ready for more advanced workflows with micronavigation. Watch out for a shared action that can be used in different situations: forcing full view of a slide on first visit, but not on later visits is one of the use cases.
You must be logged in to post a comment.
- Most Recent
- Most Relevant
Thank you,LIlybiri. I’m trying to combine your idea with java script random geneated numers stuck in a variable. In the original tutorial there was an idea of using it to generate random slide to slide movement. But it should work nicely with micronavigation. I mean jumping to random elements within a slide on a timeline. If someone asks what for, I will answer that it is useful in gamification scenarios.
You’re welcome, hope you watch the first use case as well? It is a sequence of 3 posts, the first 2 already created:
https://elearning.adobe.com/2018/05/force-view-slide-first-visit/
https://elearning.adobe.com/2018/05/listen-narration-micro-navigation/
Sorry, Maybe I didn’t understand your question well, thought you were asking about shorter slides, but you talk about less slides. If you can use advanced/shared actions to make the total number of slides smaller, that will certainly make the project smoother and lighter. Too many times I still see duplicate slides, or having several almost identical slides which could have been managed with actions in one slide. Those ‘older’ workflows are sticky, but with the new hype of mobile devices which do not have the same powerful hardware, not the ideal connectivity, this should better change.
Piotr, I am just finishing the second use case, where frames are skipped on later visits to avoid the replay of an audio clip. If slides have audio, you are probably aware of the fact that the audio has to be loaded On Enter for each slide. Shorter audio clips will indeed result in smoother playing of the project, less waiting time. For graphics this is less important. But I find it also much easier to manage and edit shorter slides. I see too often very long slides when debugging, or doing consultancy jobs. Not a good practice, and that is even more important if you expect the project to play on mobile devices.


 You see a small gap (0,1 sec) before the first object. Reason is the delay I mentioned before: playhead is stopped at frame 1, I don’ want that shape to appear immediately. Because this is a one slide project, I didn’t need to pause the slide at all, not even at the end. Both buttons have no pausing point as you can see in the Timeline.


