 Newbie
13 posts
Newbie
13 posts
In this blog, you’ll learn how to make generic characters that come with Captivate into characters that represent your specific company or organization. With some basic photo editing skills and a hack that I’ll show you, it’s easy to get the look you want.
Captivate offers a lot of generic characters to use in your courses. But, what if you want your character to look like someone who works for your company or organization?
Easy. You can edit characters from one of the choices that come with Captivate (Assets –> Get Free eLearning Assets).

from this

to this

with a little bit of photo editing know-how.
Let me show you how!
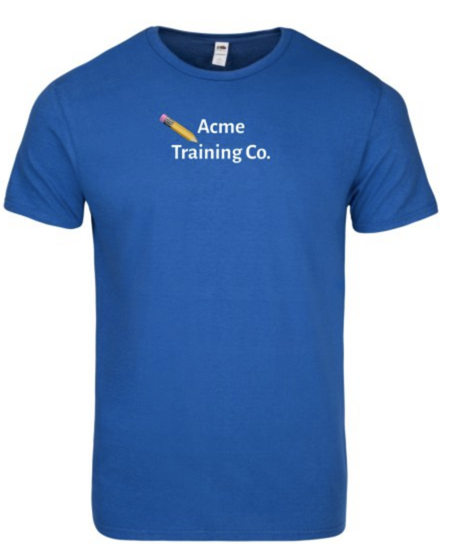
1. To get the t-shirt I wanted, I did a little hack. There are many sites that provide you with the tools to custom design T-shirts. All you need is your logo and the shirt color. For this example, I designed the shirt in Vistaprint.

2. I uploaded my logo with “Add Image” and then captured the image with Snagit.
3. Using photo editing software (I used Photoshop CC), I removed the neck line and white background.

4. To edit the character, Pavan, who is in Media –> Characters, first add him to your project so he shows up in your library, then right mouse click and select “Edit with…” If you’ve edited with Photoshop before, it will show up. Otherwise, you’ll have to browse for it this first time.

5. I imported the edited T-shirt on its own layer on top of Pavan , and with a little Photoshop editing know-how thanks mostly to Edit –> Transform –> Distort, I was able to get the t-shirt to fit pretty nicely on Pavan.
6. To get Pavan in his Acme Training Co t-shirt into this Captivate project, use File–> Import –> Photoshop File to retain roundtrip Photoshop editing.

That’s it. Have fun customizing your Captivate Characters. Please reach out with any questions or comments.
Captivate offers a lot of generic characters to use in your courses. But, what if you want your character to look like someone who works for your company or organization?
Easy. You can edit characters from one of the choices that come with Captivate (Assets –> Get Free eLearning Assets).
from this
to this
with a little bit of photo editing know-how.
Let me show you how!
1. To get the t-shirt I wanted, I did a little hack. There are many sites that provide you with the tools to custom design T-shirts. All you need is your logo and the shirt color. For this example, I designed the shirt in Vistaprint.
2. I uploaded my logo with “Add Image” and then captured the image with Snagit.
3. Using photo editing software (I used Photoshop CC), I removed the neck line and white background.
4. To edit the character, Pavan, who is in Media –> Characters, first add him to your project so he shows up in your library, then right mouse click and select “Edit with…” If you’ve edited with Photoshop before, it will show up. Otherwise, you’ll have to browse for it this first time.
5. I imported the edited T-shirt on its own layer on top of Pavan , and with a little Photoshop editing know-how thanks mostly to Edit –> Transform –> Distort, I was able to get the t-shirt to fit pretty nicely on Pavan.
6. To get Pavan in his Acme Training Co t-shirt into this Captivate project, use File–> Import –> Photoshop File to retain roundtrip Photoshop editing.
That’s it. Have fun customizing your Captivate Characters. Please reach out with any questions or comments.


You must be logged in to post a comment.
- Most Recent
- Most Relevant
Nice trick Alice. Thanks for sharing.
