 Newbie
6 posts
Newbie
6 posts
In this post, I’ll show you how to use variables to capture the user’s name and recall it later in the course.
To a new Captivate user, variables may be confusing. However, by incorporating variables, you can really open up some fun possibilities with Captivate. In this post, I’ll show you how to use variables to capture the user’s name and recall it later in the course.
Variables are a container that holds data. Data can consist of numbers or words. In this case, our data will be the user’s name, that they will enter. The allows you to personalize the course experience for the learner and address the learner by their name throughout your course.
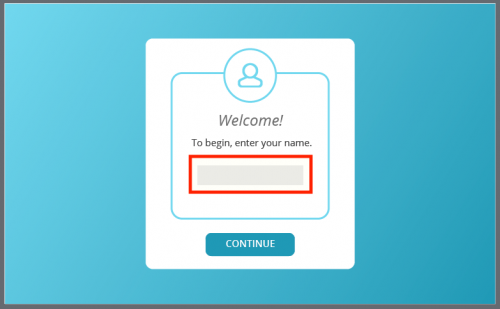
1. Create the slide where you want to capture the name.
I used a combination of smart shapes and created a button that will move us to the next slide.

2. Insert a text entry box. (Text> Text Entry Box)
With the text entry box selected:
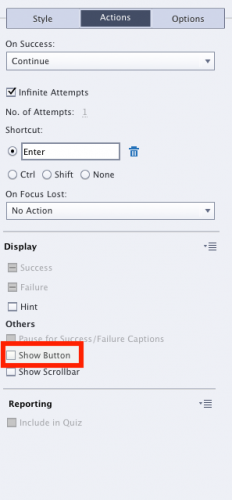
- In the Properties panel, under actions, uncheck ‘Show Button.’
- We don’t need this submit button because we created our own custom button.
- Style the text entry box to your liking.
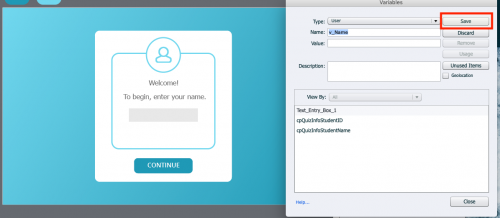
3. Create your variable that will hold the user’s name. (Project> Variables)
Name the variable v_name
- I always start my variables with v_ to make them easy to locate.
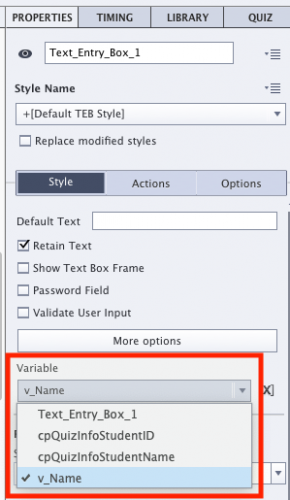
4. Apply the variable to the text entry box
With the text entry box selected:
- In the Properties panel, under style, change the default text entry box variable to your newly created variable ‘v_name.’
5. Create your remaining slides.
When you wish to use the name (variable), select the variable button to insert it in your text.


6. Preview your project and be amazed. You did it!

To a new Captivate user, variables may be confusing. However, by incorporating variables, you can really open up some fun possibilities with Captivate. In this post, I’ll show you how to use variables to capture the user’s name and recall it later in the course.
Variables are a container that holds data. Data can consist of numbers or words. In this case, our data will be the user’s name, that they will enter. The allows you to personalize the course experience for the learner and address the learner by their name throughout your course.
1. Create the slide where you want to capture the name.
I used a combination of smart shapes and created a button that will move us to the next slide.
2. Insert a text entry box. (Text> Text Entry Box)
With the text entry box selected:
- In the Properties panel, under actions, uncheck ‘Show Button.’
- We don’t need this submit button because we created our own custom button.
- Style the text entry box to your liking.
3. Create your variable that will hold the user’s name. (Project> Variables)
Name the variable v_name
- I always start my variables with v_ to make them easy to locate.
4. Apply the variable to the text entry box
With the text entry box selected:
- In the Properties panel, under style, change the default text entry box variable to your newly created variable ‘v_name.’
5. Create your remaining slides.
When you wish to use the name (variable), select the variable button to insert it in your text.
6. Preview your project and be amazed. You did it!


You must be logged in to post a comment.
- Most Recent
- Most Relevant
This is a great foundation to many more potential uses of variables! Thank you for the share.
Please visit this blog, where I showed the forgotten steps in this workflow:
https://elearning.adobe.com/2019/05/using-text-entry-boxes-basics/
Thanks for your input. While your blog post is much more technical, there are no forgotten steps in this workflow. It is simplified and it works exactly how it was intended. Anyone with questions can feel free to reach out to me.
Kari, I’m glad to see you contributing to the Adobe eLearning Community. This is a great article and a good example of using TEBs. I was not confused by your entry at all.
Great job. Thanks for the example!
You can turn off the Submit button, since it is a not-validated TEB. However the reason you mention is very confusing. Your button will not replace the Submit button at all, it has another functionality but is not a replacement. You didn’t talk about validated and non-validated TEB’s at all.
Sorry to sound so critical. Even a very basic blog can add value for other users, but it should not create confusion.
9 years old, but still visited blog:
http://blog.lilybiri.com/timesaving-tip-create-associated-variable-for
As for inserting Variables (which is the official term in Captivate, not custom variable) while defining the maximum length of the displayed value of the variable::
https://elearning.adobe.com/2018/11/understanding-using-system-variables-part-1/
It is highly recommended not to keep the generic name for the TEB associated variable. That is perfectly possible without much workarounds: use the X button next to the Variable field and you’ll be able to create a more meaningful name for the associated variable. That makes it a lot easier for use. Old trick which I posted many years ago but still valid. Will post some links in another comment (will have moderating delay).
