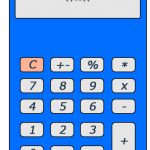
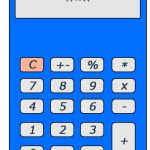
This post takes a look at getting the numbers functioning on the displays for our calculator.
In the last two posts, I presented a basic calculator and also a quick rundown on creating the framework – or really just the graphical elements of the calculator itself. In case you missed those, you may want to catch up – with the following links.
Part 1 – The Calculator
Part 2 – The Framework
In this post, I want to work through the code used to put the number buttons (0-9) on the display as well as the decimal as that is a part of the numbers.
Challenges
When I first got started on this project, I thought I would use the concatenate technique to populate the numbers to the display. Initially, this seemed to work OK as I played with whole numbers 1 through 9. The tricky part is that every number button press needs to update the same variable until a function button is pressed. Concatenation seemed a good fit for this. I ran into issues when it came time to add the zero or a decimal point though. What was odd is that with the zero – it was fine if the zero were part of a number such as 207 but would sometimes struggle with numbers like 0.007 where there were leading zeroes or 2000 where there were trailing zeroes. In some cases, Captivate merely stripped the zeroes and in other cases, they did not appear until the button was pressed a second time or until a number other than zero was press. So – for example, in typing 2005 – pressing zero the first time would result in just showing the 2, but pressing zero a second time both zeroes would appear. It was similar for the decimal point – for some reason it did not appear until pressing a number afterwards. So the behavior was not what I wanted it to be.
A second challenge was dealing with floating point math. Those pesky results when you start dealing with decimals in particular and suddenly an answer of 7 is displayed as 7.00000000000001 or some other crazy value. More on this when we cover the equals button.
Below, I present my solution which only performs a single calculation at a time. I was satisfied with that for the time being and will try to figure out how to make it so that you can do multiple sequential calculations somewhere in the future.
Displays
There are actually three displays which are represented by three different variables.
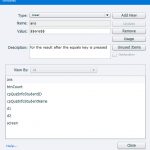
The variables are
- d1 – for the first number in the calculation
- d2 – for the second number in the calculation
- ans – for the result after the equals key is pressed
These variables are keyed into the smartshapes used for the displays as $$d1$$, $$d2$$, and $$ans$$. This way, the displays will update dynamically as the buttons are pressed.
Numbers 1 through 9
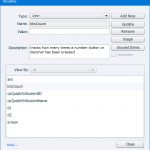
Each of these numbers has a similar code with a difference simply being the number being added to the variable. In this code you will find two more variables at work.
- btnCount – This tracks how many times a number button or decimal has been pressed
- screen – this flag is to help with differentiating between the first or second number in the calculation. We are simply on screen 1 or screen 2.
The btnCount variable was added to help limit the number of digits to that which would fit on the display. I thought it would give it a cleaner look.
The code for each number button 1 through 9 has essentially four parts – two for screen 1 and two for screen 2. Let’s examine the code for our number 1 button. Below are the first two parts that correspond to screen 1.
if ((window.screen==1) && (window.btnCount==0)) {
d1=””;
d1=d1+=”1″;
++btnCount;
}else if (window.screen==1) {
d1=d1+=”1″;
++btnCount;
}
In the first part above we are checking for two conditions.
- If we are on screen 1
- If no buttons have been pressed yet (by default the screen reads 0)
If these are both true – we clear the display (d1=””;) This gets rid of the initial zero on the display. Otherwise pressing the number 1 would show on the display as 01 instead of just 1.
Next, we add the number 1 to the d1 display (d1=d1+=”1″;) Notice that I put the 1 in quotes. This ended up being an important part of my solution. I needed to make sure that everything added to the displays was a string rather than a number. That does seem counter-intuitive but it was the key to making the zero and decimal work the way I wanted. Using the += we take the current value of d1 and append the number onto the end of it.
Finally, we increment the btnCount variable
The second part is an else if statement for when the first statement returns false. Here we are simply looking to see that we are on screen 1. You’ll notice that we are not clearing the display in this part. If btnCount does not equal zero – it means there are other numbers on the display and we don’t want to clear them. So we add the 1 to the end and increment our btnCount variable.
Next we can look at the two parts for screen two.
if ((window.screen==2) && (window.btnCount==0)) {
d2=””;
d2=d2+=”1″;
++btnCount;
}else if (window.screen==2) {
d2=d2+=”1″;
++btnCount;
}
You will notice they are exactly the same as the first two parts with the exception that we are now updating screen number two. So these would be in effect when it is time to update the second display. When a function button is pressed, we leave the first display value in place and then update the second using the same logic.
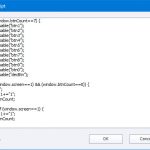
One additional piece that is included on the numbers 1-9 is that we are checking for that btnCount variable so that we cannot overpopulate the display.
if (window.btnCount==7) {
cp.disable(“btn1”);
cp.disable(“btn2”);
cp.disable(“btn3”);
cp.disable(“btn4”);
cp.disable(“btn5”);
cp.disable(“btn6”);
cp.disable(“btn7”);
cp.disable(“btn8”);
cp.disable(“btn9”);
cp.disable(“btn0”);
cp.disable(“decBtn”);
}
This block of code simply disables the number buttons so that you cannot enter more than eight characters. This code is placed at the top so that it runs first.
The Number Zero
The number zero had to be treated a little bit differently but ultimately it was simpler – only two parts needed – one for each of our two screens.
if ((window.screen==1) && (window.btnCount>=1)) {
d1=d1+=”0″;
++btnCnt;
}if ((window.screen==2) && (window.btnCount>=1)) {
d2=d2+=”0″;
++btnCount;
}
In both cases, we are checking which screen we are on and whether or not a button has been pressed. Remember, the default screen displays a zero so we only need to update the display if another button has already been pressed.
The number zero also includes the block of code for the btnCount check to disable the buttons as described above.
The Decimal
I struggled with the decimal for a while because it never wanted to show up until after a number was pressed and I wanted it to appear right away. So 5.7 would remain as 5 on the display until I pressed the 7. The same strategy as the numbers is used with the decimal and the issue goes away.
if (window.screen==1) {
d1=d1+=”.”;
cp.disable(“decBtn”);
++btnCount;
}if (window.screen==2) {
d2=d2+=”.”;
cp.disable(“decBtn”);
++btnCount;
}
With the decimal, we don’t need to check for any other buttons being pressed because if the decimal is the first button that is pressed, we want the leading zero to remain so there is no need to clear it. If the decimal is not the first button pressed we just add it anyway. What is different is that you see we are disabling the decimal button after it is pressed so that someone does not enter multiple decimals for a given number – that would not make any sense. The decimal button does need to include the check on the btnCount variable to disable the buttons since you could break the calculator by pressing the decimal as character number eight. The posted sample in part 1 did not include this yet as it was a bug I discovered after the original post.
Stay tuned for Part 4! We will take a look at some more code for other buttons.
I really appreciate you getting back to me. I do have the code, as presented above, attached to the 1 button with the “execute Java Script action chosen. I made sure to replace all of the quote marks as suggested (thank you for that tip). I have my smart shapes labeled with the double $$. Do I need to create/assign the btnCount and screen variables? Also, when I preview my project to test the 1 button the variable text still shows on the screen and when I press the 1 button nothing happens or changes. What step am I missing?
I have the 5 variables in the project. I am assuming I am making them incorrectly. The only time I get the $$d1$$ to not show on the screen is if I add 0 as the value for the d1 variable. I then get the number 0 displayed when I preview, but when I click the 1 button nothing changes. For the script window I have it ordered as you mentioned above the cp.disable code first, the if/else code for d1 and then the if else code for d2. Am I biting off my than I can chew for my skill level?
There should be three screens – do you have the first screen on top?
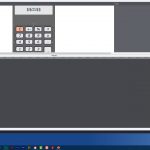
When all put together, the first numbers are added to the first screen currentDisplay1
You should make sure that is properly named and at the top of the stack.
If the variable is correctly made in Captivate under Project >> Variables, the smartshape should simply be blank or show the zero you have as its starting value.
If it still shows $$d1$$ in preview – it usually means you haven’t made the variable in Captivate
Also – keep in mind two things
- There is much going on and if you’re not incorporating all of it yet – there may be something missing that breaks function somewhere else.
- JavaScript is very fussy. A single typo is all it takes to break it.
I do have the three screens with the first display at the top of the stack. Do the three screens need to be grouped together? When I preview the project I am now getting the zero to display on the screen since I added that as the value for the d1 variable. The 1 button still does not display a one when clicked on the project preview.
Do I need to code every single button on the calculator for the button clicks to work? I just added the code for the 1 button to test and see if I had the code entered correctly.
From your screenshot it looks like you have your objects named the same as your variables.
Also, unless you changed the code to match, the name of each screen is
currentDisplay1
currentDisplay2
currentDisplayAns
no underscore.
You shouldn’t have to code all the buttons but they will all need to have the right names.
btn1
btn2
etc…
and the screen and btnCount variables will need to be made
If the JavaScript cannot find that object when it tries to run it – it will break.
You have $$ans$$ as the value for the ans variable.
Just leave it blank.
Your smartShape on the Captivate Stage is where you add $$ans$$ as text. That is the way you can display what the actual value of the variable is which, by definition, is changing.
Likewise for $$d1$$ and $$d2$$
It would be OK to set the value for d1 to be zero.
OK – Trying to think about this some more…
The code on each button begins by checking the values of screen and btnCount.
if ((window.screen==1) && (window.btnCount==0)) {
so let’s set your variable default values to be 1 for screen and 0 for btnCount.
OK – got this working just fine.
Here is what I did…
First of all – the screenshots you provided above were not what was in this file.
- I had to create the screen and btnCount variables
- I deleted the $$ans$$, $$d1$$, and $$d2$$ values for the variables
- I went through and retyped all the quote marks.
- the first line of code in the window for the JavaScript was missing and so it was broke.
- I renamed the button from one_button to btn1 to match the code
- I renamed the screens so that the object name was not the same as the variable name.
These were all things previously mentioned.
Jeffrey,
We have two things here. First of all, applying the code to each button just requires that you select Execute JavaScript for the button onSuccess action. You should find a button labeled Script_Window. Clicking that button should bring up a place for you to put the code.
Secondly, getting the variables to display is accomplished by placing the variable name between double dollar signs in your smartShape. In this example, I have a variable named d1 so in order for that variable value to appear on stage, I place the text $$d1$$ in my smartShape.
It is critical that you name your variables and objects the same way that I do in the write-ups. If you change any of them – that’s OK but it means you’ll have to update all the places where those variables or object names are referenced elsewhere in the code.
Also – if you happen to be doing a copy/paste of my code – you may need to go back and re-type all of the quotation marks. Pasting code from here to Captivate will often cause the quotes to be “smart quotes” instead of straight quotes and the code breaks.
I really appreciate you getting back to me. I do have the code, as presented above, attached to the 1 button with the “execute Java Script action chosen. I made sure to replace all of the quote marks as suggested (thank you for that tip). I have my smart shapes labeled with the double $$. Do I need to create/assign the btnCount and screen variables? Also, when I preview my project to test the 1 button the variable text still shows on the screen and when I press the 1 button nothing happens or changes. What step am I missing?
You must be logged in to post a comment.


