 Newbie
2 posts
Newbie
2 posts
In this walk through I will show you how I created a simple drag and drop activity using interactions. Initially when I tried setting this up I ran into some problems so I will walk you through the sets I used to avoid some of the issues and hopefully you are able to save some time in creating your own activity.
This is a simple drag and drop activity I have users place assets and liabilities in the correct location to demonstrate their ability to classify account types but you can do this with anything you want.
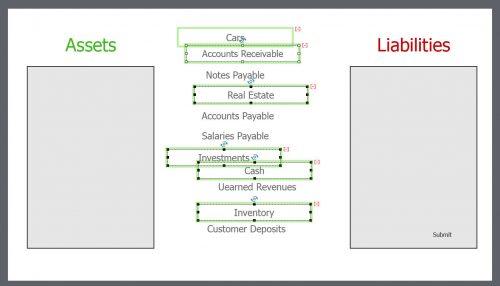
To get started, create a list of items you want to have the user drag into a location, and also the object(s) you want to have them drag to. In the example below I have created a list of account descriptions which I want the user to drag into the appropriate box to indicate it is either an asset or liability.

To insert the text boxes, click on the text drop-down on the ribbon and select text caption.
Type your description

To create an object, click on the Shapes menu and select the shape you want to create.

Now you have the slide set up, click on Interactions and drag down to drag and drop.The Drag and Drop Interaction Wizard will then open

Step 1
Create your types by clicking on the plus symbol shown below and typing in your new type description.

Holding Ctrl (Windows) or Cmd (Mac), click on all of one category and then select the corresponding type you just created.
Do the same for the next type and then click next.
Step 2
Specify the drop targets by clicking on the objects you created. Here I clicked on both rectangles. After doing so they should have a blue outline.
Click Next

Step 3
The sources or answer options will now have an arrow symbol inside of them. Grab one and drag it to the correct drop target.

After doing so, all source options previously categorized as that type will have an arrow pointing to the target you dragged to.
Match all options with corresponding targets the same way before clicking finish.

You will then see your drag and drop menu appear on the left of your screen as shown below.

Set your actions to how you want to set up your activity. Here I am giving infinite attempts and selected auto submit correct answers. Upon successful completion of the activity, I am it will continue to the next slide.
You can also choose to add undo and reset buttons if you wish to make these options available.
You will also see a text box appear in the center of the screen. There are actually two stacked on top of each other. One for success text and one for failure text. These will display upon either successful or unsuccessful completion of the activity.
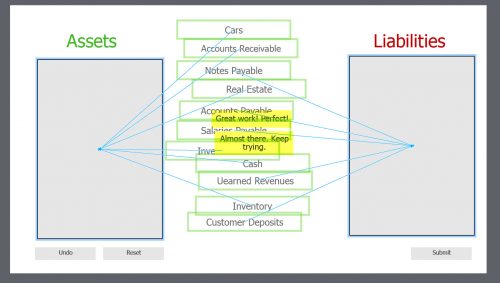
To edit these text boxes, drag one above the other and change the type to whatever you want to display.

By clicking on the target objects you will also have the option to change the format of how the answers are positioned once a user drags them into a target object. I like to change the position from the default “Anchor” to absolute so they keep the same position as they are dropped in the targets.
Each target object must be formatted independently so click on one, change the format and then do the same for the other(s).
If you wish to include reporting capabilities and include the score of the activity in a quiz you can do this from the actions tab after click on the target objects.

When you are finished, preview your drag and drop activity from the preview menu at the top.

To get started, create a list of items you want to have the user drag into a location, and also the object(s) you want to have them drag to. In the example below I have created a list of account descriptions which I want the user to drag into the appropriate box to indicate it is either an asset or liability.
To insert the text boxes, click on the text drop-down on the ribbon and select text caption.
Type your description
To create an object, click on the Shapes menu and select the shape you want to create.
Now you have the slide set up, click on Interactions and drag down to drag and drop.The Drag and Drop Interaction Wizard will then open
Step 1
Create your types by clicking on the plus symbol shown below and typing in your new type description.
Holding Ctrl (Windows) or Cmd (Mac), click on all of one category and then select the corresponding type you just created.
Do the same for the next type and then click next.
Step 2
Specify the drop targets by clicking on the objects you created. Here I clicked on both rectangles. After doing so they should have a blue outline.
Click Next
Step 3
The sources or answer options will now have an arrow symbol inside of them. Grab one and drag it to the correct drop target.
After doing so, all source options previously categorized as that type will have an arrow pointing to the target you dragged to.
Match all options with corresponding targets the same way before clicking finish.
You will then see your drag and drop menu appear on the left of your screen as shown below.
Set your actions to how you want to set up your activity. Here I am giving infinite attempts and selected auto submit correct answers. Upon successful completion of the activity, I am it will continue to the next slide.
You can also choose to add undo and reset buttons if you wish to make these options available.
You will also see a text box appear in the center of the screen. There are actually two stacked on top of each other. One for success text and one for failure text. These will display upon either successful or unsuccessful completion of the activity.
To edit these text boxes, drag one above the other and change the type to whatever you want to display.
By clicking on the target objects you will also have the option to change the format of how the answers are positioned once a user drags them into a target object. I like to change the position from the default “Anchor” to absolute so they keep the same position as they are dropped in the targets.
Each target object must be formatted independently so click on one, change the format and then do the same for the other(s).
If you wish to include reporting capabilities and include the score of the activity in a quiz you can do this from the actions tab after click on the target objects.
When you are finished, preview your drag and drop activity from the preview menu at the top.


You must be logged in to post a comment.
- Most Recent
- Most Relevant
You may have been lucky, but I had to instruct already many users not to overlap bounding boxes (c and d are indeed very close on my keyboard). Especially for newbie tutorials, that kind of possible issues origin should be avoided. Have created many tutorials.
As for Preview, I totally disagree. The output can be working for SWF, which is used for all the Preview methods except F11, and not be working for HTML5 output. If it works in this case, that is great but there is never a guarantee. It is very annoying that you cannot use real Preview methods with HTML5 output for a non-responsive project. I mostly turn on the TOC and enable navigation during testing to avoid having to navigate too much across slides. This si definitely a situation to be avoided.
BTW I never use the wizard for D&D, but it is logical that you showed it for this type of tutorial. Understand not mentioning the Object actions and (eventually) the existence of the InBuilt states is fine as well.
Having written many blogs about D&D, may I point out that you should avoid having overlapping bouncing boxes for drag sources and drop targets? I see a lot of overlapping in the screenshots, and that can be dangerous. You can stack drag sources, so that only the top one can be dragged, before the next one becomes visible. But partially overlapping is never a good idea.
I see from the screenshots that this is a non-responsive project. In that case, if you want HGTML5 output (which you should since EOL of Flash player is in the near future) you have to know that only the first Preview option Preview HTML5 in Browser is showing a temporary HTML5 output. The option you recommend ‘From this slide’ is showing SWF output, which can be different.
You talk about the global actions – in this case only the Success action. The real power of D&D is also in the Object actions, and the InBuilt states for all D&D objects.
D&D slides, set up as Knowledge Check slides (which is the case in your example) are reset automatically when leaving the slide. When set up as a scored quiz slide, that is not the case.
Thanks for your comments Lieve. I think you mean bounding boxes and not bouncing.
Stacking text boxes is completely optional and I have chosen to do this to give my slide a random look and to intentionally to point out the success and failure text boxes are created automatically and positioned on top of each other. With them stacked, it is not possible to see the lower layer response and a person may not even know they are there. I didn’t at first. When selecting them I do have to be careful but I also have never had any issues and the activity works and functions as it should.
As I mentioned, this is a tutorial for getting started with creating a Drag and Drop activity so I have also chosen not to dive too deep but instead focus on the big picture and cover the basics. My intention was to show people how I successfully created a Drag and Drop activity so they could make one themselves.
For me, previewing from the current slide appears the same as the HTML5 preview in my browser. I tested this before posting. The advantage is they don’t have to progress through all of the slides.
Thanks again for your comments!
