 Legend
245 posts
Legend
245 posts
Step-by-step workflow explaining the creation of a slider box for a project. A toggle button with states is used to slide the box in and out of slides.
Intro
This post is meant as an answer to a thread posted in the eLearning community. “I want to create a menu that slides on and off the screen, like a door that moves to the left and right, when the user clicks a button.” I invite you to read the comment by Greg Stager who is posting some links to blogs he wrote where JS is used to create slider solutions. As you know, I often try to use only Captivate features to solve similar use cases instead of JS. This is a new example. You’ll find a step-by-step workflow to recreate the example I show. The shape (which I use as ‘box’) is not having a menu, I invite you to (re-)read my post about Hyperlinks for the creation of a Dropdown menu. That way you can avoid creating multiple interactive objects in the ‘box’.
If you don’t feel up to create advanced actions, I have an offer at the end of the post as an alternative ![]()
Example
Watch this short file, three slides a title slide. The three slides have two buttons (from the Assets panel in 11.5): a Next button on top, and the Slide toggle button below it. You can use the toggle button as many times as you wish on a slide. To restart, refresh the browser.
Step-by-step workflow
Step 0: Next button on master slide
I used only one master slide in this project, which made it easy to put the Next button on that master slide. I kept the default option ‘Pause project until user clicks’ (Actions tab ). That will result in having each slide paused at its last frame.
Step 1: Sliding assets
Two assets have to be created and put on the first slide where you want to use the sliding box:
- Sliding Box: I used a rectangular shape, labeled SS_slider. You can add content to it, but make sure that you check the Options tab, because you will need both the size and the exact x/y coordinates. Here a screenshot of my setup, since it was in a non-responsive project you see both size and location in px. If it was a responsive project, it would have been in %. Put the box in the wanted position after sliding in.
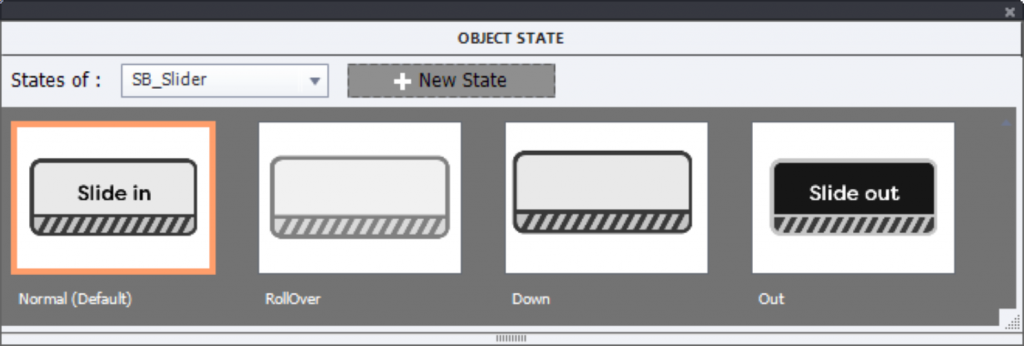
- Toggle button: (SB_Slider) will be used both for slide in and out. You need to create an extra custom state for this button, I labeled it Out. Remember that Rollover nor Down state can change when you switch from the Normal to the Out state, hence make those states neutral (I did not add text to them).
Time the Sliding Box and the Toggle button for the rest of the project, rest of the project, with the option ‘Always on top’. Screenshot of Timeline: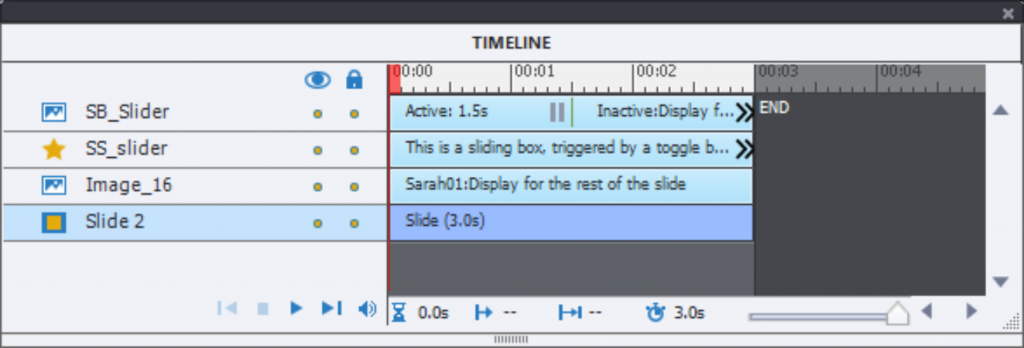
Step 2: Custom Out Effect
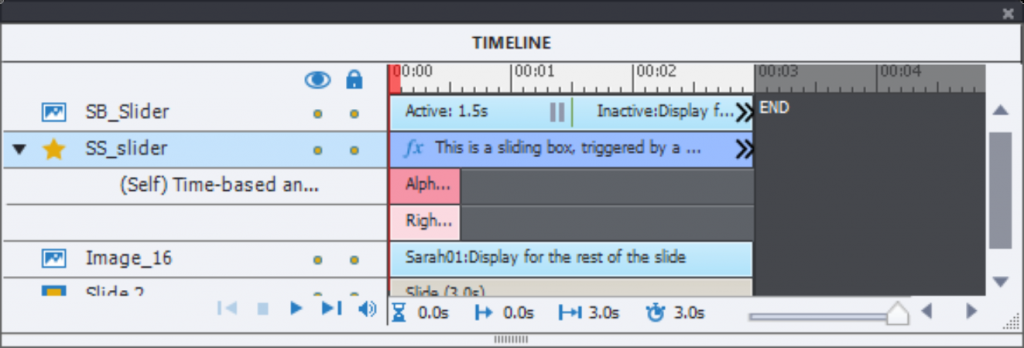
Create a time-based effect to get the sliding box out of the stage. Do not use an Exit effect, but a simple motion path. I added an AlphaFromTo effect as well (100% to 0%), and reduced the duration of both effects to 1 second.
Workflow to save this effect as a custom effect is described in detail in this post. Do use that method after you have done step 3:
Step 3: Create Guides
Show the Rulers (View menu) and create two vertical guides, through the start and end point of the motion path. See this screenshot:
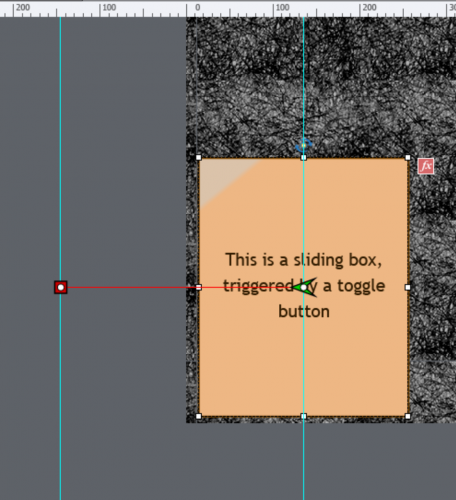
They will be needed to create the In Effect, to be exactly the opposite of the Out effect. Now you can save the custom effect, and take it out from the slider box.
If you didn’t use a horizontal motion path, you’ll need also horizontal guides. More information about the use of Rulers and Guides in this post.
Step 4: Move slider box in Out position
Use the guide in the scratch area to move the slider box to the correct position. I mostly use shortcut key (SHIFT or CTRL combined with left arrow) to keep that movement horizontal. For a non-horizontal movement, you use vertical and horizontal guide. You’ll see a screenshot of the new position in step 5
Step 5: Custom In Effect
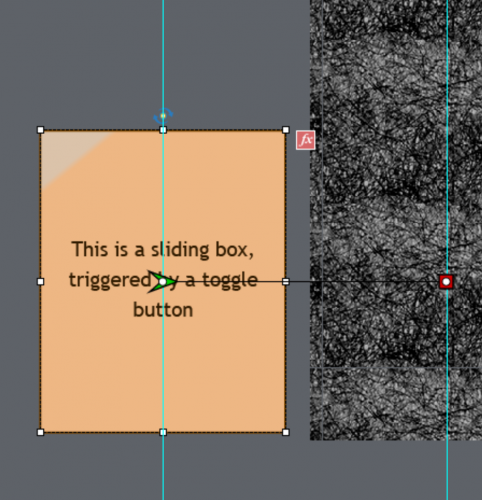
Create this effect using the two guides (or four if you needed also horizontal guides). In the screenshot you see this effect, where I combined a motion path effect with an AlphaFromTo effect (0 to 100%). Save the effect, same as for the Out custom effect.
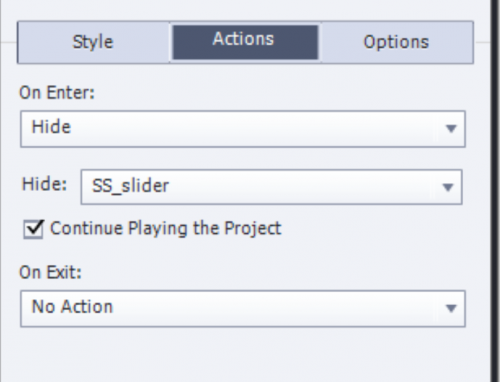
Step 6: Hide Slider box
Use the On Enter action of the slide to hide the Slider box.
Pause
Next three steps are bit tough, you could skip them and scroll immediately to the offer at the end.
Step 7: Variable v_slider
Create a user variable, which I named v_slider. It will be used to track the status of the Slider box: in or out? Similar logic you’ll be able to see for all the Toggle buttons in this older post.
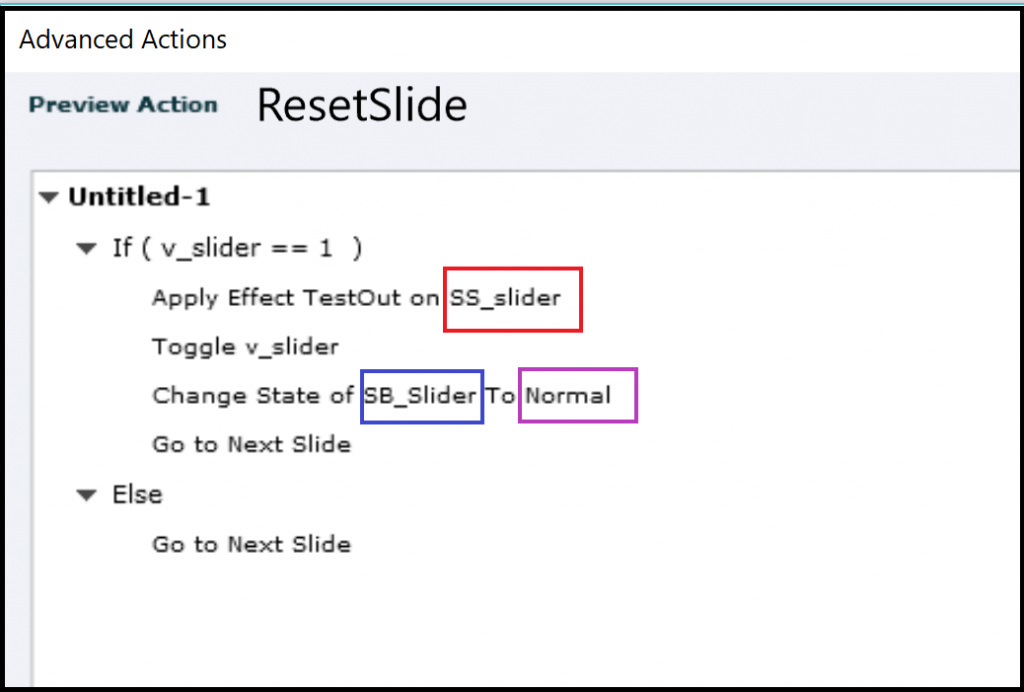
Step 8: Advanced Action ResetSlide
Create this (conditional) advanced action :
Step 9: Advanced Action ToggleSlider
Create this conditional action. Similar to the previous actin, I highlighted the 4 parameters in case of conversion to a shared action.

Step 10: Attach the actions to events
The action ResetSlide has to be triggered by the Success event of the Next button, whereas ToggleSlider has to be linked to the Success event of the toggle button.
Offert
You can obtain the described actions as shared actions for free, including a short explanation of how to use them. You could skip steps 7 to 9, but still have to do the other steps.
How? Visit my website (https://www.lilybiri.com), fill in the contact form with your request, and a small comment on my blogs or website. You’ll get everything by mail. I probably will post more offers in the near future, if you don’t want to hear about them, you can indicate that as well (I am European, honor the GDPR law).
Intro
This post is meant as an answer to a thread posted in the eLearning community. “I want to create a menu that slides on and off the screen, like a door that moves to the left and right, when the user clicks a button.” I invite you to read the comment by Greg Stager who is posting some links to blogs he wrote where JS is used to create slider solutions. As you know, I often try to use only Captivate features to solve similar use cases instead of JS. This is a new example. You’ll find a step-by-step workflow to recreate the example I show. The shape (which I use as ‘box’) is not having a menu, I invite you to (re-)read my post about Hyperlinks for the creation of a Dropdown menu. That way you can avoid creating multiple interactive objects in the ‘box’.
If you don’t feel up to create advanced actions, I have an offer at the end of the post as an alternative ![]()
Example
Watch this short file, three slides a title slide. The three slides have two buttons (from the Assets panel in 11.5): a Next button on top, and the Slide toggle button below it. You can use the toggle button as many times as you wish on a slide. To restart, refresh the browser.
Step-by-step workflow
Step 0: Next button on master slide
I used only one master slide in this project, which made it easy to put the Next button on that master slide. I kept the default option ‘Pause project until user clicks’ (Actions tab ). That will result in having each slide paused at its last frame.
Step 1: Sliding assets
Two assets have to be created and put on the first slide where you want to use the sliding box:
- Sliding Box: I used a rectangular shape, labeled SS_slider. You can add content to it, but make sure that you check the Options tab, because you will need both the size and the exact x/y coordinates. Here a screenshot of my setup, since it was in a non-responsive project you see both size and location in px. If it was a responsive project, it would have been in %. Put the box in the wanted position after sliding in.
- Toggle button: (SB_Slider) will be used both for slide in and out. You need to create an extra custom state for this button, I labeled it Out. Remember that Rollover nor Down state can change when you switch from the Normal to the Out state, hence make those states neutral (I did not add text to them).
Time the Sliding Box and the Toggle button for the rest of the project, rest of the project, with the option ‘Always on top’. Screenshot of Timeline:
Step 2: Custom Out Effect
Create a time-based effect to get the sliding box out of the stage. Do not use an Exit effect, but a simple motion path. I added an AlphaFromTo effect as well (100% to 0%), and reduced the duration of both effects to 1 second.
Workflow to save this effect as a custom effect is described in detail in this post. Do use that method after you have done step 3:
Step 3: Create Guides
Show the Rulers (View menu) and create two vertical guides, through the start and end point of the motion path. See this screenshot:
They will be needed to create the In Effect, to be exactly the opposite of the Out effect. Now you can save the custom effect, and take it out from the slider box.
If you didn’t use a horizontal motion path, you’ll need also horizontal guides. More information about the use of Rulers and Guides in this post.
Step 4: Move slider box in Out position
Use the guide in the scratch area to move the slider box to the correct position. I mostly use shortcut key (SHIFT or CTRL combined with left arrow) to keep that movement horizontal. For a non-horizontal movement, you use vertical and horizontal guide. You’ll see a screenshot of the new position in step 5
Step 5: Custom In Effect
Create this effect using the two guides (or four if you needed also horizontal guides). In the screenshot you see this effect, where I combined a motion path effect with an AlphaFromTo effect (0 to 100%). Save the effect, same as for the Out custom effect.
Step 6: Hide Slider box
Use the On Enter action of the slide to hide the Slider box.
Pause
Next three steps are bit tough, you could skip them and scroll immediately to the offer at the end.
Step 7: Variable v_slider
Create a user variable, which I named v_slider. It will be used to track the status of the Slider box: in or out? Similar logic you’ll be able to see for all the Toggle buttons in this older post.
Step 8: Advanced Action ResetSlide
Create this (conditional) advanced action :
Step 9: Advanced Action ToggleSlider
Create this conditional action. Similar to the previous actin, I highlighted the 4 parameters in case of conversion to a shared action.
Step 10: Attach the actions to events
The action ResetSlide has to be triggered by the Success event of the Next button, whereas ToggleSlider has to be linked to the Success event of the toggle button.
Offert
You can obtain the described actions as shared actions for free, including a short explanation of how to use them. You could skip steps 7 to 9, but still have to do the other steps.
How? Visit my website (https://www.lilybiri.com), fill in the contact form with your request, and a small comment on my blogs or website. You’ll get everything by mail. I probably will post more offers in the near future, if you don’t want to hear about them, you can indicate that as well (I am European, honor the GDPR law).


You must be logged in to post a comment.
- Most Recent
- Most Relevant
Thank you!
You’re welcome!
Thanks as always for putting a great tutorial together.
