 Legend
99 posts
Legend
99 posts
A custom digital character set for your use in projects.
This is the fourth and final post in this series of a custom digital font. Feel free to review the other related posts on this if you have not already.
In this post, I am sharing the project file and some tips.
The Project File
Remember – this is actually a series of image states with a particular naming convention. What you will get is a Captivate File (v11.5.0.476) with basically four items.
1. Red number set with a decimal, hyphen, and colon. There is an image for both a number as well as a number with a decimal point for both ease and spacing of crafting numbers.
2. Red alphanumeric set. This contains all of the states from the red number set plus 26 additional letter states.
3. Green number set with decimal, hyphen, and colon.
4. Green alphanumeric set.
All sets also contain a blank space. This is the default – so it looks like nothing is on the screen. I placed a box on the stage underneath each of the character sets for ease in locating.
Things to Know
1. All states are named using the same convention. char1, char2, charA, charB, etc
2. All special characters are named as follows. charSpace, charColon, charHyphen, charDot
3. All numbers with decimal included are named as follows. char1dot, char2dot, etc.
4. All states are exactly the same size. 72W x 100H
5. Remember – this is a 7 Segment font like you might see on a digital alarm clock. The Eight has all seven segments lit up. That means there are limitations to crafting letters.
Resizing Advice
Chances are good that you will want to use a size that is different than what is provided. Here is my advice to save time and trouble.
1. Open the font project in a separate tab.
2. Open a blank project in a separate tab.
3. Copy the character set of your choice from the font project.
4. Paste the set into the blank project.
5. Size the font to suit your project.
6. In the properties panel with options selected – click the little dropdown in the Transform section and select Apply to all items of this type (see pic).

7. Copy the character set
8. Paste the character set into your own project.
I do it this way so that any other items on your stage do not change or move in a way you do not want them to.
Object Naming Advice
When you actually place a character set into a project I would suggest a good naming system that can help you easily identify your object. Especially if you utilize more than one of them in a single project.
For example – With the Microwave (Part 1) – I used digit1, digit2, digit3, and digit4 to name each of the number positions in the clock.
In the digital signage (Part 2) – I had four rows with 9 character sets in each row. I named them simply a1 thru a9, b1 thru b9, c1 thru c9, and d1 thru d9.
This made it easy to find the character I needed changed.
Upcoming Project
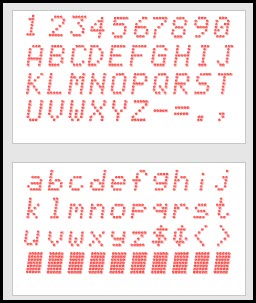
I know the alphabet with seven segments does not look great. I was going to offer a 14 segment font but decided to bypass that and go straight to a full LED display font. Here is a sneak peek at that. It will be more full featured with upper and lower case alphabet and several additional symbols.
I will share this when it is ready. In the mean time I look forward to seeing and hearing about the projects that you have made with this digital font set.
Here is the project file. For those of you with an older version of Captivate – my apologies.
sevenSegFont – 640KB
Enjoy!
This is the fourth and final post in this series of a custom digital font. Feel free to review the other related posts on this if you have not already.
In this post, I am sharing the project file and some tips.
The Project File
Remember – this is actually a series of image states with a particular naming convention. What you will get is a Captivate File (v11.5.0.476) with basically four items.
1. Red number set with a decimal, hyphen, and colon. There is an image for both a number as well as a number with a decimal point for both ease and spacing of crafting numbers.
2. Red alphanumeric set. This contains all of the states from the red number set plus 26 additional letter states.
3. Green number set with decimal, hyphen, and colon.
4. Green alphanumeric set.
All sets also contain a blank space. This is the default – so it looks like nothing is on the screen. I placed a box on the stage underneath each of the character sets for ease in locating.
Things to Know
1. All states are named using the same convention. char1, char2, charA, charB, etc
2. All special characters are named as follows. charSpace, charColon, charHyphen, charDot
3. All numbers with decimal included are named as follows. char1dot, char2dot, etc.
4. All states are exactly the same size. 72W x 100H
5. Remember – this is a 7 Segment font like you might see on a digital alarm clock. The Eight has all seven segments lit up. That means there are limitations to crafting letters.
Resizing Advice
Chances are good that you will want to use a size that is different than what is provided. Here is my advice to save time and trouble.
1. Open the font project in a separate tab.
2. Open a blank project in a separate tab.
3. Copy the character set of your choice from the font project.
4. Paste the set into the blank project.
5. Size the font to suit your project.
6. In the properties panel with options selected – click the little dropdown in the Transform section and select Apply to all items of this type (see pic).
7. Copy the character set
8. Paste the character set into your own project.
I do it this way so that any other items on your stage do not change or move in a way you do not want them to.
Object Naming Advice
When you actually place a character set into a project I would suggest a good naming system that can help you easily identify your object. Especially if you utilize more than one of them in a single project.
For example – With the Microwave (Part 1) – I used digit1, digit2, digit3, and digit4 to name each of the number positions in the clock.
In the digital signage (Part 2) – I had four rows with 9 character sets in each row. I named them simply a1 thru a9, b1 thru b9, c1 thru c9, and d1 thru d9.
This made it easy to find the character I needed changed.
Upcoming Project
I know the alphabet with seven segments does not look great. I was going to offer a 14 segment font but decided to bypass that and go straight to a full LED display font. Here is a sneak peek at that. It will be more full featured with upper and lower case alphabet and several additional symbols.
I will share this when it is ready. In the mean time I look forward to seeing and hearing about the projects that you have made with this digital font set.
Here is the project file. For those of you with an older version of Captivate – my apologies.
sevenSegFont – 640KB
Enjoy!


You must be logged in to post a comment.
- Most Recent
- Most Relevant
