 Legend
245 posts
Legend
245 posts
Explanation of the setup of the Sequence Check sample project.
Intro
I have posted an example file where the sequence of clicks is checked, under sample projects. The workflow started from an old post, created before the switch from SWF to HTML5 output, and having lot of new features added to more recent versions of Captivate. This blog will explain the setup of both example slides.
At the end, for those interested in choice between advanced and shared actions, will explain why shared actions couldn’t be used in this use case.
Setup
Variables
Similar to the old post I used only two user variables (to be created):
- v_counter: will track the number of clicks on interactive objects. It starts with a default value of 0. It is reused on the second sequence slide, by resetting to the default value using the On Enter action of that slide.
- v_correct: will track the number of correct clicks, set up with default value of 0 and re-used in the same way as the previous variable.
Multistate Objects
Instead of the hide/show workflow used in the original post, this time replaced it by multi-state objects to display the feedback. Object is labeled Tx_Display (for the Geo-slide) and Tx_DisplayBis (for the Keypad slide). Look at the screenshot of Object states of Tx_Display:
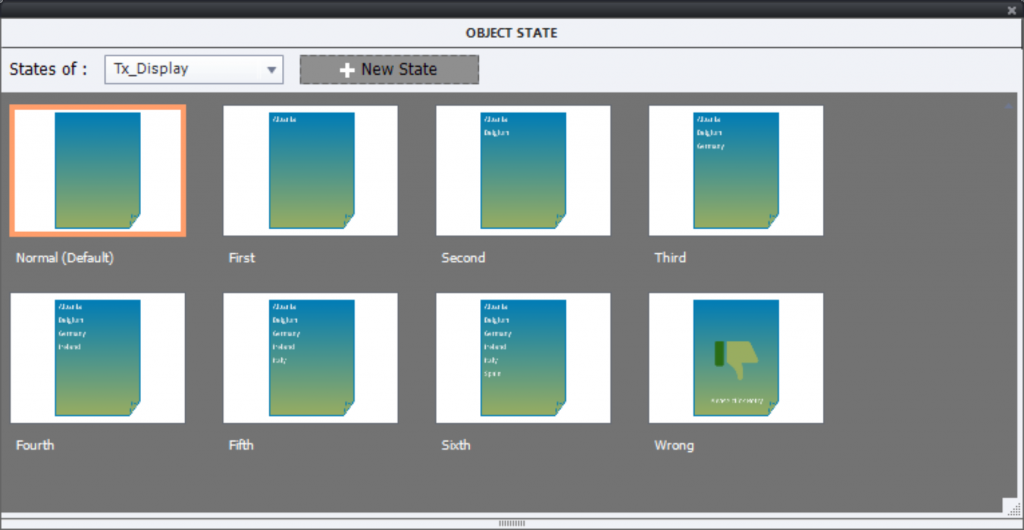
Normal state is empty (easy to reset, will be automatically reset when returning to the slide if ‘Retain State’ is unchecked). The 6 following states correspond with the correct sequence, hence their labeling. The last state is the Wrong state. The sequence of states is important, because I will be using the ‘Go to Next State’ command in the actions.
SVGs
If you follow my posts, you know that I am a big fan of the use of SVGs as image and interactive objects. In this case I used them mostly because they remain crisp at any resolution and lead to very small file size. The file size of the published project is less than 4MB. Almost half of that size is due to the bitmap images on the ready-to-go slides, and one PNG which I used for the Background of the Keypad. Look at the timelines of the sequence slides. I grouped the SVGs. Too bad that you cannot recognize the interactive object from the color (should be green), but they all have a pausing point set at 1.5secs:


The group Gr_Wrong on the Keypad groups all button SVGS which are not used in the pincode. Those buttons are on top of the image, and can be hidden, since the remaining keypad image shows them as well but in a non-interactive version. For the Geo slide, the colored country SVG buttons are also on top of a big SVG (Europe), but I don’t want the colored ones to disappear, for that reason the buttons will be disabled, not hidden (see advanced actions below).
Actions and events – Geo slide
The colored country SVG buttons trigger an advanced action On Success. There are 6 countries, which means 6 advanced actions (created with the duplicate function). The five first actions are similar to this one:
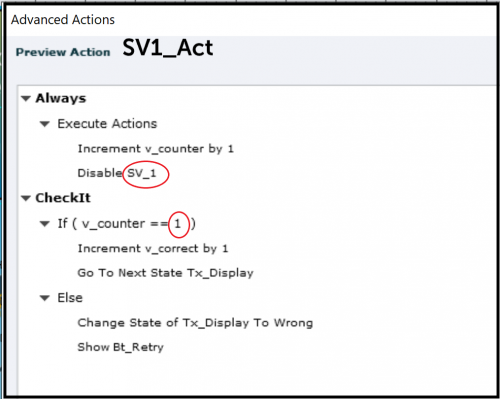
Only the items marked by a red oval have to be switched for the actions SV2….SV5. It is the name of the SVG button in the first decision, and the literal (number) in the second decision. If the clicked country is not fitting in the correct sequence, the learner sees the Wrong state in the text shape and the Retry button will appear.
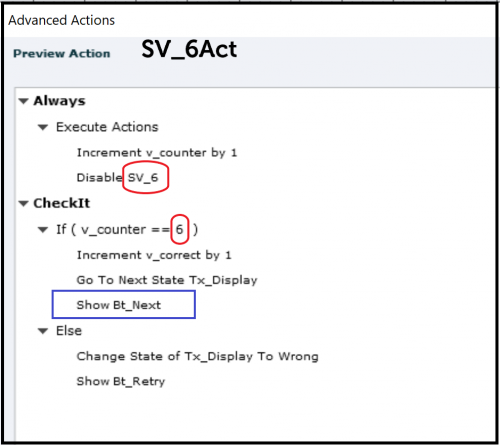
The last country SVG button has a slightly different action, derived from the previous. shown action. Reason: the Next button has to appear if the sequence was totally correct. That extra command is highlighted by a blue rectangle.
The Next button has the default command ‘Go to Next Slide’ on its Success event.
The Retry button has to reset everything, as you can see in this screenshot. Action is triggered by the Success event:

Actions and events – Keypad slide
Because of the re-use of the variables v_counter, v_correct and the button Bt_Next which is timed for the rest of the project, the On Enter event of this slide is used to reset everything to default values. If you want to allow going back to slides, a similar action would be needed for the Geo slide, but that was not the case in the example file. The On Enter action is pretty simple:
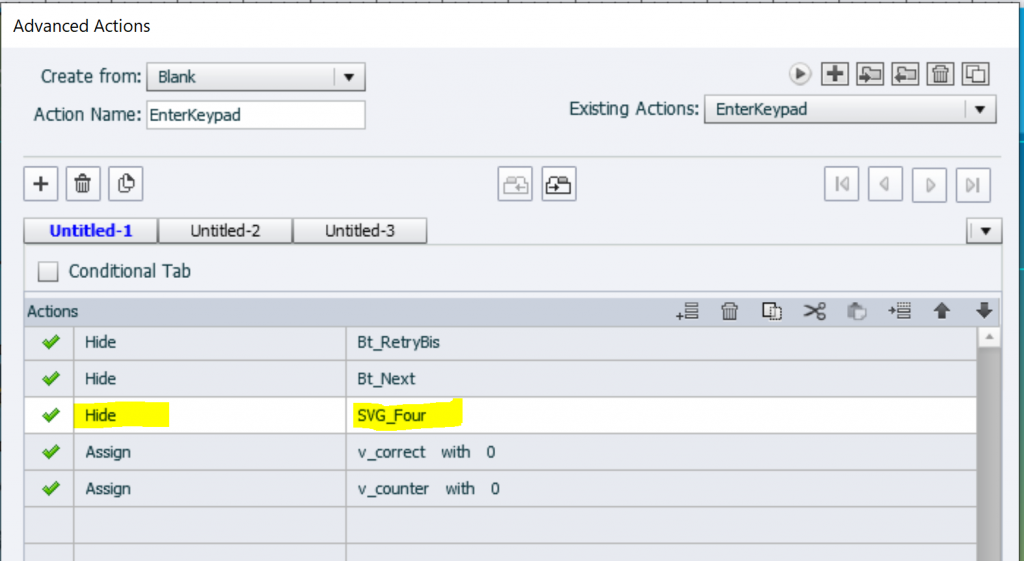
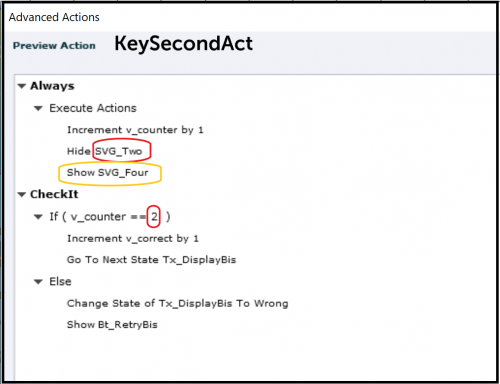
Some explanation may be needed for the Hide command which I highlighted. Since the required pincode (29791) needs the number ‘9’ twice (second and fourth position in the sequence) I have put two SVGs on top of each other: SVG_Two and SVG_Four. By default SVG_Two is visible, but SVG_Four is hidden and becomes visible With the same action where SVG_Two is hidden. You cannot have two interactive objects on top of each other when both are active at the same location.
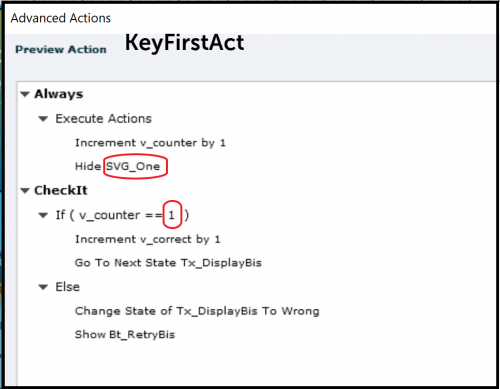
The Number buttons trigger an advanced action On Success. It is similar to the one in the Geo slide, except for using Hiding instead of disabling. Example of the first number button (which is 2):
As explained above, for SVG_Second (number 9) there is a slight difference:
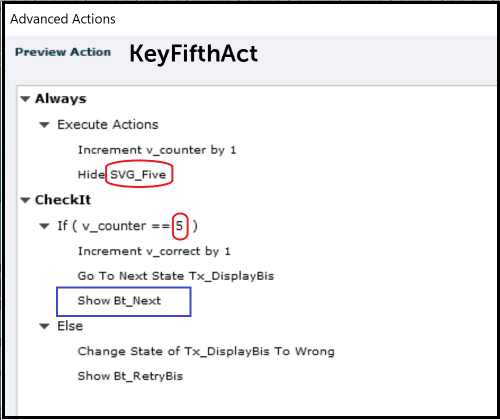
Similar to the Geo slide, the last correct button (number 1) will show the Next button if all was correct:
Any wrong number button will trigger this action using its Success event:

The new Retry button, labeled RetryBis is similar to the one on the Geo slide, triggers:
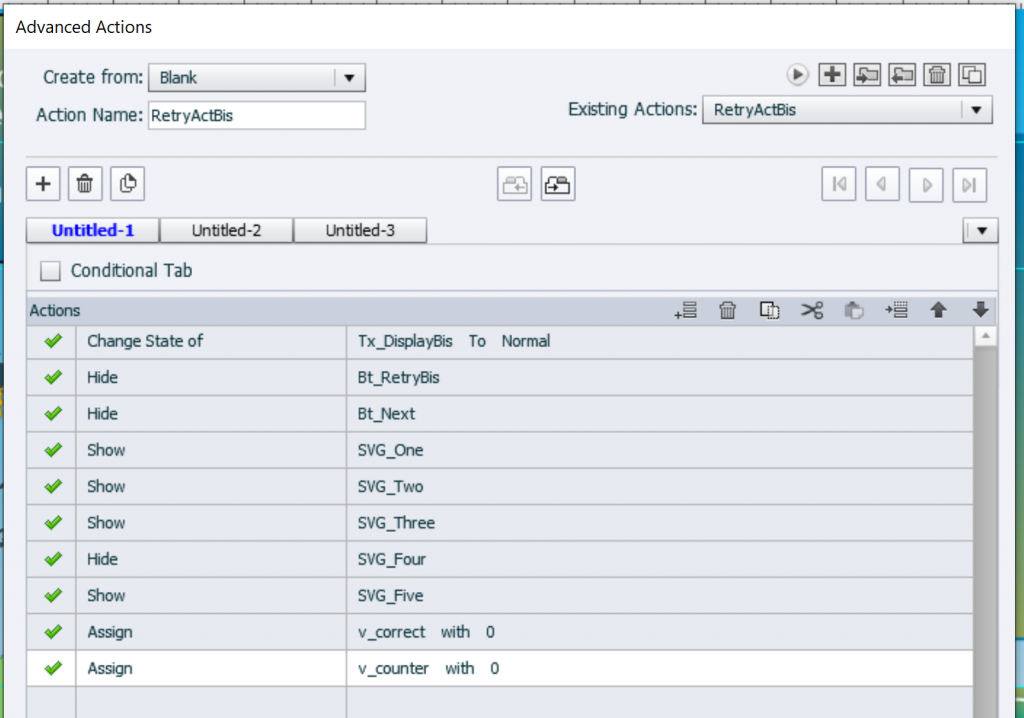
Remember that the SVG button Four is in the same location as Two, because both have the number 9. That is why SVG_Four has to be hidden and SVG_Two shown.
Why not use Shared Actions?
Although we have very similar actions for the SVG buttons, both on the Geo slide and on the Keypad slide, this is a typical use case where it is impossible to use shared actions. Problem are the ‘literals’, which should have been converted to parameters. Look at the screenshot of the action SV1_Act posted earlier. Logically these items should be parameters:
- The SVG button SV_1 – compulsory parameter in the first decision
- The literal ‘1’ in the condition of the second edition, not compulsory
- The multistate object Tx_Display, compulsory paraBt_Nextmeter in the second decision
- The state Wrong in the ELSE part of the second decision
- The button Bt_Next in the ELSE part of the second decision
Why is the literal a problem? Because it is also used in the Increment command. If you replace it by 2 for the second button, this will also be the case in the Increment command. I may have a workaround, but it is not always functional.
Second reason: with the workaround the parameters would increase to 6, which is my limit for a usable Shared action. Whereas using duplicate functionality for the advanced action is lot quicker, since only two items need to be edited.
This blog is already way too long. If you like to hear about my ‘thumb rules’ for choosing between duplicate advanced and shared actions, post a comment. Maybe I’ll dedicate another blog to it.
Intro
I have posted an example file where the sequence of clicks is checked, under sample projects. The workflow started from an old post, created before the switch from SWF to HTML5 output, and having lot of new features added to more recent versions of Captivate. This blog will explain the setup of both example slides.
At the end, for those interested in choice between advanced and shared actions, will explain why shared actions couldn’t be used in this use case.
Setup
Variables
Similar to the old post I used only two user variables (to be created):
- v_counter: will track the number of clicks on interactive objects. It starts with a default value of 0. It is reused on the second sequence slide, by resetting to the default value using the On Enter action of that slide.
- v_correct: will track the number of correct clicks, set up with default value of 0 and re-used in the same way as the previous variable.
Multistate Objects
Instead of the hide/show workflow used in the original post, this time replaced it by multi-state objects to display the feedback. Object is labeled Tx_Display (for the Geo-slide) and Tx_DisplayBis (for the Keypad slide). Look at the screenshot of Object states of Tx_Display:
Normal state is empty (easy to reset, will be automatically reset when returning to the slide if ‘Retain State’ is unchecked). The 6 following states correspond with the correct sequence, hence their labeling. The last state is the Wrong state. The sequence of states is important, because I will be using the ‘Go to Next State’ command in the actions.
SVGs
If you follow my posts, you know that I am a big fan of the use of SVGs as image and interactive objects. In this case I used them mostly because they remain crisp at any resolution and lead to very small file size. The file size of the published project is less than 4MB. Almost half of that size is due to the bitmap images on the ready-to-go slides, and one PNG which I used for the Background of the Keypad. Look at the timelines of the sequence slides. I grouped the SVGs. Too bad that you cannot recognize the interactive object from the color (should be green), but they all have a pausing point set at 1.5secs:
The group Gr_Wrong on the Keypad groups all button SVGS which are not used in the pincode. Those buttons are on top of the image, and can be hidden, since the remaining keypad image shows them as well but in a non-interactive version. For the Geo slide, the colored country SVG buttons are also on top of a big SVG (Europe), but I don’t want the colored ones to disappear, for that reason the buttons will be disabled, not hidden (see advanced actions below).
Actions and events – Geo slide
The colored country SVG buttons trigger an advanced action On Success. There are 6 countries, which means 6 advanced actions (created with the duplicate function). The five first actions are similar to this one:
Only the items marked by a red oval have to be switched for the actions SV2….SV5. It is the name of the SVG button in the first decision, and the literal (number) in the second decision. If the clicked country is not fitting in the correct sequence, the learner sees the Wrong state in the text shape and the Retry button will appear.
The last country SVG button has a slightly different action, derived from the previous. shown action. Reason: the Next button has to appear if the sequence was totally correct. That extra command is highlighted by a blue rectangle.
The Next button has the default command ‘Go to Next Slide’ on its Success event.
The Retry button has to reset everything, as you can see in this screenshot. Action is triggered by the Success event:
Actions and events – Keypad slide
Because of the re-use of the variables v_counter, v_correct and the button Bt_Next which is timed for the rest of the project, the On Enter event of this slide is used to reset everything to default values. If you want to allow going back to slides, a similar action would be needed for the Geo slide, but that was not the case in the example file. The On Enter action is pretty simple:
Some explanation may be needed for the Hide command which I highlighted. Since the required pincode (29791) needs the number ‘9’ twice (second and fourth position in the sequence) I have put two SVGs on top of each other: SVG_Two and SVG_Four. By default SVG_Two is visible, but SVG_Four is hidden and becomes visible With the same action where SVG_Two is hidden. You cannot have two interactive objects on top of each other when both are active at the same location.
The Number buttons trigger an advanced action On Success. It is similar to the one in the Geo slide, except for using Hiding instead of disabling. Example of the first number button (which is 2):
As explained above, for SVG_Second (number 9) there is a slight difference:
Similar to the Geo slide, the last correct button (number 1) will show the Next button if all was correct:
Any wrong number button will trigger this action using its Success event:
The new Retry button, labeled RetryBis is similar to the one on the Geo slide, triggers:
Remember that the SVG button Four is in the same location as Two, because both have the number 9. That is why SVG_Four has to be hidden and SVG_Two shown.
Why not use Shared Actions?
Although we have very similar actions for the SVG buttons, both on the Geo slide and on the Keypad slide, this is a typical use case where it is impossible to use shared actions. Problem are the ‘literals’, which should have been converted to parameters. Look at the screenshot of the action SV1_Act posted earlier. Logically these items should be parameters:
- The SVG button SV_1 – compulsory parameter in the first decision
- The literal ‘1’ in the condition of the second edition, not compulsory
- The multistate object Tx_Display, compulsory paraBt_Nextmeter in the second decision
- The state Wrong in the ELSE part of the second decision
- The button Bt_Next in the ELSE part of the second decision
Why is the literal a problem? Because it is also used in the Increment command. If you replace it by 2 for the second button, this will also be the case in the Increment command. I may have a workaround, but it is not always functional.
Second reason: with the workaround the parameters would increase to 6, which is my limit for a usable Shared action. Whereas using duplicate functionality for the advanced action is lot quicker, since only two items need to be edited.
This blog is already way too long. If you like to hear about my ‘thumb rules’ for choosing between duplicate advanced and shared actions, post a comment. Maybe I’ll dedicate another blog to it.


You must be logged in to post a comment.
- Most Recent
- Most Relevant
Although I posted the sample project days before this blog, it is still pending approval. If you want to see the example file, please use this link or visit my personal blog:
