Setup of the Game ‘Find Differences’ published as sample project.
Intro
I posted a sample project with a small game, using tons of SVGs extracted (with Illustrator) from one Adobe Stock image. For those interested in the workflow in Captivate, here is a short description of the setup. Maybe it can inspire you….
Setup
Objects and Timeline
SVGs reign as you can see in the screenshot of the Timeline panel of the game slide:
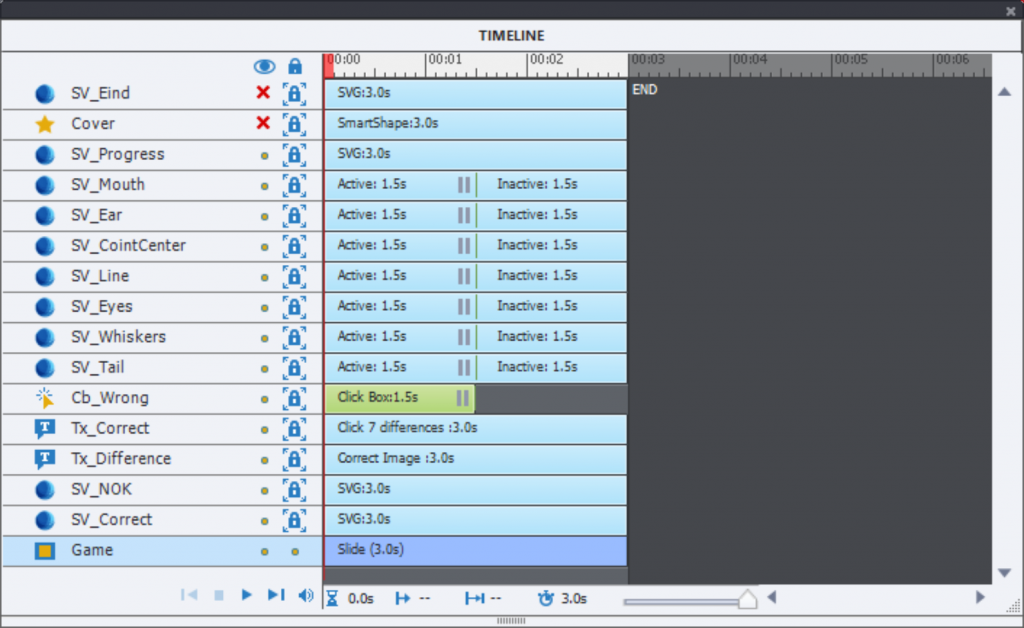
The stacking (z-order) of the objects is important. From bottom to top you see:
- Two instances of the same image (SV_Correct to the left and SV_NOK to the right.
- Two text containers which show the two titles (Tx_Correct and Tx_Difference).
- A click box CB_Wrong: it is important that this click box is below all other interactive objects, and that its pausing point is at the same time as the other ones (here 1.5secs).
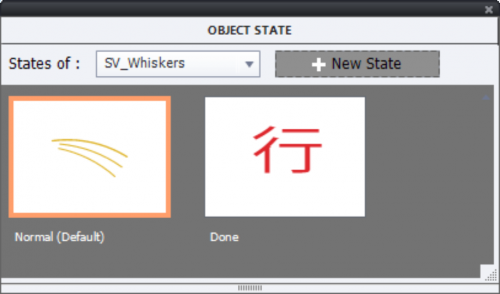
- Seven SVGs functioning as buttons. Those are the correct hotspots (if you want to cheat… look at the labels). They need to be on top of the click box, but the stacking sequence of those SVGs is not important. The Rollover and Down states of those SVGs have been deleted. One custom state ‘Down‘ has been added, contains the Chinese character for ‘OK’.

- A multistate object functioning as progress bar. The Normal state is invisible (Alpha set to 0), and you see all the states in this screenshot:
 Just a note: there are some display problems with SVGs in the present Captivate version, and that can make the previous screenshot bit confusing. Although the circles have the same size in all states, they seem to be smaller when more circles are present. Moreover something seems to be wrong with the C4 state: total width seems smaller than for the other states. Reason was that originally that state switched inadvertently to ‘Custom’, instead of Original.
In this use case it is very important that the option ‘Original’ size is forced for each state.

- A shape ‘Cover‘, which is rectangular filled with Solid dark gray, with Alpha = 70%.
- Final image ‘SV_Eind‘ (sorry for the Dutch label).
Variables
Two user variables were created:
- v_counter: with a start value of 0, will be incremented when a correct hotspot has been clicked.
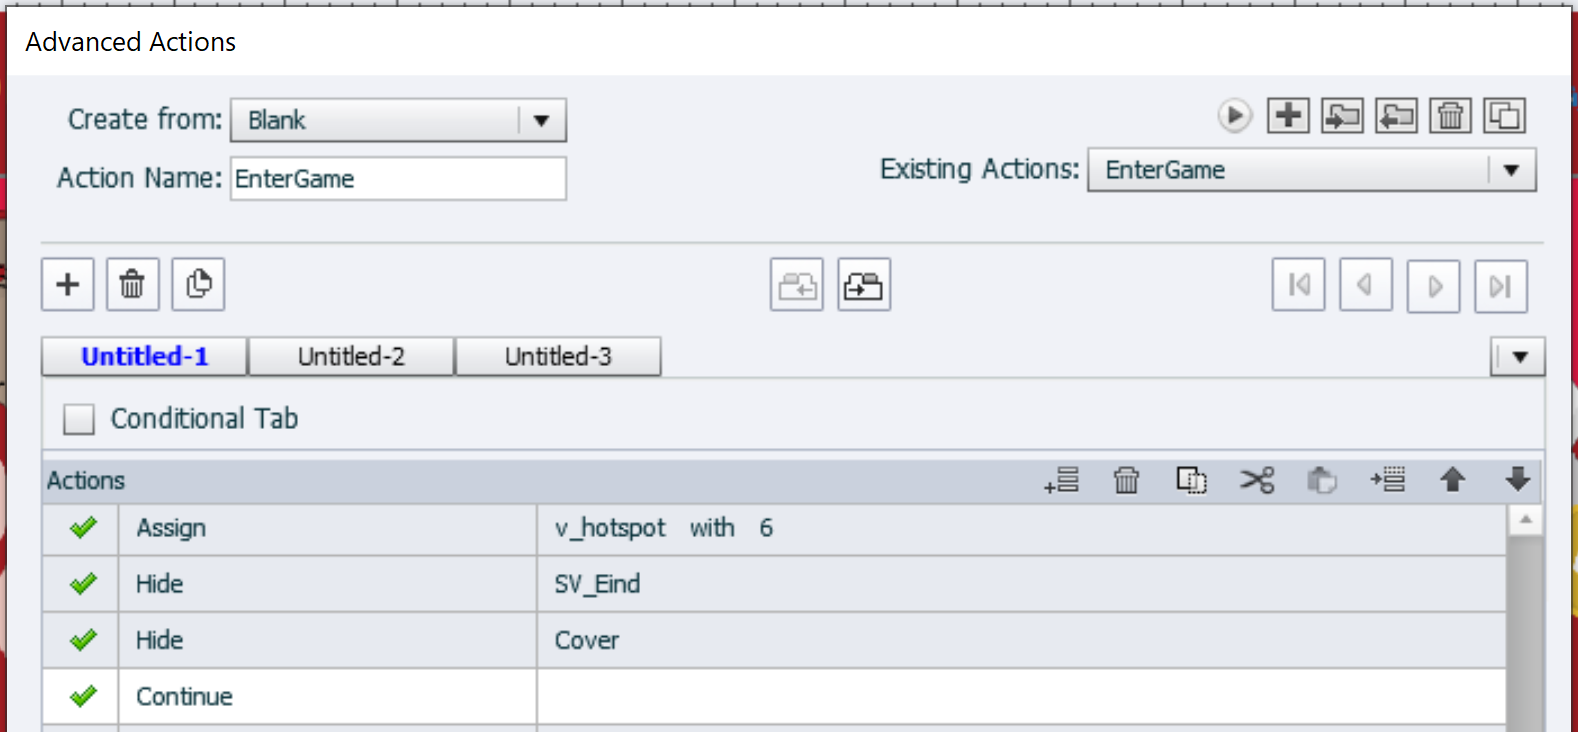
- v_hotspot: will be set to the number of hotspots minus 1; in this case it is set to 6 since there are 7 hotspots.
Advanced Actions
Two advanced actions are used:
EnterGame triggered by the On Enter event of the Game slide
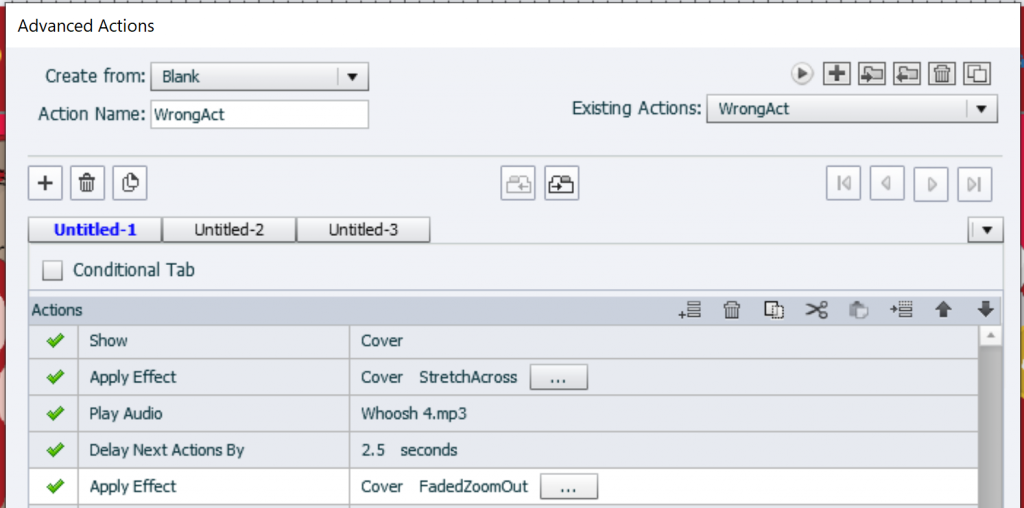
WrongAct triggered by the Success event of the Click box CB_Wrong
Another rather simple standard action, to let some audio play and have effects with the cover:
Shared Action ‘CorrectHotspot’ triggered by the SVG buttons (Success event)
The most important script for this game. Several actions happen when a correct hotspot is clicked:
- An effect is applied to emphasize the clicked SVG, in this example I used a ScaleTo effect.
- Secondary an audio clip is played (sort of congratulation)
- The hotspot needs to be disabled, to avoid having it clicked multiple times.
- To track the number of discovered hotspots, the counter variable needs to be incremented.
- Progress has to change in the indicator (yellow circles multistate object)
- When all hotspots have been found, the final image has to appear (with an effect).
This is a Preview of a filled in action, where the 5 necessary parameters are marked in a color rectangle:
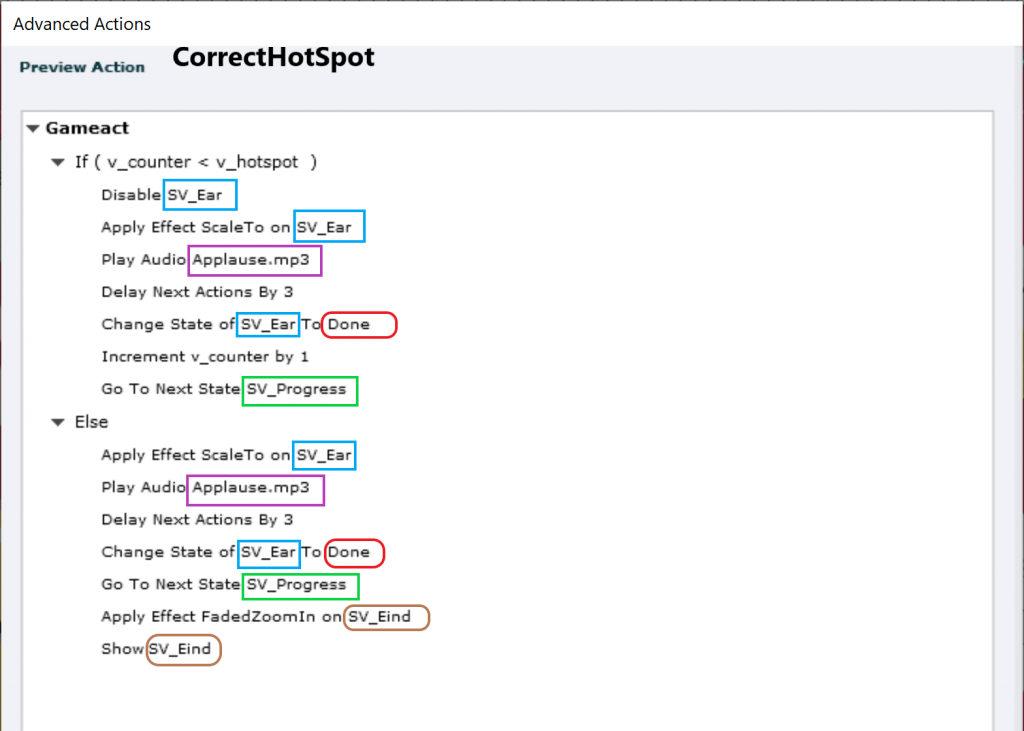
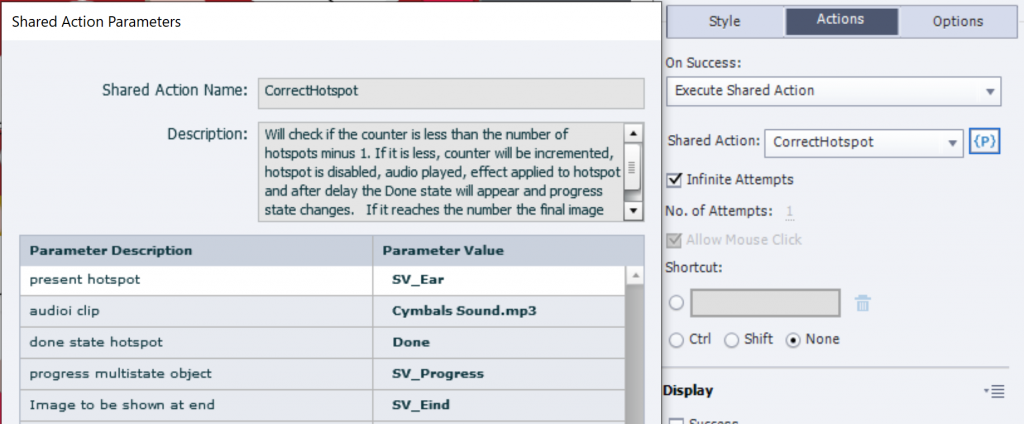
None of the candidate parameters need to be a parameter: the two variables (v_counter and v_hotspot) nor the literals. As I have emphasized many times, it can be tricky to define a literal as parameter. In this particular case it could have been possible to indicate the Delay time needed to listen to the audio clip being defined as parameter. That would be necessary if you want to use audio clips with very different lengths for the the individual hotspots. The parameters are visible in this screenshot:
Why shared action instead of duplicate advanced actions?
You can use exactly the same shared action if you have a different number of hotspots (differences). Just edit the action EnterGame to replace the value to be assigned to the variable v_hotspot. It is the reason I replaced the literal ‘6’ by a variable v_hotspot. Several parameters are used multiple times in the shared action: the name of the progress bar, the hotspot, the audio clip. When using duplicate advanced actions you would have to edit quite a lot.
One of the disadvantages is the fixed status of the applied Effects. If you want another effect, use the shared action as template for an advanced action, replace the effects and save it as a new Shared action. If you are new to shared actions: contrary to advanced actions it is perfectly possible to save a new action with the same name, provided the older one is no longer used.
Intro
I posted a sample project with a small game, using tons of SVGs extracted (with Illustrator) from one Adobe Stock image. For those interested in the workflow in Captivate, here is a short description of the setup. Maybe it can inspire you….
Setup
Objects and Timeline
SVGs reign as you can see in the screenshot of the Timeline panel of the game slide:

The stacking (z-order) of the objects is important. From bottom to top you see:
- Two instances of the same image (SV_Correct to the left and SV_NOK to the right.
- Two text containers which show the two titles (Tx_Correct and Tx_Difference).
- A click box CB_Wrong: it is important that this click box is below all other interactive objects, and that its pausing point is at the same time as the other ones (here 1.5secs).
- Seven SVGs functioning as buttons. Those are the correct hotspots (if you want to cheat… look at the labels). They need to be on top of the click box, but the stacking sequence of those SVGs is not important. The Rollover and Down states of those SVGs have been deleted. One custom state ‘Down‘ has been added, contains the Chinese character for ‘OK’.

- A multistate object functioning as progress bar. The Normal state is invisible (Alpha set to 0), and you see all the states in this screenshot:
 Just a note: there are some display problems with SVGs in the present Captivate version, and that can make the previous screenshot bit confusing. Although the circles have the same size in all states, they seem to be smaller when more circles are present. Moreover something seems to be wrong with the C4 state: total width seems smaller than for the other states. Reason was that originally that state switched inadvertently to ‘Custom’, instead of Original.
In this use case it is very important that the option ‘Original’ size is forced for each state.

- A shape ‘Cover‘, which is rectangular filled with Solid dark gray, with Alpha = 70%.
- Final image ‘SV_Eind‘ (sorry for the Dutch label).
Variables
Two user variables were created:
- v_counter: with a start value of 0, will be incremented when a correct hotspot has been clicked.
- v_hotspot: will be set to the number of hotspots minus 1; in this case it is set to 6 since there are 7 hotspots.
Advanced Actions
Two advanced actions are used:
EnterGame triggered by the On Enter event of the Game slide

WrongAct triggered by the Success event of the Click box CB_Wrong
Another rather simple standard action, to let some audio play and have effects with the cover:

Shared Action ‘CorrectHotspot’ triggered by the SVG buttons (Success event)
The most important script for this game. Several actions happen when a correct hotspot is clicked:
- An effect is applied to emphasize the clicked SVG, in this example I used a ScaleTo effect.
- Secondary an audio clip is played (sort of congratulation)
- The hotspot needs to be disabled, to avoid having it clicked multiple times.
- To track the number of discovered hotspots, the counter variable needs to be incremented.
- Progress has to change in the indicator (yellow circles multistate object)
- When all hotspots have been found, the final image has to appear (with an effect).
This is a Preview of a filled in action, where the 5 necessary parameters are marked in a color rectangle:

None of the candidate parameters need to be a parameter: the two variables (v_counter and v_hotspot) nor the literals. As I have emphasized many times, it can be tricky to define a literal as parameter. In this particular case it could have been possible to indicate the Delay time needed to listen to the audio clip being defined as parameter. That would be necessary if you want to use audio clips with very different lengths for the the individual hotspots. The parameters are visible in this screenshot:

Why shared action instead of duplicate advanced actions?
You can use exactly the same shared action if you have a different number of hotspots (differences). Just edit the action EnterGame to replace the value to be assigned to the variable v_hotspot. It is the reason I replaced the literal ‘6’ by a variable v_hotspot. Several parameters are used multiple times in the shared action: the name of the progress bar, the hotspot, the audio clip. When using duplicate advanced actions you would have to edit quite a lot.
One of the disadvantages is the fixed status of the applied Effects. If you want another effect, use the shared action as template for an advanced action, replace the effects and save it as a new Shared action. If you are new to shared actions: contrary to advanced actions it is perfectly possible to save a new action with the same name, provided the older one is no longer used.
You must be logged in to post a comment.


 Just a note: there are some display problems with SVGs in the present Captivate version, and that can make the previous screenshot bit confusing. Although the circles have the same size in all states, they seem to be smaller when more circles are present. Moreover something seems to be wrong with the C4 state: total width seems smaller than for the other states. Reason was that originally that state switched inadvertently to ‘Custom’, instead of Original.


