In-depth exploration of the roundtripping with Photoshop., with lot of tips to have a smoother workflow.
For ?
This blog is not meant for long-time users of Photoshop (and Captivate)! I am addressing Captivate developers who are collaborating with graphics designers using Photoshop. The roundtripping with Photoshop is a feature existing since many versions, and (at least to me) one of the best collaborations with CC applications. I have been using Photoshop since decades and Captivate since 2005.
Collaboration is always easier with good understanding. This blog will try to improve understanding between the Captivate developer and her/his team mate which is a Photoshop expert. You will learn some typical Photoshop terminology, about the two import workflows for native Photoshop files. Watching some typical examples can help you to make suggestions to your PS expert. Goal: make your Captivate use of their creative work more agreeable, and save time.
Photoshop terminology
Layers
As Captivate developer you are used to layer, as they appear in the Timeline panel (doubles as Layers panel). You probably use those layers for selection or for editing the stacking order (z-order) . You may also have locked layers and/or made them invisible on the stage for easy editing if you work with very crowded slides. Each layer in a cptx file can have only one object (in a cpvc-project it is bit different).
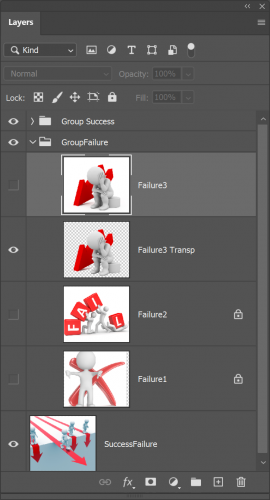 The screenshot here shows a typical Layers panel.
A layer in Photoshop is always static (not linked to a timeline) but it can have multiple objects on each layer. They have more functionality. Some examples:
- Mask on a layer can limit a region to which something is not applied.
- You can change the opacity of a layer (or part of it if masked).
- Photoshop can have special type of layers interacting with other layers (you’ll see an example below).
- The way pixels on layers interact can be changed by blending modes.
Like in Captivate, a layer can be locked and made invisible. In the screenshot layer ‘Failure3Trans is visible. Layers Failure1 and Failure2 are locked.
The active layer – like in Captivate – is the one you are busy editing. Grouping of layers is also possible. In the screenshot you see two groups of layers and one individual layer at the bottom.
Flattening
Normally in Photoshop this means that all layers will be merged into one layer.
However in the Captivate dialog box for importing a source Photoshop file (see below) the meaning is different. Only the ‘checked’ layers will be imported as one merged image. You will see a typical example in the last section.
Layer comps
A Photoshop document can have a multitude of layers of all kinds. Not all of them are content layers but I will not expand on that terminology. To make the decision which layers to import for a certain goal in Captivate sometimes very difficult. To make it easier, the Photoshop expert can define ‘comps’. You can see them as a filter: when you choose a comp, some layers will be made visible and checked off, while the other layers remain invisible. That way you’ll import exactly the right layers just by choosing a ‘comp’ name. You will see examples in the third section of this blog. Very useful!
Import Photoshop Source Document
You are probably used to import graphic assets using the Media button on the Big Button Bar. That is possible both for (bitmap) Image and SVG. You will not find an option under that button to import a PSD-file (PSD is the extension of a native Photoshop file). There are two possible ways to do so:
1. File, Import, Photoshop file (Shift-Alt-P)
Using this method will import both to the slide and the Project Library. Similar to importing images with Media button, on the stage it will be centered automatically both vertically and horizontally. In the Library you will see a new folder under the root. The folder has the same name as the Photoshop file, and includes what is imported.
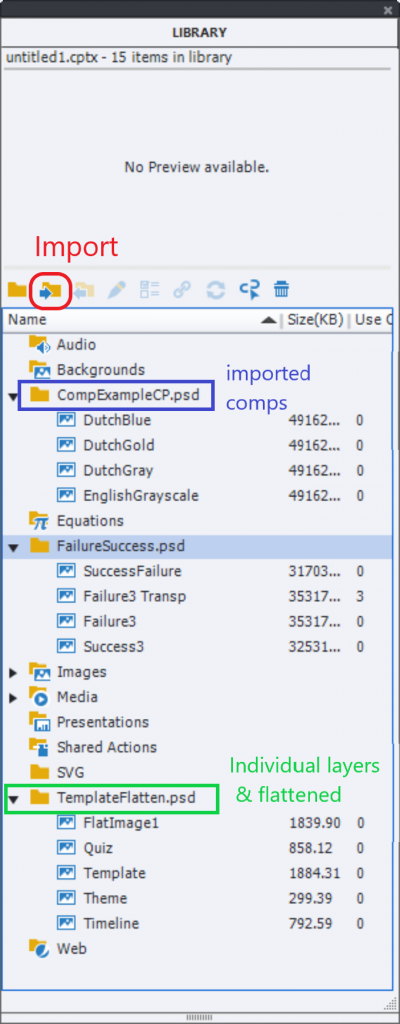
In the screenshot you see the Library with 3 imported Photoshop files: FailureSuccess – the file for which the layer panel was shown in the previous screenshot; CompExampleCP which will be shown as example for use of comps; TemplateFlatten which you’ll discover as an example for flattening and non-flattening in the example section.
2. Import button in Library
Using this workflow only export to the library, not to the stage. In the screenshot the Import button is indicated with a red rounded rectangle.
The result for the Library is the same as with the first workflow. New folders will be created. The level below the folders are all PNG images. You can drag those PNG-images to any slide and location.
Which of the two workflows is better, depends on the situation. Have a look at the example section, where I will indicate which workflow may be better for each example. Photoshop files can be designed for multiple purposes to be used in Captivate.
Examples
1. Photoshop file as ‘Library’
 The first screenshot (Terminology, Layersà with the Layers panel of ‘SuccessFailure’ is a typical example of what I mean by ‘Library’. Several images, each on their layer, are in one Photoshop file. In this example they have the same style. The Captivate developer can choose which images she/he likes best for the active project. Some of the images have a version with transparent, and another with white background (multiple background are possible of course).
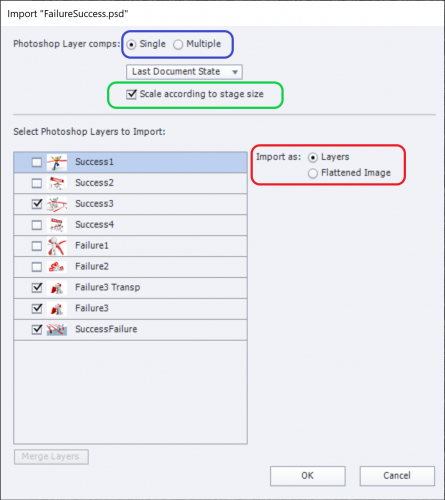
Another example which I saw several times with clients: Photoshop was used as layout tool, each of the slides were on a layer in Photoshop. That may be considered also as a PSD file of this ‘Library’ type. When you open the Import Dialog box, with one of the two workflows, it will look like the screenshot to the right:
- There are no comps, you leave it to ‘Simple’ (blue marker)
- There is only one option in the Dropdown list:’ Last Document state’. It means the state when the Photoshop document was closed in Photoshop.
- I recommend to check the option to scale (green), unless you have the images created exactly at the wanted size for use in Captivate (which is the best practice).
- You will see all the layers of the Photoshop document. You can check the layers you need to import.
- If you have multiple layers selected, you probably will not want them to merge to one image, since the images are choices, not part of a global image (red rectangle: Layers is the default setting).
- About the workflow: if you want more than one layer Workflow 2 (Import button) is recommended here. If you choose Workflow 1 (file menu) all layers will be converted to PNG images AND inserted all in the center of the slide. Not what you want. Use workflow 1 only when you import one layer.
2. Flattening or not?

To the left you see the Layers panel (Photoshop) of the file ‘TemplateFlatten”.
This file has 3 image layers which were extracted from 1 bitmap image. Each of them is exactly on the location as in the original bitmap image. I added a ‘template’ layer which can eventually be imported and used to restore the original combined image. But in most cases that will not be necessary.
In this case I recommend Workflow 1, whether you want to import the individual layers as PNGs (Layers in the Import dialog box) or the combined image by checking the option ‘Flattened’.
Reason: when the image are imported to the stage, they will in the correct (relative) location. When you import them only to the Library, you’ll need to use the Template to position the individual PNGs in the correct location.
Look back at the Library panel (Captivate) in the section ‘Import’: the four layers were imported as layers, and in a second process the flattened image was imported as well. That flattened image will be posted automatically in the correct library folder, and gets a generic name (FlatImage1) which you can edit of course.
3 Use of Comps
In the second example I used the same image. Each of the images has a text on the head scarf. The color of the images is gold. I wanted to make this file more flexible in two ways:
- To have another ‘hue’ for the images, so that it better fits with a project color scheme.
- To be used with the Texts in multiple languages.
That has led to a lot more layers, since text had to be on a separate layer (make it also editable), and to change the hue I used Adjustment layers which are a non-destructive way to change the ‘look’ of the layers below. In the screenshot below you see text layers in two languages (English and Dutch) and 3 adjustment layers on top. To keep it manageable for this blog, I kept only the global image, not the individual ones. Next to the layers panel you see the Layer Comps panel. Each of those comps defines a situation. Presently ‘DutchSepia’ is active and reflected in the Layers panel: the visible layers (eye icon) are needed for this look, with Dutch text on the scarfs and a Sepia adjustment layers.

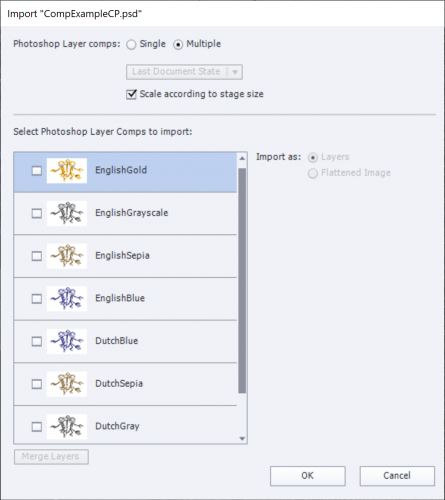
Captivate makes it really easy to import the wanted ‘comp’. Kudos to the team! In most instances you will want to import one comp, and it is possible with two different setups of the Import Dialog box.
In the left screenshot, next to ‘Photoshop Layer Comps’ the option ‘ Multiple’ is checked. If the comps were labeled well, you can easily select the wanted comp to import. It will be imported always as Flattened. The options for ‘Import as:’ are dimmed.
The result of comps import is visible in the Project Library screenshot (Import section). You see that I repeated the import process 4 times, because 4 comps are available, each being a merged image from the layers visible in that comp filter.
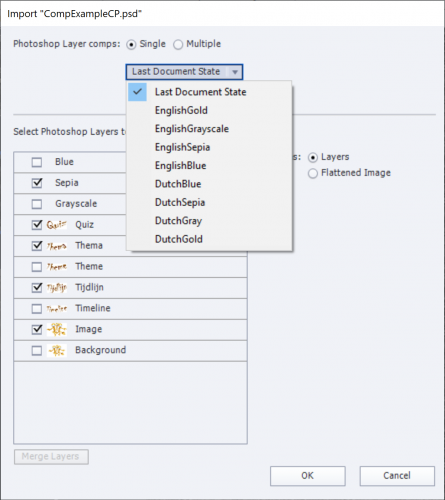
Second possibility is to keep the Single radiobutton checked next to ‘Photoshop Layer comps’. Have a look at the screenshot to the right which shows that situation.
Open the dropdown list under ‘Last Document State’ and you will see all the available comps.
Advantage of this second workflow is that you can see which Photoshop layers are selected for import. You could eventually edit those selections, but be careful. You can import layers in this case as well, but I would not recommend that if adjustment layers are used. They cannot be imported into Captivate, only the real images.
Since you will mostly import only one comp the choice for the Import workflow is free, whether with File, Import or with the Import button in the Library.
Updating
Not mentioned so far, because you’ll find this in all blogs and video about Photoshop roundtripping. The ‘green’ checkmark next to the Photoshop folder, which indicates that the original PSD-file is in synch with Captivate. If your Photoshop expert updates that file in any way: adding layers, editing content on one or more layers, correcting typos in the text layers this will be reflected in Captivate by a color change in that round checkmark. Clicking the red checkmark will allow you to update and have the changes automatically be imported and applied in Captivate.
For ?
This blog is not meant for long-time users of Photoshop (and Captivate)! I am addressing Captivate developers who are collaborating with graphics designers using Photoshop. The roundtripping with Photoshop is a feature existing since many versions, and (at least to me) one of the best collaborations with CC applications. I have been using Photoshop since decades and Captivate since 2005.
Collaboration is always easier with good understanding. This blog will try to improve understanding between the Captivate developer and her/his team mate which is a Photoshop expert. You will learn some typical Photoshop terminology, about the two import workflows for native Photoshop files. Watching some typical examples can help you to make suggestions to your PS expert. Goal: make your Captivate use of their creative work more agreeable, and save time.
Photoshop terminology
Layers
As Captivate developer you are used to layer, as they appear in the Timeline panel (doubles as Layers panel). You probably use those layers for selection or for editing the stacking order (z-order) . You may also have locked layers and/or made them invisible on the stage for easy editing if you work with very crowded slides. Each layer in a cptx file can have only one object (in a cpvc-project it is bit different).
 The screenshot here shows a typical Layers panel.
A layer in Photoshop is always static (not linked to a timeline) but it can have multiple objects on each layer. They have more functionality. Some examples:
- Mask on a layer can limit a region to which something is not applied.
- You can change the opacity of a layer (or part of it if masked).
- Photoshop can have special type of layers interacting with other layers (you’ll see an example below).
- The way pixels on layers interact can be changed by blending modes.
Like in Captivate, a layer can be locked and made invisible. In the screenshot layer ‘Failure3Trans is visible. Layers Failure1 and Failure2 are locked.
The active layer – like in Captivate – is the one you are busy editing. Grouping of layers is also possible. In the screenshot you see two groups of layers and one individual layer at the bottom.
Flattening
Normally in Photoshop this means that all layers will be merged into one layer.
However in the Captivate dialog box for importing a source Photoshop file (see below) the meaning is different. Only the ‘checked’ layers will be imported as one merged image. You will see a typical example in the last section.
Layer comps
A Photoshop document can have a multitude of layers of all kinds. Not all of them are content layers but I will not expand on that terminology. To make the decision which layers to import for a certain goal in Captivate sometimes very difficult. To make it easier, the Photoshop expert can define ‘comps’. You can see them as a filter: when you choose a comp, some layers will be made visible and checked off, while the other layers remain invisible. That way you’ll import exactly the right layers just by choosing a ‘comp’ name. You will see examples in the third section of this blog. Very useful!
Import Photoshop Source Document
You are probably used to import graphic assets using the Media button on the Big Button Bar. That is possible both for (bitmap) Image and SVG. You will not find an option under that button to import a PSD-file (PSD is the extension of a native Photoshop file). There are two possible ways to do so:
1. File, Import, Photoshop file (Shift-Alt-P)
Using this method will import both to the slide and the Project Library. Similar to importing images with Media button, on the stage it will be centered automatically both vertically and horizontally. In the Library you will see a new folder under the root. The folder has the same name as the Photoshop file, and includes what is imported.
In the screenshot you see the Library with 3 imported Photoshop files: FailureSuccess – the file for which the layer panel was shown in the previous screenshot; CompExampleCP which will be shown as example for use of comps; TemplateFlatten which you’ll discover as an example for flattening and non-flattening in the example section.
2. Import button in Library
Using this workflow only export to the library, not to the stage. In the screenshot the Import button is indicated with a red rounded rectangle.
The result for the Library is the same as with the first workflow. New folders will be created. The level below the folders are all PNG images. You can drag those PNG-images to any slide and location.
Which of the two workflows is better, depends on the situation. Have a look at the example section, where I will indicate which workflow may be better for each example. Photoshop files can be designed for multiple purposes to be used in Captivate.
Examples
1. Photoshop file as ‘Library’
 The first screenshot (Terminology, Layersà with the Layers panel of ‘SuccessFailure’ is a typical example of what I mean by ‘Library’. Several images, each on their layer, are in one Photoshop file. In this example they have the same style. The Captivate developer can choose which images she/he likes best for the active project. Some of the images have a version with transparent, and another with white background (multiple background are possible of course).
Another example which I saw several times with clients: Photoshop was used as layout tool, each of the slides were on a layer in Photoshop. That may be considered also as a PSD file of this ‘Library’ type. When you open the Import Dialog box, with one of the two workflows, it will look like the screenshot to the right:
- There are no comps, you leave it to ‘Simple’ (blue marker)
- There is only one option in the Dropdown list:’ Last Document state’. It means the state when the Photoshop document was closed in Photoshop.
- I recommend to check the option to scale (green), unless you have the images created exactly at the wanted size for use in Captivate (which is the best practice).
- You will see all the layers of the Photoshop document. You can check the layers you need to import.
- If you have multiple layers selected, you probably will not want them to merge to one image, since the images are choices, not part of a global image (red rectangle: Layers is the default setting).
- About the workflow: if you want more than one layer Workflow 2 (Import button) is recommended here. If you choose Workflow 1 (file menu) all layers will be converted to PNG images AND inserted all in the center of the slide. Not what you want. Use workflow 1 only when you import one layer.
2. Flattening or not?

To the left you see the Layers panel (Photoshop) of the file ‘TemplateFlatten”.
This file has 3 image layers which were extracted from 1 bitmap image. Each of them is exactly on the location as in the original bitmap image. I added a ‘template’ layer which can eventually be imported and used to restore the original combined image. But in most cases that will not be necessary.
In this case I recommend Workflow 1, whether you want to import the individual layers as PNGs (Layers in the Import dialog box) or the combined image by checking the option ‘Flattened’.
Reason: when the image are imported to the stage, they will in the correct (relative) location. When you import them only to the Library, you’ll need to use the Template to position the individual PNGs in the correct location.
Look back at the Library panel (Captivate) in the section ‘Import’: the four layers were imported as layers, and in a second process the flattened image was imported as well. That flattened image will be posted automatically in the correct library folder, and gets a generic name (FlatImage1) which you can edit of course.
3 Use of Comps
In the second example I used the same image. Each of the images has a text on the head scarf. The color of the images is gold. I wanted to make this file more flexible in two ways:
- To have another ‘hue’ for the images, so that it better fits with a project color scheme.
- To be used with the Texts in multiple languages.
That has led to a lot more layers, since text had to be on a separate layer (make it also editable), and to change the hue I used Adjustment layers which are a non-destructive way to change the ‘look’ of the layers below. In the screenshot below you see text layers in two languages (English and Dutch) and 3 adjustment layers on top. To keep it manageable for this blog, I kept only the global image, not the individual ones. Next to the layers panel you see the Layer Comps panel. Each of those comps defines a situation. Presently ‘DutchSepia’ is active and reflected in the Layers panel: the visible layers (eye icon) are needed for this look, with Dutch text on the scarfs and a Sepia adjustment layers.


Captivate makes it really easy to import the wanted ‘comp’. Kudos to the team! In most instances you will want to import one comp, and it is possible with two different setups of the Import Dialog box.
In the left screenshot, next to ‘Photoshop Layer Comps’ the option ‘ Multiple’ is checked. If the comps were labeled well, you can easily select the wanted comp to import. It will be imported always as Flattened. The options for ‘Import as:’ are dimmed.
The result of comps import is visible in the Project Library screenshot (Import section). You see that I repeated the import process 4 times, because 4 comps are available, each being a merged image from the layers visible in that comp filter.

Second possibility is to keep the Single radiobutton checked next to ‘Photoshop Layer comps’. Have a look at the screenshot to the right which shows that situation.
Open the dropdown list under ‘Last Document State’ and you will see all the available comps.
Advantage of this second workflow is that you can see which Photoshop layers are selected for import. You could eventually edit those selections, but be careful. You can import layers in this case as well, but I would not recommend that if adjustment layers are used. They cannot be imported into Captivate, only the real images.
Since you will mostly import only one comp the choice for the Import workflow is free, whether with File, Import or with the Import button in the Library.
Updating
Not mentioned so far, because you’ll find this in all blogs and video about Photoshop roundtripping. The ‘green’ checkmark next to the Photoshop folder, which indicates that the original PSD-file is in synch with Captivate. If your Photoshop expert updates that file in any way: adding layers, editing content on one or more layers, correcting typos in the text layers this will be reflected in Captivate by a color change in that round checkmark. Clicking the red checkmark will allow you to update and have the changes automatically be imported and applied in Captivate.
You must be logged in to post a comment.
- Most Recent
- Most Relevant


