 Explorer
1 posts
Explorer
1 posts
Tips on quickly formatting and editing the handout printed from Captivate.
As a new Captivate user, I found it incredibly frustrating to have limited admin permissions on my work computer which made the template hacks I’d read in the Adobe forums unavailable to me.
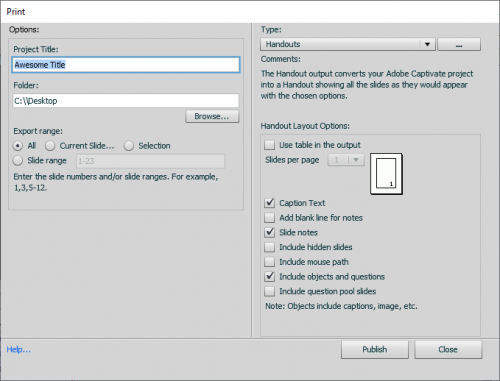
So below are some methods I use to quickly format Handouts (with the “Use table in the output” unchecked) using Print in Captivate.
ORDER OF IMAGES, TEXT, & OTHER OBJECTS
First, know that the order of your slide objects will reflect in the printed document. The objects that display in the timeline nearest the bottom (objects furthest back) show first in the printout. For example (see image below):
1. [Image] Course_Topics_Slide_Img – displays first and before…
2. [Line Shape] Middle_Line_Break_72 – displays, followed by
3. [Text Caption] Text_Caption_812 – the final of the three objects to display
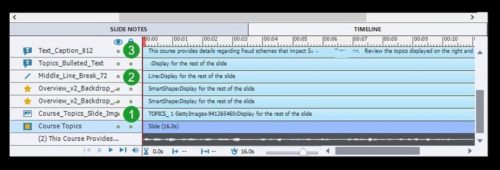
This is important because if you have a header that appears first and before body text in a document, the header object should be “behind” the body text that follows to render the correct output.
UNIFORM FONTS & TEXT
For text that appears in different fonts, size, color, etc. you can simply open the Word document and use the Select All option to highlight all text and set the desired font family, size, and color (if font color, or other attributes, aren’t relevant to document needs).
ODD SLIDE RATIO (Slide Image)
If the slide seems smashed or proportioned oddly, the more slides, the more cumbersome it is to adjust manually. What’s worse is that you would have to unlock proportions for each image to do any bulk edit.
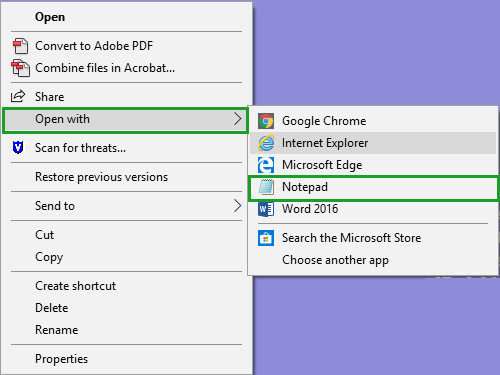
Instead, you can save your word document as a web page and exit Word to right-click the saved document (now a HTM/HTML web file) and use the ‘Open with’ option to edit with a text editor (i.e. Window’s Notepad).
1). Identify the slide image size so that you can find and replace all instances of it.
Example: I change only the width via Edit > Replace to find width:620pt;height:5in and replaces all instances with width:720pt;height:5in and SAVE! When I open the HTM/HTML in Word I see all slides are wider.
2). Save after replacing all instances with the desired width and/or height.
3). Open the web file in Word to confirm edit(s).
You can use this same method to make other edits like the margin and other format settings. Identify the specific edit you’d like to make and locate the reference to use the Find and Replace All option and edit accordingly.
ALTERNATE IMAGE METHOD
If you’re more comfortable with manually replacing each slide image or using slide images to create or input into another template, then consider the asset images in the folder created from the Word web page.
NOTE, the slide images are duplicated, so be sure to determine which image to extract, for example, the odd numbered slides: image001, image003, etc. are sized correctly.
As a new Captivate user, I found it incredibly frustrating to have limited admin permissions on my work computer which made the template hacks I’d read in the Adobe forums unavailable to me.
So below are some methods I use to quickly format Handouts (with the “Use table in the output” unchecked) using Print in Captivate.
ORDER OF IMAGES, TEXT, & OTHER OBJECTS
First, know that the order of your slide objects will reflect in the printed document. The objects that display in the timeline nearest the bottom (objects furthest back) show first in the printout. For example (see image below):
1. [Image] Course_Topics_Slide_Img – displays first and before…
2. [Line Shape] Middle_Line_Break_72 – displays, followed by
3. [Text Caption] Text_Caption_812 – the final of the three objects to display
This is important because if you have a header that appears first and before body text in a document, the header object should be “behind” the body text that follows to render the correct output.
UNIFORM FONTS & TEXT
For text that appears in different fonts, size, color, etc. you can simply open the Word document and use the Select All option to highlight all text and set the desired font family, size, and color (if font color, or other attributes, aren’t relevant to document needs).
ODD SLIDE RATIO (Slide Image)
If the slide seems smashed or proportioned oddly, the more slides, the more cumbersome it is to adjust manually. What’s worse is that you would have to unlock proportions for each image to do any bulk edit.
Instead, you can save your word document as a web page and exit Word to right-click the saved document (now a HTM/HTML web file) and use the ‘Open with’ option to edit with a text editor (i.e. Window’s Notepad).
1). Identify the slide image size so that you can find and replace all instances of it.
Example: I change only the width via Edit > Replace to find width:620pt;height:5in and replaces all instances with width:720pt;height:5in and SAVE! When I open the HTM/HTML in Word I see all slides are wider.
2). Save after replacing all instances with the desired width and/or height.
3). Open the web file in Word to confirm edit(s).
You can use this same method to make other edits like the margin and other format settings. Identify the specific edit you’d like to make and locate the reference to use the Find and Replace All option and edit accordingly.
ALTERNATE IMAGE METHOD
If you’re more comfortable with manually replacing each slide image or using slide images to create or input into another template, then consider the asset images in the folder created from the Word web page.
NOTE, the slide images are duplicated, so be sure to determine which image to extract, for example, the odd numbered slides: image001, image003, etc. are sized correctly.


You must be logged in to post a comment.
- Most Recent
- Most Relevant
Print output is very outdated in Captivate, but you gave some nice tips. It didn’t keep up with new features like multistate objects, use of advanced/shared actions etc…. Honestly, I have not used the Word templates since a decade. In my mind it is contradictory to provide printed documents for an interactive course, with maybe the exception for the preparatory storyboard.
Conference people often required however printed documents, and in that case I did use screenshots (Snagit) which I put in an InDesign template. It is a lot of work, whereas it is so simple to provide a direct link to an uploaded course on a webserver. Like putting an old engine in a new Porsche car.
