 Legend
245 posts
Legend
245 posts
Following up another post about automatic Hint after an number of wrong clicks on a hotspot, this use case demonstrates the advantages and disadvantages of Shared actions over Advanced actions.
Intro
If you have followed me since a while, you know that I am a great fan of Shared actions. However I am aware that many developers seem to be afraid of those shared actions. In this post I will try to demystify the ‘shared action’, and answer some questions.
First of all: the biggest advantage of a shared action is its reusability. Whenever you need an action which will be used multiple times in a project, or which you plan to use in more than one project, it is worthwhile to consider the use of a shared action. Here are some other reasons. You can skip this part and come back to it later:
- When used within one project, you are using instances of the same shared action. If you prefer using duplicated and edited advanced actions the file size will be bigger. It can be compared with the use of multiple instances of the same graphic/audio clip.
- Shared actions appear in the Project Library with all the functionalities of Library assets: how many times uses, on which events etc..
- You can transfer an existing advanced action to a new project using copy/paste of the object triggering the action: a button, click box, TEB (success/Last attempt events), slide (Enter/Exit event). If variables are used in the advanced action, they will be created in the new project. However, in many cases, commands in the advanced actions will revert to Continue if what they are referring to is not available in the new project. Example: missing slides for navigation commands, missing states or even multistate objects…
- Transferring a shared action to a new project is a breeze: drag the action from the original Library to the Library of the new project. Variables which are not used as parameters will be created (similar to copy/paste for advanced actions). Since the shared action is not connected with any event, you don’t have to bother about having everything in place before transferring the shared action. In both cases user variables which are not defined as parameters, will be created in the new project.
- There is no built-in way to document Advanced actions in Captivate. A shared action however allows to add a description to the action and to the parameters if any are used.
There are some limitations to shared actions:
- It is not possible to trigger a shared action from a hyperlink.
- You cannot attribute a shared action to several events at once, as is possible for an advanced action.
Beware: not all advanced actions are suited as shared action. In a recent post about ‘Hint after x failed clicks’ I explained a use case which was meant as introduction for Captivate users new to variables and advanced actions. You may have a look at that first blog post:
Step-by-step: Automatic Hint after 2 Wrong Clicks – eLearning (adobe.com)
Conversion to shared action
It is a good idea to create and test the action as advanced action before creating the shared action. This was the advanced action created in the mentioned blog post, triggered by the Success event of the ‘wrong’ hotspots (5) in the example:
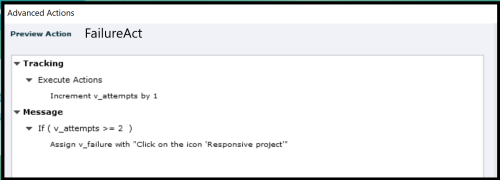
Two user variables were used:
- v_attempts tracks the number of clicks on the button/hotspot
- v_failure is used in the Failure feedback message and allows to change the content of that message. The default failure message will be replaced by a Hint message after the defined number of clicks.
First version Shared Action
Open the advanced action in the dialog box, use the button Save as Shared action, and this dialog box will appear:

In the screenshot you see that I have filled in the description. It is important to do so, try to explain in short sentences what the action will do exactly. It may seem a loss of time, but if you reuse the action a couple of months later, you’ll understand why I emphasize this.
In the main part you see the ‘parameters’, and in this particular case all of them show the green check mark. This means that you can save the shared action as it is. Result will be that the parameters remain static, cannot be changed when you attach the action to an event. They will not need a description neither. Comparing with the advanced action:
Pro
- The description of the action, which is impossible for an advanced action.
- Its appearance in the Project Library with all the functionality of other assets.
- For reusability in another project: you can drag the shared action from this library opened as external library to the Project library of the new project. For an advanced action you would need to copy/paste one of the wrong hotspots to the new project.
Con
- You cannot attach the shared action to all wrong hotspot events at once, you need to do it one by one. The advanced action could be attached in one workflow by selecting all the wrong hotspots.
- For another hotspot slide in the same project it will be easier to create a duplicate advanced action, and edit the Hint text (value for the variable v_failure).
Second version Shared action
In the first screenshot I marked two parameters with a question mark:
- Parameter ‘2′: literal indicating the number of required wrong clicks before showing the Hint.
- Parameter ‘Click on the icon ‘Responsive project”: the new value (literal) for the variable v_failure to replace the failure text by the Hint text.
You can make the static parameter dynamic by clicking the check box, and entering a description for the parameter. To me the most important candidate is the Hint text. Making that parameter dynamic, means that you can enter a different Hint text for each new attachment of the action to an event. Beware: the correct checkmark will only appear after confirming the description of the active parameter:
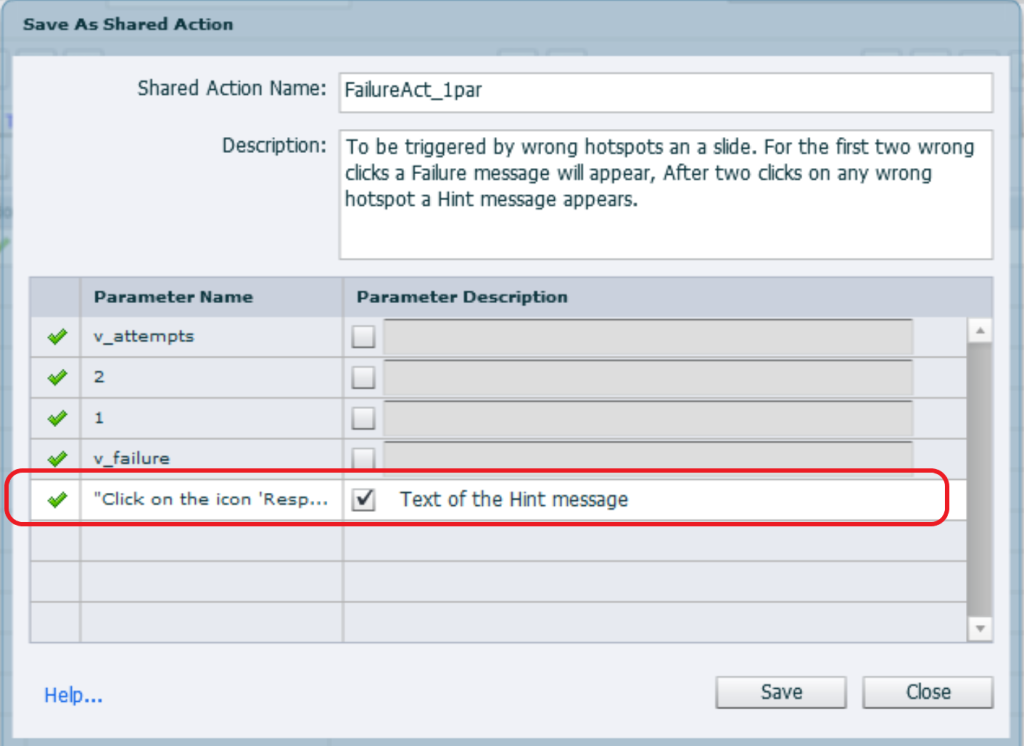
This makes the action flexible: you only have to enter the Hint text as parameter whenever you attach the shared action to an event.
Pro
- Besides the description of the action, the meaning of the parameter will appear whenever you apply the shared action.
- Its appearance in the Project Library.
- Reusability in any new project remains.
- File size will be lower compared with using duplicate advanced actions.
- You can edit the Hint text for each instance.
Con
- You cannot attach the shared action to multiple events at once.
- You need to fill in the text parameter with each attachment (copy/paste is possible)
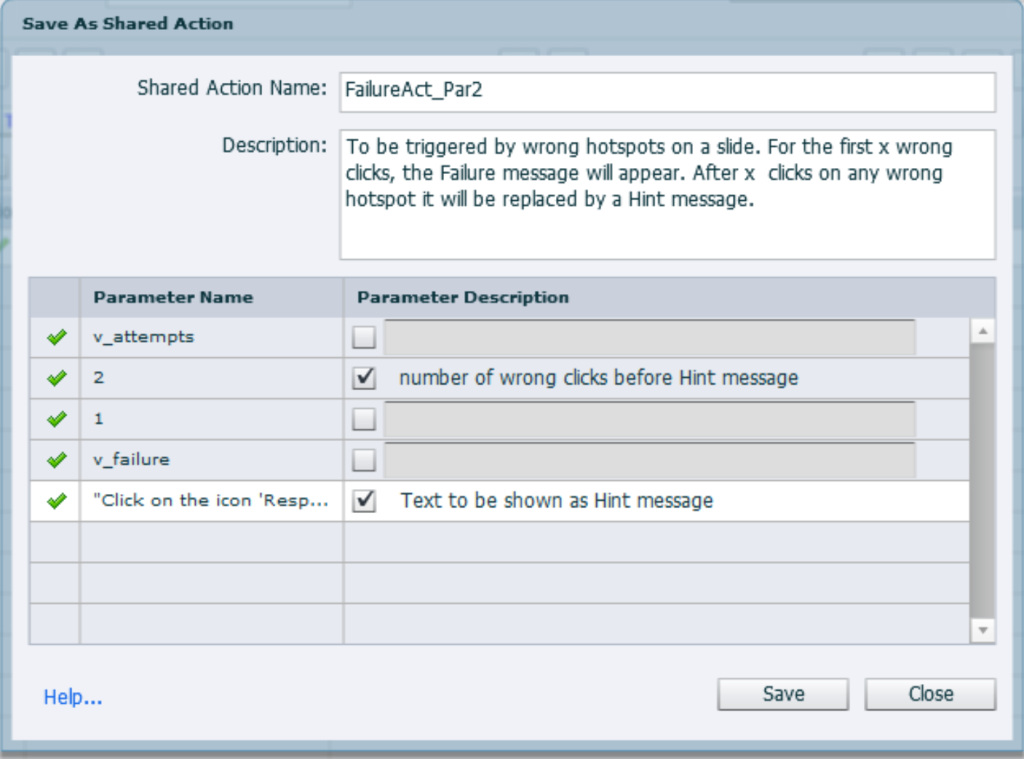
Third version Shared action
You can make the action even more flexible by declaring the number of wrong clicks to be a dynamic parameter. Using that shared action you’ll be able to change the number of wrong clicks before showing the Hint instead of the Failure message. Like increasing the number for a more complicated hotspot slide. I don’t have to explain this screenshot anymore:
More tips
I may write out another blog post to demonstrate the use of the shared action explained here as template for advanced actions extending the Hint message to graphical assets.
If you want to learn more about using Shared actions, please have a look at my ‘crash course’, learning how to use a shared action. For both lessons you’ll have both a video approach and a step-by-step approach, your choice. You can still download the examples.
To circumvent the “Con” of shared actions not being able to apply to multiple events at once, remember that you can easily create an advanced action from a shared action. Here is an example:
Intro
If you have followed me since a while, you know that I am a great fan of Shared actions. However I am aware that many developers seem to be afraid of those shared actions. In this post I will try to demystify the ‘shared action’, and answer some questions.
First of all: the biggest advantage of a shared action is its reusability. Whenever you need an action which will be used multiple times in a project, or which you plan to use in more than one project, it is worthwhile to consider the use of a shared action. Here are some other reasons. You can skip this part and come back to it later:
- When used within one project, you are using instances of the same shared action. If you prefer using duplicated and edited advanced actions the file size will be bigger. It can be compared with the use of multiple instances of the same graphic/audio clip.
- Shared actions appear in the Project Library with all the functionalities of Library assets: how many times uses, on which events etc..
- You can transfer an existing advanced action to a new project using copy/paste of the object triggering the action: a button, click box, TEB (success/Last attempt events), slide (Enter/Exit event). If variables are used in the advanced action, they will be created in the new project. However, in many cases, commands in the advanced actions will revert to Continue if what they are referring to is not available in the new project. Example: missing slides for navigation commands, missing states or even multistate objects…
- Transferring a shared action to a new project is a breeze: drag the action from the original Library to the Library of the new project. Variables which are not used as parameters will be created (similar to copy/paste for advanced actions). Since the shared action is not connected with any event, you don’t have to bother about having everything in place before transferring the shared action. In both cases user variables which are not defined as parameters, will be created in the new project.
- There is no built-in way to document Advanced actions in Captivate. A shared action however allows to add a description to the action and to the parameters if any are used.
There are some limitations to shared actions:
- It is not possible to trigger a shared action from a hyperlink.
- You cannot attribute a shared action to several events at once, as is possible for an advanced action.
Beware: not all advanced actions are suited as shared action. In a recent post about ‘Hint after x failed clicks’ I explained a use case which was meant as introduction for Captivate users new to variables and advanced actions. You may have a look at that first blog post:
Step-by-step: Automatic Hint after 2 Wrong Clicks – eLearning (adobe.com)
Conversion to shared action
It is a good idea to create and test the action as advanced action before creating the shared action. This was the advanced action created in the mentioned blog post, triggered by the Success event of the ‘wrong’ hotspots (5) in the example:
Two user variables were used:
- v_attempts tracks the number of clicks on the button/hotspot
- v_failure is used in the Failure feedback message and allows to change the content of that message. The default failure message will be replaced by a Hint message after the defined number of clicks.
First version Shared Action
Open the advanced action in the dialog box, use the button Save as Shared action, and this dialog box will appear:
In the screenshot you see that I have filled in the description. It is important to do so, try to explain in short sentences what the action will do exactly. It may seem a loss of time, but if you reuse the action a couple of months later, you’ll understand why I emphasize this.
In the main part you see the ‘parameters’, and in this particular case all of them show the green check mark. This means that you can save the shared action as it is. Result will be that the parameters remain static, cannot be changed when you attach the action to an event. They will not need a description neither. Comparing with the advanced action:
Pro
- The description of the action, which is impossible for an advanced action.
- Its appearance in the Project Library with all the functionality of other assets.
- For reusability in another project: you can drag the shared action from this library opened as external library to the Project library of the new project. For an advanced action you would need to copy/paste one of the wrong hotspots to the new project.
Con
- You cannot attach the shared action to all wrong hotspot events at once, you need to do it one by one. The advanced action could be attached in one workflow by selecting all the wrong hotspots.
- For another hotspot slide in the same project it will be easier to create a duplicate advanced action, and edit the Hint text (value for the variable v_failure).
Second version Shared action
In the first screenshot I marked two parameters with a question mark:
- Parameter ‘2′: literal indicating the number of required wrong clicks before showing the Hint.
- Parameter ‘Click on the icon ‘Responsive project”: the new value (literal) for the variable v_failure to replace the failure text by the Hint text.
You can make the static parameter dynamic by clicking the check box, and entering a description for the parameter. To me the most important candidate is the Hint text. Making that parameter dynamic, means that you can enter a different Hint text for each new attachment of the action to an event. Beware: the correct checkmark will only appear after confirming the description of the active parameter:
This makes the action flexible: you only have to enter the Hint text as parameter whenever you attach the shared action to an event.
Pro
- Besides the description of the action, the meaning of the parameter will appear whenever you apply the shared action.
- Its appearance in the Project Library.
- Reusability in any new project remains.
- File size will be lower compared with using duplicate advanced actions.
- You can edit the Hint text for each instance.
Con
- You cannot attach the shared action to multiple events at once.
- You need to fill in the text parameter with each attachment (copy/paste is possible)
Third version Shared action
You can make the action even more flexible by declaring the number of wrong clicks to be a dynamic parameter. Using that shared action you’ll be able to change the number of wrong clicks before showing the Hint instead of the Failure message. Like increasing the number for a more complicated hotspot slide. I don’t have to explain this screenshot anymore:
More tips
I may write out another blog post to demonstrate the use of the shared action explained here as template for advanced actions extending the Hint message to graphical assets.
If you want to learn more about using Shared actions, please have a look at my ‘crash course’, learning how to use a shared action. For both lessons you’ll have both a video approach and a step-by-step approach, your choice. You can still download the examples.
To circumvent the “Con” of shared actions not being able to apply to multiple events at once, remember that you can easily create an advanced action from a shared action. Here is an example:


You must be logged in to post a comment.
- Most Recent
- Most Relevant
