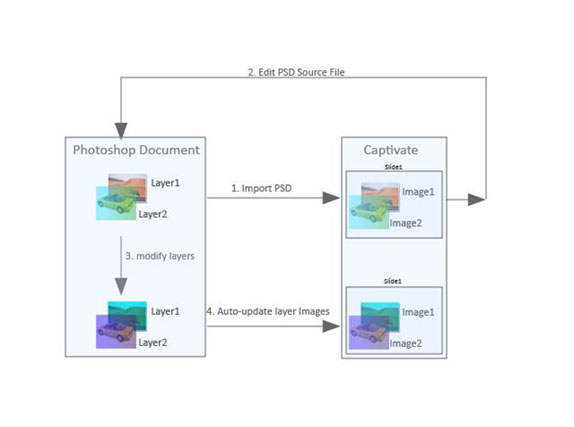
One of the exciting features of eLearning Suite 2 is Photoshop round tripping with Captivate. You can not only import Photoshop layers but also edit the source Photoshop document from Captivate (eLS 2.0). The new workflow provides ways to easily maintain the imported PS content in sync with the source document. Captivate detects changes and updates the affected layers automatically.
You can now import the Photoshop document once and modify as many times as required without the bother of importing layers over and again. Moreover, Captivate 5 gives the flexibility to import layer comps as a single image inside Captivate. You can also import multiple layer comps.
Captivate lovers can now create great learning experience using Photoshop round tripping in conjunction with objects.
Basic Round Tripping workflow:
Auto-Update of Photoshop Layers.
As mentioned earlier, you can edit the source Photoshop document within Captivate. Captivate detects changes and updates the affected layers automatically.
There are multiple ways by which you can edit the source PSD file.
- Edit from stage: Select any PSD image and click on “Edit PSD source” context menu.
- Edit from Library: Select PSD Folder in the library and click on the “Edit PSD source” context menu.
 |
 |
This will launch Photoshop CS5 (if not running already) and open the source PSD file. You can modify the existing layers, add/delete layers as needed. Once you save the changes, Captivate detects the changes and automatically updates the corresponding layers.
You might see difference in auto-update based on from where you started Edit workflow. Say if you have started the edit workflow from library and added a new layer in source PSD then this layer is added only to the Captivate library under PSD folder but not to the stage. However if you have started the Edit from Stage then new layer is reflected on stage also.
Offline update of Photoshop Layers
Auto-update of PSD Layers gives you a quick way to work with Photoshop layers in Captivate if you constantly modify the PSD file and want to see the changes immediately in Captivate.
However, if you don’t want to update the PSD images each time the corresponding PSD source file gets modified, then use the offline update of PSD file. Ensure that you don’t start editing the source PSD file from captivate. Launch Photoshop and open the source PSD manually. Make the changes and save the PSD file. Captivate does not update the PSD layers automatically. Go back to your Captivate project and observe the status icon of PSD Folder in the library. It should turn to red indicating that source PSD is modified.
There are multiple ways to update the linked PSD file similar to Edit Process.
- Update from Stage: Select any PSD image on stage and click on “Update PSD file” context menu. Invoking update from stage will ensure that any new layers added in source PSD will also appear on stage.
- Update from Library: Select PSD Folder in the library and click on “Update PSD file” context menu or click on status icon(red).In this case, any new layer added in source PSD will be added in library only and not on stage.
 |
 |
As mentioned earlier, you can edit the source Photoshop document within Captivate. Captivate detects changes and updates the affected layers automatically.
Roger, unfortunately no. The only way to get the multi-sco packager, the added specialized round-tripping, mobile add-ons etc. is with the eLearning Suite. It’s a question I’d encourage you to echo at one of the upcoming Tuesday “Ask the Adobe eLearning Team” sessions.
Thanks for this great feature, that saved me already a lot of time. Has a lot improved (talk about testing cycle): imported layers on stage keep their size if they were resized after updating the source file. Perhaps possible future improvement: could we take over the layer or layer comp name for the images on stage? If a layer/layer comp is used twice, a number could be added. One example: have a PS-file with different ‘icons’ used as markers each on its layer. Layers are labeled, labels appear in Library of CP when imported. When dragged to the stage, the name of the image is a default name, if there was an option to label the image with the name of the layer, supplemented by a character?
You must be logged in to post a comment.


