


 Notification



 Legend
227 posts
Legend
227 posts


 In Adobe Captivate 5/5.5, you can add different effects to your objects, like motion path, color effect, filter, emphasis, etc.
The common path to add effects to your object is time-based effect, where you simply right-click the object and apply the desired effect(s). When you preview the screen, the effect appears as soon as the object appears on the screen.
The road less traveled is to associate the effect with an event to trigger the animation/effect. For example, on a click of a button or after a specific slide begins. Here’s a screen with such an effect:
Found it interesting? Here are some simple steps to apply event-based effects:
- Add an object that will trigger the effect. In this example, a button.
- Add an object to which you want to apply effect. In this example, an image.
- Select the button.
- In the Properties Inspector, under Action accordion, select On Success action to Apply Effect.

- Select the image label as Object Name and click the Animation Palette button.

- An event-based animation trigger for the selected object is created and listed in the Effects panel. Select the event-based trigger and apply the effect to this object.


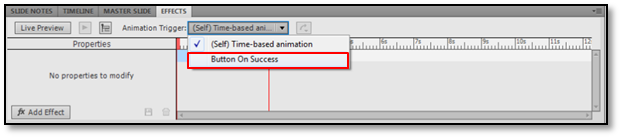
Let me know if you found this workflow useful or have any questions by leaving a comment on this post.
Happy Captivating! 🙂
In Adobe Captivate 5/5.5, you can add different effects to your objects, like motion path, color effect, filter, emphasis, etc.
The common path to add effects to your object is time-based effect, where you simply right-click the object and apply the desired effect(s). When you preview the screen, the effect appears as soon as the object appears on the screen.
The road less traveled is to associate the effect with an event to trigger the animation/effect. For example, on a click of a button or after a specific slide begins. Here’s a screen with such an effect:
Found it interesting? Here are some simple steps to apply event-based effects:
- Add an object that will trigger the effect. In this example, a button.
- Add an object to which you want to apply effect. In this example, an image.
- Select the button.
- In the Properties Inspector, under Action accordion, select On Success action to Apply Effect.
- Select the image label as Object Name and click the Animation Palette button.
- An event-based animation trigger for the selected object is created and listed in the Effects panel. Select the event-based trigger and apply the effect to this object.
Let me know if you found this workflow useful or have any questions by leaving a comment on this post.
Happy Captivating! 🙂
You must be logged in to post a comment.

- Most Recent
- Most Relevant

The apply effects in the Advance Action is not working with Drag and Drop interaction. Does anybody knows how to fix this?
What wasn’t explained in above was the last step, how to add an effect. In my version of Captivate there is a tiny litte “fx” button in the lower left corner of the effects window. It doesn’t say Add Effect. Click that button, and you will find all the effects you can add. So glad to have learned this.
I follow all the steps and I’m able to select the event (a button) from the Animation Trigger. But it doesn’t work when I view in either in a published file or in the browser. The Animation Trigger always goes back to the (Self) Time-based animation. Even after I select my event.
Anyone know why it is not working? I’m using Captivate 5
Hi Rosario,
Are you able to see the effect in Preview mode?
Thanks Pooja for the tips. Its easy to implement but very useful and effective.
great drill for event based animating


