 Newbie
8 posts
Newbie
8 posts
Audio Recording Process Outline:
Pre-Planning
Setup
Recording Work Session
Post Capture
The Audio Recording Process
Pre-Planning
After the voice talent is ready for recording, a recording session is scheduled, preferably in a quiet room, when the surrounding area is quiet, with minimal traffic. Definitely not in an open area or at a cube / shared workspace, as your quiet recording space can suddenly turn into a group work session.
Our recording process requires a laptop with power, microphone, USB cable, and specialized software: Adobe Audition has been purchased as part of the eLearning suite.
Pre-work with inexperienced talent is also critical, as is giving them a chance to rehearse, review the script in your presence for awkward phrasing or unfamiliar words.
When working with novice recording talent, or if you have a technical glitch that may delay the recording for more than ¼ – ½ the work session: reschedule. Be respectful of your audio talent’s time.
Setup
Before the talent arrives, be sure you have the recording space reserved for ½ – 1 hour beforehand.
Setup your recording computer, microphone and stand.
Launch your software and perform an audio level check. This means that you must be there early, and perform this task with no noise present.
Open a new audio file for the project, name it and save it to the hard drive. I save as an uncompressed WAV file, which can be imported directly to Captivate. Captivate will save MP3 compressed files on the fly as you are exporting the project.
This allows you to have the highest quality audio directly in Captivate for reorganization or editing and only spend time compressing or decompressing when you are exporting SCORM files for posting to an LMS or webserver.
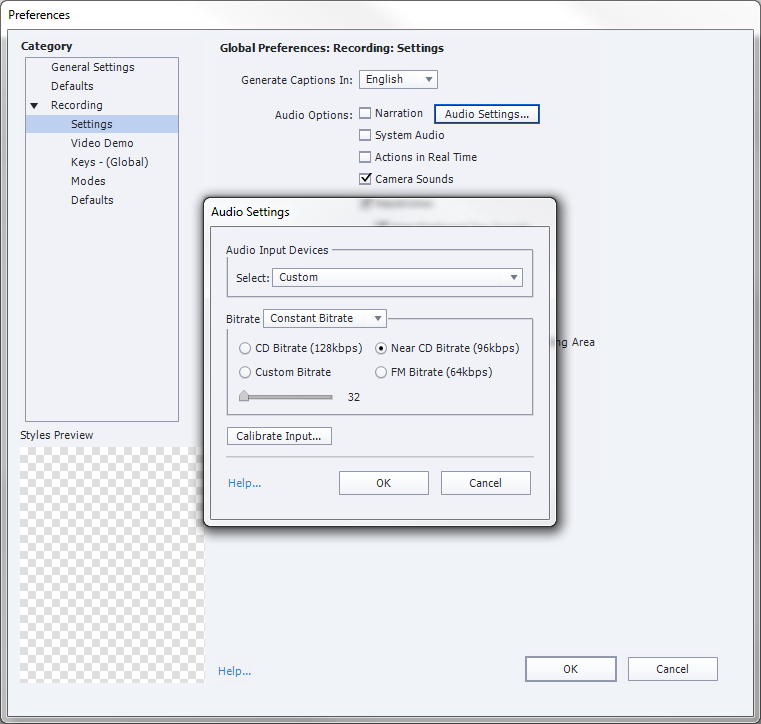
The uncompressed format for capture is preferred with the FM Bitrate to Near-CD quality sample rate 64kbps – 96kbps. Anything higher will take gigabytes to store and edit, making editing slower and storing multiple versions impractical.
You may actually want to record a segment of ambient noise, for later use in processing the audio file.
I had one recording session in a live classroom where the air conditioning system caused a bit of a whine or a whistle. I was able to return afterward and record the ambient sound, with no other voices or noises present, and use Audition to minimize the noise from the training room.
This would have been much more difficult if I’d had to travel to a distant location or a rented space to make a return trip!

As for logistics, its best if the talent and recorder both have copies of the script, but they must stay in sync for page turning – to ensure the audio captured is clean and not overlapping the sounds of turned pages or shuffling.
During the recording, Audition allows capturing ‘markers’ within the file that mark the time, and can be renamed during recording to identify slide numbers and topics covered, it’s also critical to identify a ‘redo’ or mistake that is later reread by the talent so that edits to the audio are easier.
Recording Work Session
Once the talent appears, I open the saved file, I prep the talent to be sure they don’t need a walkthrough, have a cold, or need water or a restroom visit. Often the first timers need time to read through the script.
If they’ve not recorded with me before, I’ll position them at the microphone, and inform them that they’ll need to keep a steady distance and position to the microphone. They usually want to adjust the chair at this point. And I’ll tell them that I plan to remove the page turn noises from the audio.
Then I prompt my talent to be sure they are ready, I begin the recording and ask them to begin reading.
Post Capture
Following the recording session, segments of audio are exported from Audition as WAV files with the slide number in the filename.
As the segments are saved, notes were made on a copy of the narration script with the filenames.
Be deliberate about documenting notes on the narration, changes to slides, and other issues discussed during the work session. These can be captured on the printed copy by the recorder and audio talent.
Additionally, variations of the audio segments are created that allow flexibility in placing the audio in Captivate, or to allow transfer of content from slide to slide.
If you have the narrator read “Click the Blue Continue button for the next slide,” and the design changes the button color, it’s best to have another version like “Click the continue button.”
Adobe Audition has an auto-numbering feature that will save a sequence of files with a common file prefix and serial number for each segment in the filename. This is the best way to work, but I’ve adapted my workflow to manage the file numbering process.
Best practice has been to begin the filename with a PAGE NUMBER, not SLIDE NUMBER, from the printed script. This causes a dependency on the narration script, so it’s critical to save THAT version, that day, those notes from the recording session and any editing session all be archived together for the life of the project.
For slides with no audio, I select a small section of blank audio and I’ll export as a segment with the incremental slide number. If I try to skip a slide or two, I’ll spend more time trying to relocate which slide had no audio recorded, or renumbering files.
Audio Recording Process Outline:
Pre-Planning
Setup
Recording Work Session
Post Capture
The Audio Recording Process
Pre-Planning
After the voice talent is ready for recording, a recording session is scheduled, preferably in a quiet room, when the surrounding area is quiet, with minimal traffic. Definitely not in an open area or at a cube / shared workspace, as your quiet recording space can suddenly turn into a group work session.
Our recording process requires a laptop with power, microphone, USB cable, and specialized software: Adobe Audition has been purchased as part of the eLearning suite.
Pre-work with inexperienced talent is also critical, as is giving them a chance to rehearse, review the script in your presence for awkward phrasing or unfamiliar words.
When working with novice recording talent, or if you have a technical glitch that may delay the recording for more than ¼ – ½ the work session: reschedule. Be respectful of your audio talent’s time.
Setup
Before the talent arrives, be sure you have the recording space reserved for ½ – 1 hour beforehand.
Setup your recording computer, microphone and stand.
Launch your software and perform an audio level check. This means that you must be there early, and perform this task with no noise present.
Open a new audio file for the project, name it and save it to the hard drive. I save as an uncompressed WAV file, which can be imported directly to Captivate. Captivate will save MP3 compressed files on the fly as you are exporting the project.
This allows you to have the highest quality audio directly in Captivate for reorganization or editing and only spend time compressing or decompressing when you are exporting SCORM files for posting to an LMS or webserver.
The uncompressed format for capture is preferred with the FM Bitrate to Near-CD quality sample rate 64kbps – 96kbps. Anything higher will take gigabytes to store and edit, making editing slower and storing multiple versions impractical.
You may actually want to record a segment of ambient noise, for later use in processing the audio file.
I had one recording session in a live classroom where the air conditioning system caused a bit of a whine or a whistle. I was able to return afterward and record the ambient sound, with no other voices or noises present, and use Audition to minimize the noise from the training room.
This would have been much more difficult if I’d had to travel to a distant location or a rented space to make a return trip!
As for logistics, its best if the talent and recorder both have copies of the script, but they must stay in sync for page turning – to ensure the audio captured is clean and not overlapping the sounds of turned pages or shuffling.
During the recording, Audition allows capturing ‘markers’ within the file that mark the time, and can be renamed during recording to identify slide numbers and topics covered, it’s also critical to identify a ‘redo’ or mistake that is later reread by the talent so that edits to the audio are easier.
Recording Work Session
Once the talent appears, I open the saved file, I prep the talent to be sure they don’t need a walkthrough, have a cold, or need water or a restroom visit. Often the first timers need time to read through the script.
If they’ve not recorded with me before, I’ll position them at the microphone, and inform them that they’ll need to keep a steady distance and position to the microphone. They usually want to adjust the chair at this point. And I’ll tell them that I plan to remove the page turn noises from the audio.
Then I prompt my talent to be sure they are ready, I begin the recording and ask them to begin reading.
Post Capture
Following the recording session, segments of audio are exported from Audition as WAV files with the slide number in the filename.
As the segments are saved, notes were made on a copy of the narration script with the filenames.
Be deliberate about documenting notes on the narration, changes to slides, and other issues discussed during the work session. These can be captured on the printed copy by the recorder and audio talent.
Additionally, variations of the audio segments are created that allow flexibility in placing the audio in Captivate, or to allow transfer of content from slide to slide.
If you have the narrator read “Click the Blue Continue button for the next slide,” and the design changes the button color, it’s best to have another version like “Click the continue button.”
Adobe Audition has an auto-numbering feature that will save a sequence of files with a common file prefix and serial number for each segment in the filename. This is the best way to work, but I’ve adapted my workflow to manage the file numbering process.
Best practice has been to begin the filename with a PAGE NUMBER, not SLIDE NUMBER, from the printed script. This causes a dependency on the narration script, so it’s critical to save THAT version, that day, those notes from the recording session and any editing session all be archived together for the life of the project.
For slides with no audio, I select a small section of blank audio and I’ll export as a segment with the incremental slide number. If I try to skip a slide or two, I’ll spend more time trying to relocate which slide had no audio recorded, or renumbering files.


You must be logged in to post a comment.
- Most Recent
- Most Relevant
Good insight on voice recording. A skill as important as development.
