 Staff
3 posts
Staff
3 posts
Download the sample project here to try it yourself and follow along: Fill_In_Fluid_Boxes.cptx
Can Fluid Boxes have Fill?
Think of a Fluid Box in Captivate 2017 as a logical container, used to layout objects and content across any range of devices. So, by default, these containers are invisible in the published output – unless we apply a Fill to them.
Fluid boxes can have different types of Fill – solid, gradient or image fill. These will act as a background for that particular container, and will move and stretch along with that box. Also, fill colors are additive. If a parent Fluid box, and its child box, have different colors with lesser opacity, we can see a combination of both the colors on stage.
How to apply Fill?
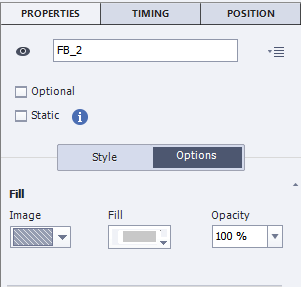
Simply select a Fluid box on your slide, click on the “Options” tab in the PI, and apply a Fill of your choice.
Let us walk through the creation of a sample project which utilizes the power of Fluid box fill. We will create the below responsive slide.
- Add a new slide and add 2 horizontal fluid boxes to it:
 After inserting you will notice that the parent Fluid box is selected by default.
In case it is not, select any of the fluid boxes on stage and hover on its boundary – this highlights its parent’s boundary.
Clicking this highlighted boundary will select the parent.
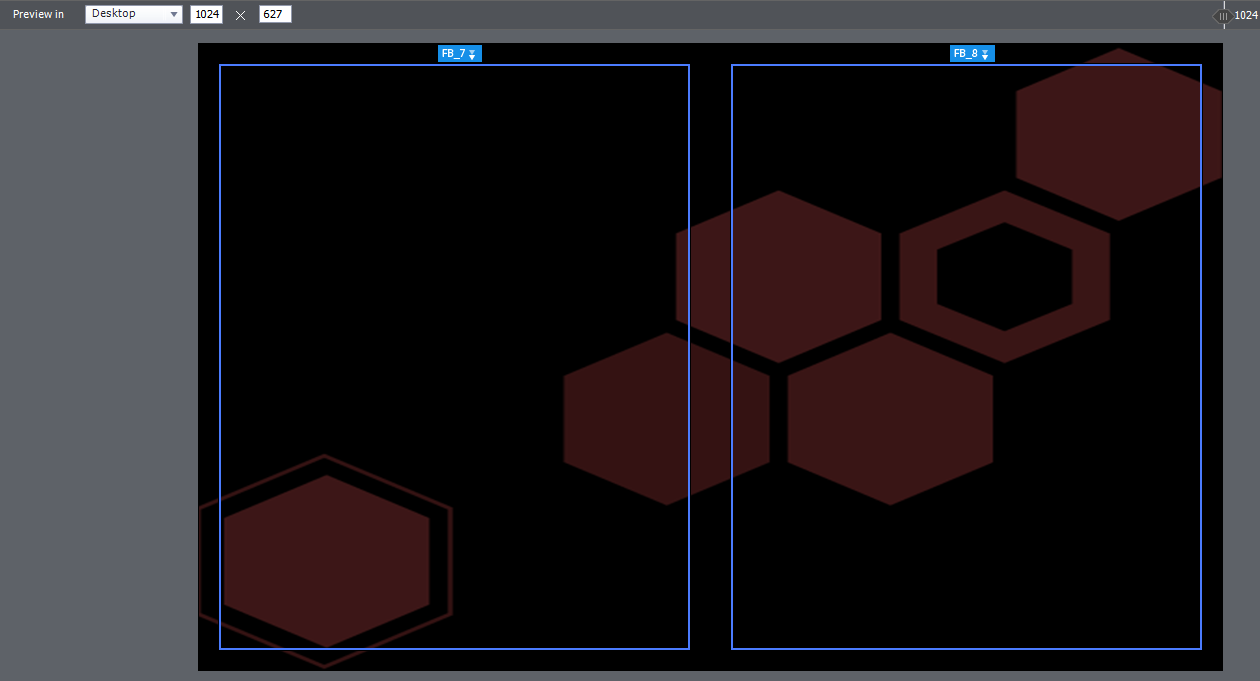
2. Let us add Fill to the parent – Select the Options tab and select Image Fill. Use the image “RedHexagon” from the project library.
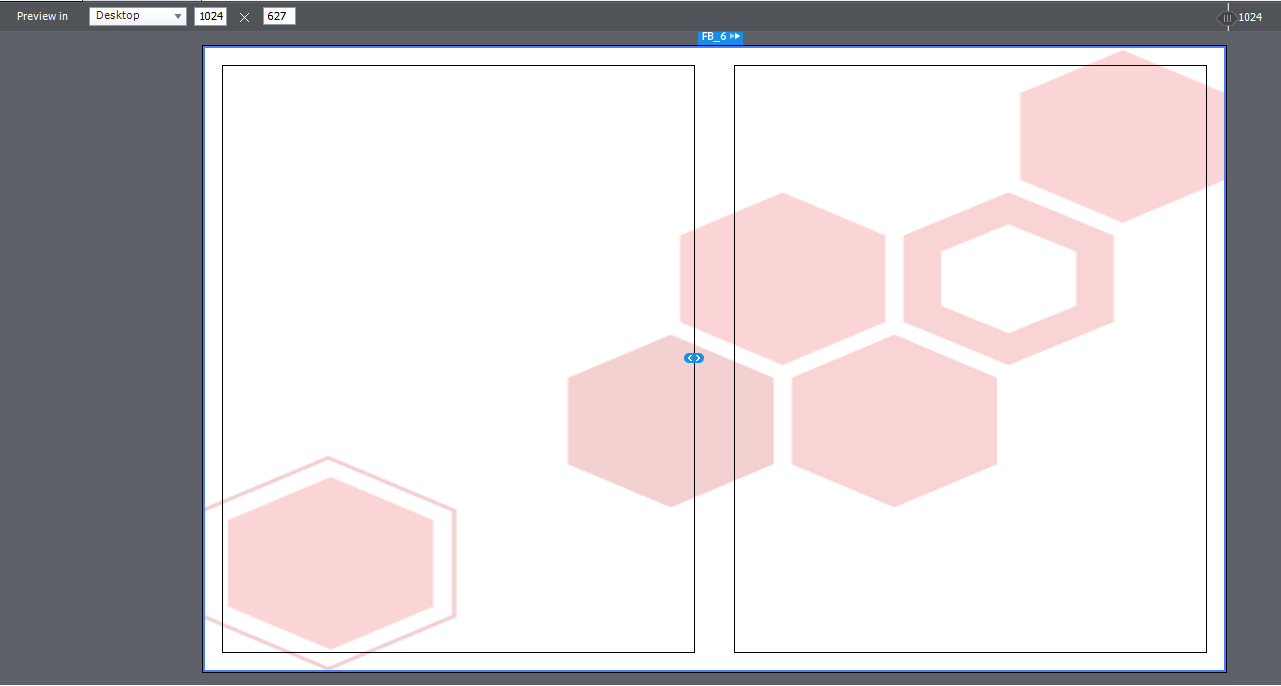
Let us add some padding so that we can see the Fill more clearly. Add 20px Horizontal and 20px Vertical padding. Now your slide should look like this:
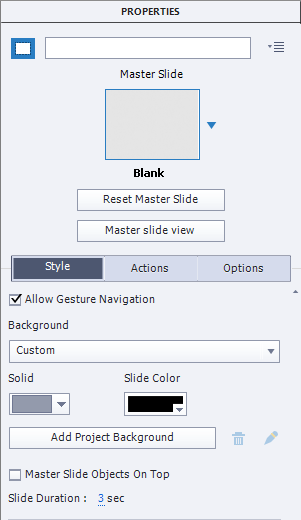
You can add a slide background color as well to get a dual effect. Select the grey area to get Slide properties, and change the background to Custom. Select the color as Black.
Now your slide should look like this:
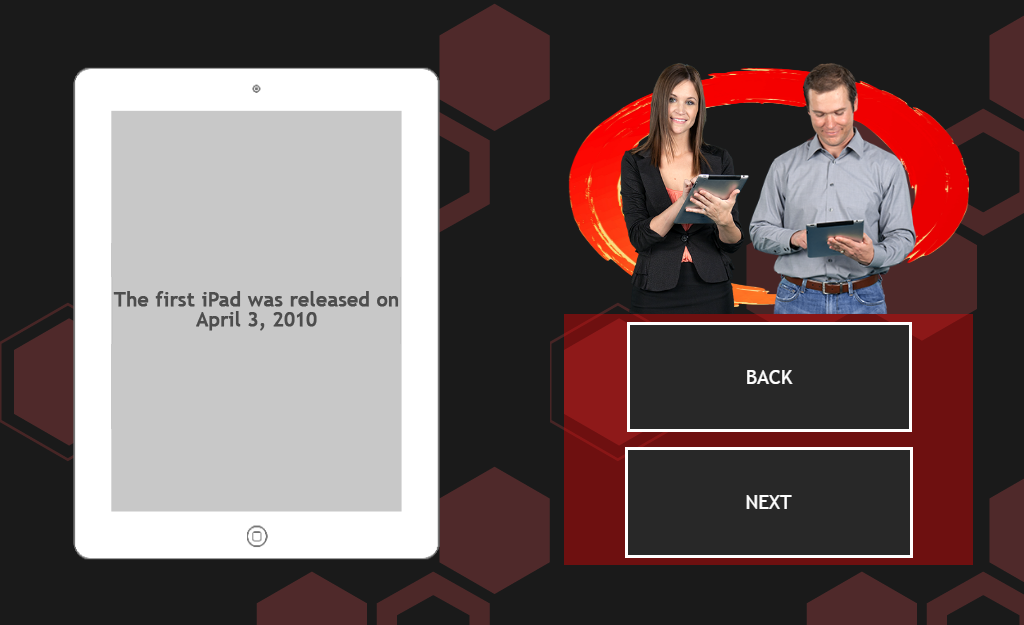
- Select the first fluid box on the left, and add an Image Fill to it. Select the image “iPadImage” from the Library.
- Go to the same Fluid box Style tab and uncheck “Stretch to Fit” both horizontally, and vertically. Add horizontal padding of 40px.
- Add a text caption to this Fluid Box. Add some text, and add Left and Right margins according to your preference.
- Now select the second Fluid box and insert two Vertical Fluid boxes. To each of these Fluid boxes we will add a Fill.
To the top one, we add an Image fill. Use “RedCircle” from the Library
To the bottom one, we will use a Solid Fill. Set a Red fill color and change the opacity to around 60-70%.
Your slide should now look like:

- For the final touches, add some Character images to the top Fluid Box with the RedCircle Fill. The Flow of this box should be Horizontal. If not, set it from the Fluid box Properties.
To the bottom box, add a few Smart Shape Buttons, or normal Buttons. The flow of this box should be Vertical. If not, set it from the Fluid box Properties.
- To make this Slide wrap beautifully on lower devices, let us set the Wrap Properties as well.
Select the parent Fluid box which contains the boxes with Red Circle and Red solid fill. You can do this by selecting its children, and then hovering on the boundaries to make it get highlighted. Once it is highlighted, click the highlight to select.
The Wrap Property for this Box must be set to “Squeeze in a Column”.
- Now preview your slide by moving the Slider in the edit area, or use “Preview” from the Big button bar on top.
You are all done with your slide now.
Tips:
- You can use Fill in the initial stages of designing your layout, as well. By setting Fill for Fluid boxes, you can clearly visualize which Fluid box wraps to which area after moving the Slider. Giving each box a color helps to see how wrapping happens.
- Fill is additive. If your parent Fluid Box has some color set to it, and if its child has another color, then the result which is visible to our eyes is a mix of both the colors. Similarly, if the parent has a black solid fill, whereas the child box has a transparent PNG image fill, then the combination of both is the final result on stage.
Download the sample project here to try it yourself and follow along: Fill_In_Fluid_Boxes.cptx
Can Fluid Boxes have Fill?
Think of a Fluid Box in Captivate 2017 as a logical container, used to layout objects and content across any range of devices. So, by default, these containers are invisible in the published output – unless we apply a Fill to them.
Fluid boxes can have different types of Fill – solid, gradient or image fill. These will act as a background for that particular container, and will move and stretch along with that box. Also, fill colors are additive. If a parent Fluid box, and its child box, have different colors with lesser opacity, we can see a combination of both the colors on stage.
How to apply Fill?
Simply select a Fluid box on your slide, click on the “Options” tab in the PI, and apply a Fill of your choice.
Let us walk through the creation of a sample project which utilizes the power of Fluid box fill. We will create the below responsive slide.
- Add a new slide and add 2 horizontal fluid boxes to it:
After inserting you will notice that the parent Fluid box is selected by default.
In case it is not, select any of the fluid boxes on stage and hover on its boundary – this highlights its parent’s boundary.
Clicking this highlighted boundary will select the parent.
2. Let us add Fill to the parent – Select the Options tab and select Image Fill. Use the image “RedHexagon” from the project library.
Let us add some padding so that we can see the Fill more clearly. Add 20px Horizontal and 20px Vertical padding. Now your slide should look like this:
You can add a slide background color as well to get a dual effect. Select the grey area to get Slide properties, and change the background to Custom. Select the color as Black.
Now your slide should look like this:
- Select the first fluid box on the left, and add an Image Fill to it. Select the image “iPadImage” from the Library.
- Go to the same Fluid box Style tab and uncheck “Stretch to Fit” both horizontally, and vertically. Add horizontal padding of 40px.
- Add a text caption to this Fluid Box. Add some text, and add Left and Right margins according to your preference.
- Now select the second Fluid box and insert two Vertical Fluid boxes. To each of these Fluid boxes we will add a Fill.
To the top one, we add an Image fill. Use “RedCircle” from the Library
To the bottom one, we will use a Solid Fill. Set a Red fill color and change the opacity to around 60-70%.
Your slide should now look like:
- For the final touches, add some Character images to the top Fluid Box with the RedCircle Fill. The Flow of this box should be Horizontal. If not, set it from the Fluid box Properties.
To the bottom box, add a few Smart Shape Buttons, or normal Buttons. The flow of this box should be Vertical. If not, set it from the Fluid box Properties.
- To make this Slide wrap beautifully on lower devices, let us set the Wrap Properties as well.
Select the parent Fluid box which contains the boxes with Red Circle and Red solid fill. You can do this by selecting its children, and then hovering on the boundaries to make it get highlighted. Once it is highlighted, click the highlight to select.
The Wrap Property for this Box must be set to “Squeeze in a Column”.
- Now preview your slide by moving the Slider in the edit area, or use “Preview” from the Big button bar on top.
You are all done with your slide now.
Tips:
- You can use Fill in the initial stages of designing your layout, as well. By setting Fill for Fluid boxes, you can clearly visualize which Fluid box wraps to which area after moving the Slider. Giving each box a color helps to see how wrapping happens.
- Fill is additive. If your parent Fluid Box has some color set to it, and if its child has another color, then the result which is visible to our eyes is a mix of both the colors. Similarly, if the parent has a black solid fill, whereas the child box has a transparent PNG image fill, then the combination of both is the final result on stage.


You must be logged in to post a comment.
- Most Recent
- Most Relevant
Thanks for sharing a valuable post. Hope you will share more post.
Very helpful!! Thank you for these tutorials and practice files. Please post more!!
This is a short project but WOW it covers a lot. In addition to the background image, you get to practice parent-child interactions between fluid boxes, formatting, and placing different types of objects.
Great job!
Hi Mohanda,
This is interesting. I’m working on my own Micro-learning project so this is really timely. Thanks for sharing.
Cheers,
Steve
