 Staff
8 posts
Staff
8 posts
CONSIDERATIONS AFTER SUGGESTING FLUID BOX
Under most circumstances hitting suggest Fluid Box would yield close to perfect results but in certain cases you may need to do some extra alterations(resizing fluid box, changing flow, wrap behavior) to the properties or even adding few Fluid Boxes manually to set the flow and wrap absolutely perfect as per the user’s preference.The target of this exercise is to achieve slide as in sample3 from sample2. You can compare the two and try making necessary changes so as to achieve slide in sample3.
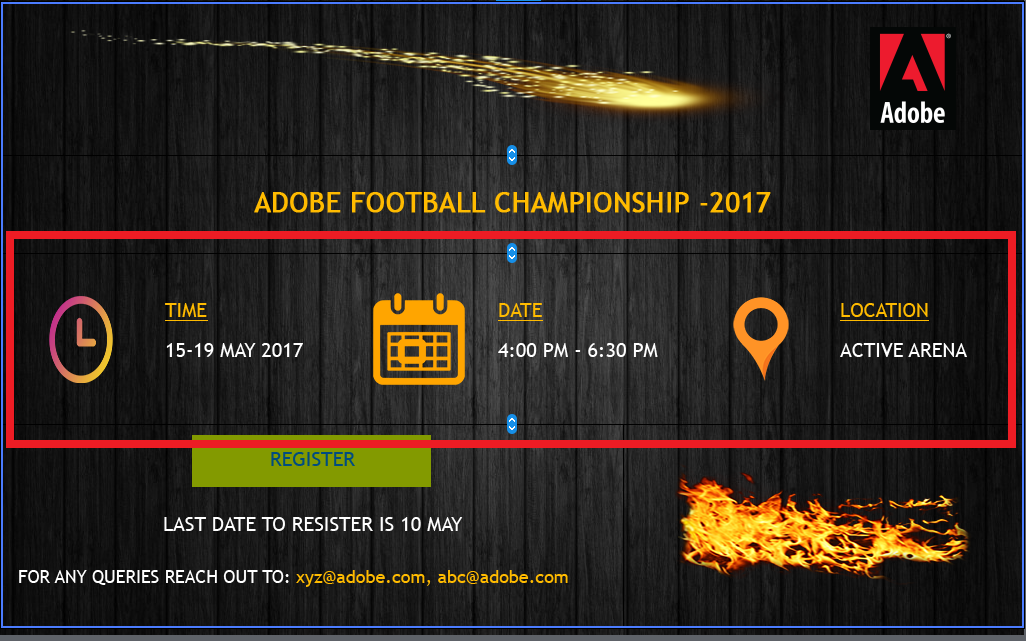
- Resize the Fluid Boxes as you may need more space for the items inside the highlighted fluid box FB_11 as and when they wrap. Make modifications, to achieve something like this:

Also see that the bottom Fluid Box has been resized horizontally, using the horizontal resize handler for FB_12:

- Consider adding 3 more Fluid Boxes to the FB_11, if you want the image and the corresponding text to wrap together. Since all the items, were added to a single fluid box, the wrap behavior exists on individual objects when its wrap point is hit. But in this case, you would want the clock image to be together with time text and similarly for date and location.
- To achieve this unlock all the objects from the FB_11. Move them off canvas to keep track of unlocked objects.
- Select FB_11 and add 3 horizontal Fluid boxes to FB_11.
- Make sure the FB_11 is stretch to fit along vertical axis and space around along horizontal axis with stretch to fit unchecked. (proj)
- Now drag and drop the items inside Fluid Boxes in the same order. (time, date and location). Remember to remove the unlock checkbox option.
- Make sure you set the flow for the newly added fluid boxes as horizontal for each.
- Perform the resize on individual objects to make it visually enhancing for the lower views.
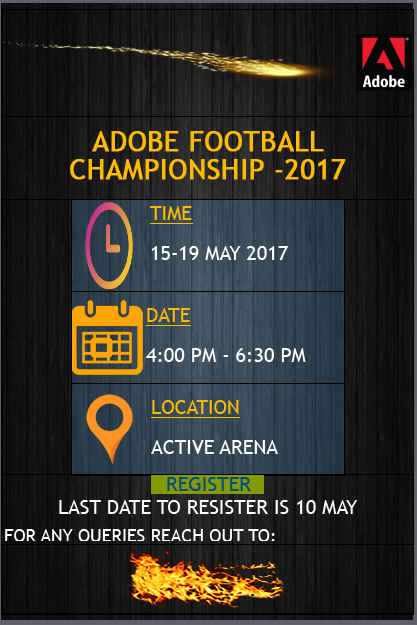
The above editing operations can be done and the values considered by moving the slider around and checking for the look and feel across the device width spectrum. (perform these steps with sample2 to achieve sample3)
- Consider setting wrap to squeeze in a row for the Fluid Box on top which contains a logo and you may not want it to wrap, rather, occupy that top right position.
You may not want the wrap behavior as in the above pic
- Coming back to replacement for those highlight smart shapes, you can now set the fill for the 3 newly added Fluid boxes.
Now you have something like this in the desktop view, ipad and google pixel respectively. (as in sample3)


CONSIDERATIONS AFTER SUGGESTING FLUID BOX
Under most circumstances hitting suggest Fluid Box would yield close to perfect results but in certain cases you may need to do some extra alterations(resizing fluid box, changing flow, wrap behavior) to the properties or even adding few Fluid Boxes manually to set the flow and wrap absolutely perfect as per the user’s preference.The target of this exercise is to achieve slide as in sample3 from sample2. You can compare the two and try making necessary changes so as to achieve slide in sample3.
- Resize the Fluid Boxes as you may need more space for the items inside the highlighted fluid box FB_11 as and when they wrap. Make modifications, to achieve something like this:
Also see that the bottom Fluid Box has been resized horizontally, using the horizontal resize handler for FB_12:
- Consider adding 3 more Fluid Boxes to the FB_11, if you want the image and the corresponding text to wrap together. Since all the items, were added to a single fluid box, the wrap behavior exists on individual objects when its wrap point is hit. But in this case, you would want the clock image to be together with time text and similarly for date and location.
- To achieve this unlock all the objects from the FB_11. Move them off canvas to keep track of unlocked objects.
- Select FB_11 and add 3 horizontal Fluid boxes to FB_11.
- Make sure the FB_11 is stretch to fit along vertical axis and space around along horizontal axis with stretch to fit unchecked. (proj)
- Now drag and drop the items inside Fluid Boxes in the same order. (time, date and location). Remember to remove the unlock checkbox option.
- Make sure you set the flow for the newly added fluid boxes as horizontal for each.
- Perform the resize on individual objects to make it visually enhancing for the lower views.
The above editing operations can be done and the values considered by moving the slider around and checking for the look and feel across the device width spectrum. (perform these steps with sample2 to achieve sample3)
- Consider setting wrap to squeeze in a row for the Fluid Box on top which contains a logo and you may not want it to wrap, rather, occupy that top right position.
You may not want the wrap behavior as in the above pic
- Coming back to replacement for those highlight smart shapes, you can now set the fill for the 3 newly added Fluid boxes.
Now you have something like this in the desktop view, ipad and google pixel respectively. (as in sample3)


You must be logged in to post a comment.
- Most Recent
- Most Relevant
