 Legend
99 posts
Legend
99 posts
If you have ever made rollover captions and tried to preview or publish a project in HTML5, I am guessing you have seen this box at some point.

Wait… What…? Not supported…? UGH! but rollover captions are really cool!
In this blog post, I hope to share with you an idea that, while it may not be perfect for every scenario, may help you with some future projects.
Not only should it remove the box above when you try to preview or publish, but it will allow you to use irregular shapes for your “rollover” or hover area.
We are going to make some custom “rollover captions” but we are simply going to call them hover hints. You may even think of it as a tool tip.
Example Setup
In my example, I use a map of Europe as the backdrop for the hover hints. I might want the learner to be able to hover over each country and have a popup that shows the name of the country. This might be good for students learning some geography in an academic setting, of course, but there are plenty of possibilities for the world of corporate training as well. The possibilities are endless.
In order to create the custom hover area, we will need to make use of the ‘Polygon’ tool to make our smart shape. That is the tool that looks like a little magic wand.

With this tool, each time I click creates a new segment between that location and the location of the click prior to it.
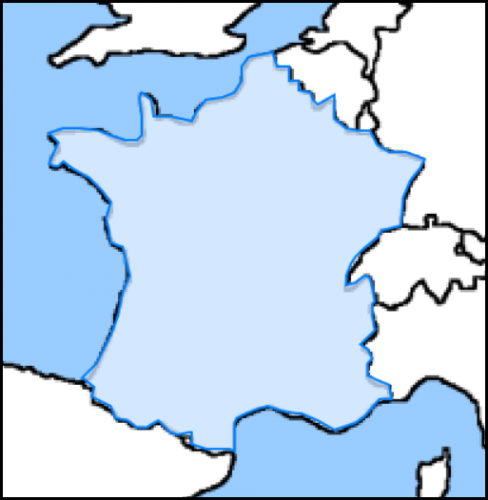
On the map, I like to zoom in a bit in order to have a little better precision as I trace around the borders of the country. In this example, I made one around France.
You can spend as little or as much time as you like doing the trace depending on your level of perfectionism.
At this point, I perform a few modifications to the properties. (Not necessarily in the order shown)
- I set the shape to be used as a button
- I set the On Success action to ‘No Action’
- I take the opacity down to 0%
- I set the stroke width for 0 (zero)
- I check to display hint
I am basically making the hover area invisible so as not to clutter the visibility of the map.


You can style the hint box and position it however you like.
Repeat the process for as many objects as necessary for your project.
The short video below shows how quick and simple it can be.
Hopefully this is helpful for someone out there.
Feel free to share ways that you have used this concept in your projects.
If you have ever made rollover captions and tried to preview or publish a project in HTML5, I am guessing you have seen this box at some point.
Wait… What…? Not supported…? UGH! but rollover captions are really cool!
In this blog post, I hope to share with you an idea that, while it may not be perfect for every scenario, may help you with some future projects.
Not only should it remove the box above when you try to preview or publish, but it will allow you to use irregular shapes for your “rollover” or hover area.
We are going to make some custom “rollover captions” but we are simply going to call them hover hints. You may even think of it as a tool tip.
Example Setup
In my example, I use a map of Europe as the backdrop for the hover hints. I might want the learner to be able to hover over each country and have a popup that shows the name of the country. This might be good for students learning some geography in an academic setting, of course, but there are plenty of possibilities for the world of corporate training as well. The possibilities are endless.
In order to create the custom hover area, we will need to make use of the ‘Polygon’ tool to make our smart shape. That is the tool that looks like a little magic wand.
With this tool, each time I click creates a new segment between that location and the location of the click prior to it.
On the map, I like to zoom in a bit in order to have a little better precision as I trace around the borders of the country. In this example, I made one around France.
You can spend as little or as much time as you like doing the trace depending on your level of perfectionism.
At this point, I perform a few modifications to the properties. (Not necessarily in the order shown)
- I set the shape to be used as a button
- I set the On Success action to ‘No Action’
- I take the opacity down to 0%
- I set the stroke width for 0 (zero)
- I check to display hint
I am basically making the hover area invisible so as not to clutter the visibility of the map.
You can style the hint box and position it however you like.
Repeat the process for as many objects as necessary for your project.
The short video below shows how quick and simple it can be.
Hopefully this is helpful for someone out there.
Feel free to share ways that you have used this concept in your projects.


You must be logged in to post a comment.
- Most Recent
- Most Relevant
Greg, I’ve ran into this issue. Thank you for sharing a possible work-around when the trainer needs this type of interaction publishing in HTML 5.
Be careful: even if you have irregular shapes, the bounding box is still important and you have to avoid overlapping bounding boxes.
I have treated a similar subject in a blog post two years ago, and presented it several times in presentations: http://blog.lilybiri.com/custom-hotspot-questions-in-captivate-8
