 Legend
245 posts
Legend
245 posts
Two workflows for conditional appearance of a Next button after having clicked all hotsptos as described in a previous article for non-responsive projects is tested in a Fluid Boxes setup. What has to change, which workflow is the most appropriate?
Intro
A couple of weeks ago I proposed two workflows for a common use case: learner has to click a number of hotspots which show explanations before being able to continue in the course. That example was for a non-responsive (maybe rescalable) project. If you missed it: Comparison Workflows for Hotspots
At the end I promised a follow-up article discussing how this can be realized in a responsive project, developed with Fluid Boxes. I will use exactly the same example, same variables (use both my custom theme and a shared action to get them quickly into the Fluid Boxes project – see Shared Actions Tips).
Preparation – Changes
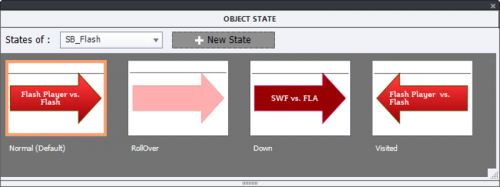
The shape buttons (arrows) used as hotspots had 4 InBuilt states in the original article. I want to use as much normal fluid boxes as possible. For that reason I have to simplify the Visited state where originally I added a checkmark image. This is not possible in a normal fluid box. The new object states look now like::
Show/Hide Workflow – Changes
In the original file the text shapes containing the explanation when a hotspot is clicked, were grouped and stacked in the same location. Grouping allowed to simplify the actions. Each action had the Hide Group command, before showing the appropriate text shape. Two parts of the workflow are impossible in a normal Fluid Box:
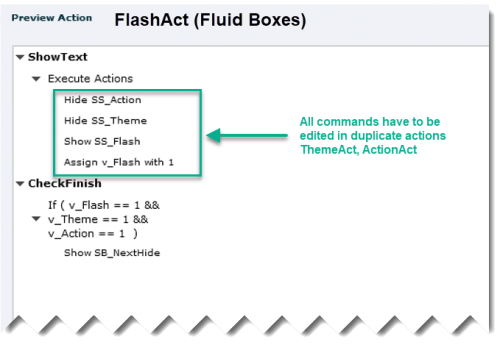
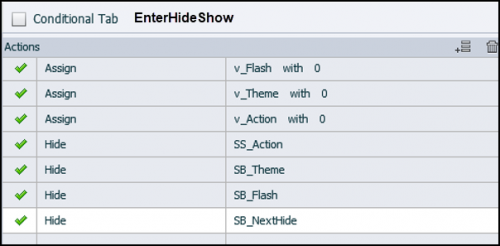
- Grouping cannot be used. The consequence is that you’ll need to have a command line for each text shape to be hidden. In this example, where only 3 hotspots are used, that is not too bad but it is getting worse when the number of hotspots increases. The advanced actions FlashAct, ThemeAct and ActionAct have to be changed as well as the action On Enter.
 ” />
” />
- It is impossible to have objects stacked in the same location. For that reason I marked the Fluid box which will have the text shapes as being static. That is not a very nice workaround. Although I marked the Height and Width of the shapes to be 100% and 90% of the size of the Fluid Box, that setting is not honored, the shape will shrink a lot more for smaller screens, because the width/height ratio of the FB is kept.
 ” />
” />
Multistate Workflow – No Changes!
Great news! No changes are needed for the Multistate workflow, it works perfectly in a Fluid Boxes project. I didin’t even have to change the fluid box with the multistate object in a static fluid box. You have of course to be careful not to add objects to the states of the object, because no stackng is allowed.
Conclusion is clear to me: avoid the good old Show/Hide workflow when you are working with Fluid Boxes. You have a much nicer result using a multistate object.
I will insert a link to the responsive project for those who want to help testing it on mobile devices. Let me know if you are interested?
Intro
A couple of weeks ago I proposed two workflows for a common use case: learner has to click a number of hotspots which show explanations before being able to continue in the course. That example was for a non-responsive (maybe rescalable) project. If you missed it: Comparison Workflows for Hotspots
At the end I promised a follow-up article discussing how this can be realized in a responsive project, developed with Fluid Boxes. I will use exactly the same example, same variables (use both my custom theme and a shared action to get them quickly into the Fluid Boxes project – see Shared Actions Tips).
Preparation – Changes
The shape buttons (arrows) used as hotspots had 4 InBuilt states in the original article. I want to use as much normal fluid boxes as possible. For that reason I have to simplify the Visited state where originally I added a checkmark image. This is not possible in a normal fluid box. The new object states look now like::
Show/Hide Workflow – Changes
In the original file the text shapes containing the explanation when a hotspot is clicked, were grouped and stacked in the same location. Grouping allowed to simplify the actions. Each action had the Hide Group command, before showing the appropriate text shape. Two parts of the workflow are impossible in a normal Fluid Box:
- Grouping cannot be used. The consequence is that you’ll need to have a command line for each text shape to be hidden. In this example, where only 3 hotspots are used, that is not too bad but it is getting worse when the number of hotspots increases. The advanced actions FlashAct, ThemeAct and ActionAct have to be changed as well as the action On Enter.
” /> - It is impossible to have objects stacked in the same location. For that reason I marked the Fluid box which will have the text shapes as being static. That is not a very nice workaround. Although I marked the Height and Width of the shapes to be 100% and 90% of the size of the Fluid Box, that setting is not honored, the shape will shrink a lot more for smaller screens, because the width/height ratio of the FB is kept.
Multistate Workflow – No Changes!
Great news! No changes are needed for the Multistate workflow, it works perfectly in a Fluid Boxes project. I didin’t even have to change the fluid box with the multistate object in a static fluid box. You have of course to be careful not to add objects to the states of the object, because no stackng is allowed.
Conclusion is clear to me: avoid the good old Show/Hide workflow when you are working with Fluid Boxes. You have a much nicer result using a multistate object.
I will insert a link to the responsive project for those who want to help testing it on mobile devices. Let me know if you are interested?


You must be logged in to post a comment.
- Most Recent
- Most Relevant
Hi Lieve,
That’s ok, I completely understand. What you posted is a very advanced trick and I’m sure many people don’t understand the significance of what you explained and that is why there are no comments.
I personally am frustrated with how fluid boxes work with multi state objects. I know you need to create a static fluid box to use multi state objects but like you pointed out the results aren’t as good. The picture objects get very small at different mobile sizes. In this article I think what you demonstrated by adding shapes with text in the fluid box , the text scales correctly because it is scaling along with the shape. I was hoping that could make multi state objects adjust size better but I think your solution is specific to text size.
In rethinking much of Captivate design I’m starting to think if you know your design mainly just for mobile phones the simplest solution is a non-responsive design with scalable html5 content checked. Then you can do almost everything Captivate does and it scales nicely even without a responsive design. I believe you made this point but I didn’t completely understand the point until trying it out and seeing how great the results are. And it’s so much simpler than trying to learn fluid boxes which I’m sure is very valuable when you need both a desktop and mobile design. I think I would certainly tell any Captivate beginner to stay away from responsive design with fluid boxes and stick with non-responsive html5 scaling.
Lieve, I often reread your articles a few times until I fully understand the point you are making. I very much appreciate your blogs and articles and I thank you for taking the time to write them.
-Steve
I didin’t think this to be a very advanced article. The big problem is that lot of developers just try to reproduce workflows which they found in a YouTube video without understanding why it has been done that way (which may not be the optimal workflow). When I coach training or publish articles, try to explain the reasons for my workflows as detailed as possible. This leads to a lot of ‘AFA erlebinsse’ during training which is very rewarding because it means the skills have been taken to a higher level . As someone wrote in a comment: I prefer to teach a hungry person how to fish instead of giving a fish.
I have been writing this often (and told the Captivate team): newibes should first start with non-responsive projects and master the core of Captivate (Timeline, Quizzing and Themes) before starting to create responsive projects. Indeed I wrote an article comparing rescabable HTML output with Fluid Boxes and Breakpoints. You can use multistate objects in a normal fluid box (did it in this project, maybe I’ll retrieve it), but you cannot add more objects to a state. If you have only one object in each state (shape can have text and image fill) it is OK.
Problematic is the fact that Fluid Boxes are pushed too much (look at the webinars in the recent years), and only about 10% of my clients really required that type of project. Confusing and misleading for all newbies. Same with ‘video’ is THE way too learn. Why are my 9 ears old blog posts still read? Is that the case with videos of that age?
You are probably the first to read this article. Since I didn’t get any feedback, I have not spent more time on publishing the example file and posting the link. Sorry about that, but my time is precious and I don’t want to spend it if it not helpful to anyone.
Hi Lieve,
Can you insert the link to this responsive design above so I can see it working?
Thank you,
-Steve Lewis
