 Staff
31 posts
Staff
31 posts
Quickly create studio-quality video-based demos to use in distance and classroom teaching. Capture screen content along with webcam audio or video right from your desktop, without investing in expensive studio hardware.
Quickly create studio-quality video-based demos to use in distance and classroom teaching. Capture screen content along with webcam audio or video right from your desktop, without investing in expensive studio hardware.
Let’s get started to learn how to record video demonstrations with Adobe Captivate.
- Click Video Demo on the Welcome screen. Or, click File > Record a New > Video Demo.
The recording window, marked by a red box, and the recording options appear.

- Click Screen Areaor Application based on what you want to record
- Select a panning mode if you want the recording window to follow your movements across the screen.
- If you are adding narration during recording, select the type of audio input.
- Select the Webcam, if you have more than one camera connected to your machine.
If your webcam is turned on, you can see the webcam feed on the screen. - You can now customize the backgrounds in the videos that you shoot.
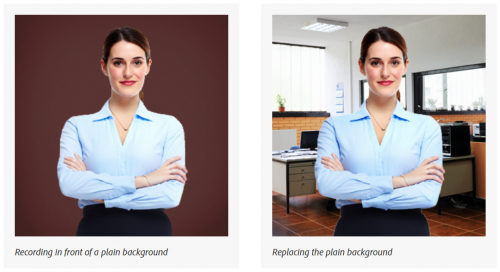
Tips: Shoot your footage with a plain background of a single color, remove that background, and replace it with something more attractive during post-production.
Here is a before and after example that illustrates how you can use this feature to alter your background.

- Click Record.
- Press End key (in Windows) or Cmd + Enter (Mac OS) when you have completed the recording. Alternatively, on Windows, click the task icon or the system tray icon to stop recording. On Mac, click the dock icon or the status bar icon.
- The preview of the recorded video appears and starts playing.

Tips and Tricks to easily Change the Background of the webcam feed
Quickly create studio-quality video-based demos to use in distance and classroom teaching. Capture screen content along with webcam audio or video right from your desktop, without investing in expensive studio hardware.
Let’s get started to learn how to record video demonstrations with Adobe Captivate.
- Click Video Demo on the Welcome screen. Or, click File > Record a New > Video Demo.
The recording window, marked by a red box, and the recording options appear.
- Click Screen Areaor Application based on what you want to record
- Select a panning mode if you want the recording window to follow your movements across the screen.
- If you are adding narration during recording, select the type of audio input.
- Select the Webcam, if you have more than one camera connected to your machine.
If your webcam is turned on, you can see the webcam feed on the screen. - You can now customize the backgrounds in the videos that you shoot.
Tips: Shoot your footage with a plain background of a single color, remove that background, and replace it with something more attractive during post-production.
Here is a before and after example that illustrates how you can use this feature to alter your background.
- Click Record.
- Press End key (in Windows) or Cmd + Enter (Mac OS) when you have completed the recording. Alternatively, on Windows, click the task icon or the system tray icon to stop recording. On Mac, click the dock icon or the status bar icon.
- The preview of the recorded video appears and starts playing.
Tips and Tricks to easily Change the Background of the webcam feed


You must be logged in to post a comment.
- Most Recent
- Most Relevant
Ooh, I’ll have to try this.
Adobe is goin to be so much better than the software I’ve been using! Thank you!
What has to be done with a retina screen?
Two possible solutions: change the ini file as recommended: DPIAwareness = 1 but you may end up with a tiny UI which is almost not manageable. I keep a dedicated older system, without a retina screen. You can also lower the resolution of the screen until you can have a display percentage of 100% which is easy enough to manage.
Thank you for the blog and the comments.
This is a lot easier than the whole Premiere/After Effects routine I had to labor through just 3 years ago.
May I just offer one tip: please mention what has to be done if the user is on a retina screen. That is a big problem….
