 Newbie
1 posts
Newbie
1 posts
This article explains how to integrate the ADFS Identity Provider (IdP) with SAML 2.0. This integration enables the use of SSO (Single Sign On) to access Adobe Captivate Prime.
Trigger:
To enable Single Sign On (SSO) for users to access Adobe Captivate Prime, an IdP (Identity Provider) supporting SAML 2.0 (Security Assertion Markup Language version 2.0) is required.
The Adobe Captivate Prime LMS supports SAML 2.0, which enables SSO (Single Sign On) using IdPs such as ADFS (Active Directory Federation Services). The use of an IdP, in this case the ADFS, means that user authentication is handled outside the LMS.
The procedure below explains how to integrate ADFS with SAML 2.0. It is advised that your organization’s IT team is closely involved in this process.
Pre-Requirements:
To enable ADFS to work with Captivate Prime, please ensure the following is in place:
- An Active Directory Instance where all users have an email address attribute.
- Fully installed and configured ADFS service.
- A Federation metadata .xml file. [Please contact the Adobe Captivate Prime Support Team captivateprimesupport@adobe.com for the Service Provider Metadata file. You must specify if you require the Global instance or the European instance according to your location.]
Procedure:
Step 1 – Add a Relying Party Trust
- Log in to the ADFS Server and launch the ADFS Management Console.

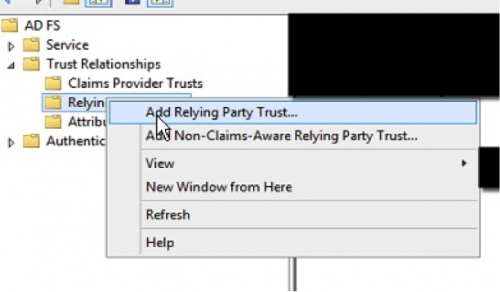
- Navigate within the ADFS Management Console and select ‘Relying Party Trusts’.


- Right click and select ‘Add Relying Party Trust…’ to launch the Add Relying Party Trust Wizard.

- On the Select Data Source screen, select ‘Import data about the relying party from a file’. Click ‘Browse’ and select the Adobe Captivate Prime configuration metadata xml you have previously saved (provided under Pre-Requirements above). Click ‘Next’.

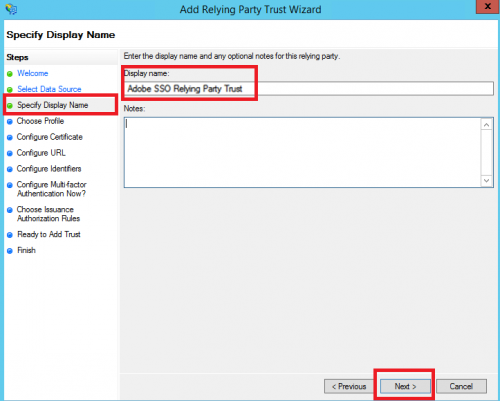
- Enter a Display Name that you will recognize or remember. Click ‘Next’.

- Here you must determine whether multi-factor authentication is required. Click ‘Next’.
- On the next screen, select ‘Permit all users to access this relying party’. Click ‘Next’.
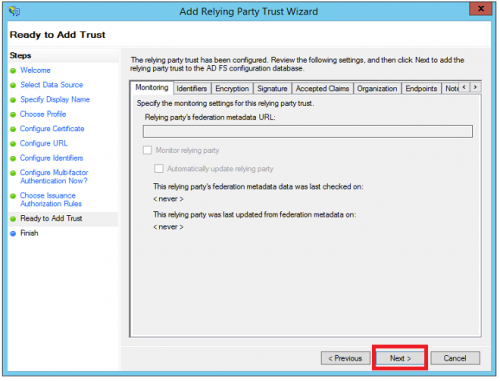
- The relying party trust has been configured. On the next screen, the wizard will display an overview of your settings. Review these settings and click ‘Next’.


- In the Finish screen, select ‘Open the Edit Claim Rules dialog’. Click ‘Close’.

Step 2 – Create Claim Rules
- Once the relying party trust has been created, you can create the claim rules. By default, the claim rule editor opens once you create the trust. A window opens called ‘Edit Claim Rules for Adobe SSO Relying Party Trust’. Click Add ‘Rule’.

- The Add Transform Claim Rule Wizard opens. In the Claim rule template drop-down menu. Select ‘Send LDAP Attributes as Claims’ and click on ‘Next’.

- On the screen, Edit Rule – LDAP EMAIL:
- In the text box under Client rule name, choose the source for user data, e.g. LDAP Email.
- From the drop-down menu under Attribute store, select ‘Active Directory’.
- From the LDAP Attribute column, select ‘E-Mail-Addresses’.
- From the Outgoing Claim Type column, select ‘E-Mail Address’.
- Click ‘OK’.


Step 3 – Finish
- Download the Federation metadata using https://server/FederationMetadata/2007-06/FederationMetadata.xml where the “server” is the name of the Server you use .
- Update your IdP metadata XML file and IdP login URL inside captivate prime
Conclusion:
You have now integrated ADFS with SAML to enable SSO for your Adobe Captivate Prime LMS account.
You must login to Adobe Captivate Prime as an Admin to configure SSO in the LMS. To learn more, please visit the Adobe Helpx page on how to Login to Captivate Prime using SSO Authentication.
For further assistance, contact the Adobe Captivate Prime Support Team at captivateprimesupport@adobe.com.
Trigger:
To enable Single Sign On (SSO) for users to access Adobe Captivate Prime, an IdP (Identity Provider) supporting SAML 2.0 (Security Assertion Markup Language version 2.0) is required.
The Adobe Captivate Prime LMS supports SAML 2.0, which enables SSO (Single Sign On) using IdPs such as ADFS (Active Directory Federation Services). The use of an IdP, in this case the ADFS, means that user authentication is handled outside the LMS.
The procedure below explains how to integrate ADFS with SAML 2.0. It is advised that your organization’s IT team is closely involved in this process.
Pre-Requirements:
To enable ADFS to work with Captivate Prime, please ensure the following is in place:
- An Active Directory Instance where all users have an email address attribute.
- Fully installed and configured ADFS service.
- A Federation metadata .xml file. [Please contact the Adobe Captivate Prime Support Team captivateprimesupport@adobe.com for the Service Provider Metadata file. You must specify if you require the Global instance or the European instance according to your location.]
Procedure:
Step 1 – Add a Relying Party Trust
- Log in to the ADFS Server and launch the ADFS Management Console.
- Navigate within the ADFS Management Console and select ‘Relying Party Trusts’.
- Right click and select ‘Add Relying Party Trust…’ to launch the Add Relying Party Trust Wizard.
- On the Select Data Source screen, select ‘Import data about the relying party from a file’. Click ‘Browse’ and select the Adobe Captivate Prime configuration metadata xml you have previously saved (provided under Pre-Requirements above). Click ‘Next’.
- Enter a Display Name that you will recognize or remember. Click ‘Next’.
- Here you must determine whether multi-factor authentication is required. Click ‘Next’.
- On the next screen, select ‘Permit all users to access this relying party’. Click ‘Next’.
- The relying party trust has been configured. On the next screen, the wizard will display an overview of your settings. Review these settings and click ‘Next’.
- In the Finish screen, select ‘Open the Edit Claim Rules dialog’. Click ‘Close’.
Step 2 – Create Claim Rules
- Once the relying party trust has been created, you can create the claim rules. By default, the claim rule editor opens once you create the trust. A window opens called ‘Edit Claim Rules for Adobe SSO Relying Party Trust’. Click Add ‘Rule’.
- The Add Transform Claim Rule Wizard opens. In the Claim rule template drop-down menu. Select ‘Send LDAP Attributes as Claims’ and click on ‘Next’.
- On the screen, Edit Rule – LDAP EMAIL:
- In the text box under Client rule name, choose the source for user data, e.g. LDAP Email.
- From the drop-down menu under Attribute store, select ‘Active Directory’.
- From the LDAP Attribute column, select ‘E-Mail-Addresses’.
- From the Outgoing Claim Type column, select ‘E-Mail Address’.
- Click ‘OK’.
Step 3 – Finish
- Download the Federation metadata using https://server/FederationMetadata/2007-06/FederationMetadata.xml where the “server” is the name of the Server you use .
- Update your IdP metadata XML file and IdP login URL inside captivate prime
Conclusion:
You have now integrated ADFS with SAML to enable SSO for your Adobe Captivate Prime LMS account.
You must login to Adobe Captivate Prime as an Admin to configure SSO in the LMS. To learn more, please visit the Adobe Helpx page on how to Login to Captivate Prime using SSO Authentication.
For further assistance, contact the Adobe Captivate Prime Support Team at captivateprimesupport@adobe.com.


You must be logged in to post a comment.
- Most Recent
- Most Relevant
