 Legend
245 posts
Legend
245 posts
Step by step tutorial to create a custom toggle button for Play/Pause, using multistate shape button, conditional action based on the system variable cpCmndPause.
Intro
Many years ago I did write this blog about a custom Play/Pause button. Meanwhile lot has changed in Adobe Captivate: new simple actions were added, multistate objects appeared, shape buttons became possible with InBuilt states and custom states. Due to a question on my personal blog, due to the recent posts about using System Variablees, time to write out a short article with a step-by step workflow to create a custom Play/pause button using a Shape Button.
Why Shape Button?
I wrote about States in this article: States and State Commands.
Captivate has 4 types of buttons, they all have the 4 InBuilt states: ‘Normal’, ‘Rollover’, ‘Down’, and ‘Visited’. They can all have supplementary custom states, which allows to create nice toggle buttons showing the situation at that moment. Examples: TOC open/closed, Audio playing/muted, CC visible/invisible etc. The three first states are included in the object style of the button or the shape, the Visited state is not included. Custom states are neither included in the style.
Text buttons, Transparent buttons (which are not necessarily transparent), Image buttons can NOT be used on master slides, can not be timed for the rest of the project. A shape button can be used on master slides, can be timed for the rest of the project. For a toggle button Play/oause this is a big advantage: you need only one shape button for your project. If you choose for one of the older button types, you would need a button on each slide.
Workflow
Shape Button – creation
You have to know what the start situation is in your course. By default (after having launched the course) everything will be in ‘Play’ situation. In that case the start look of the Shape button has to be ‘Pause’. You have to create that button on a slide, you cannot create states on a master slide.
- Create a shape and check off the option ‘Use as Button’.
- Open the State panel, using the button ‘State View’ in the Properties panel.
- In the Normal state, fill the shape with an image or text you want to show when the course is playing, to pause the course.
- Delete the InBuilt states ‘Rollover’ and ‘Down’, using the right-click menu on those states (you cannot use a simple Delete key).
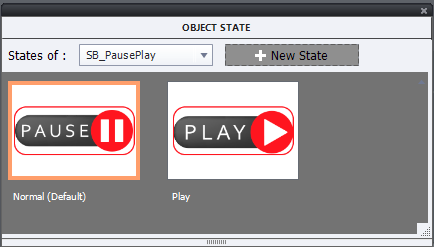
- Add a Custom State, and label it (I use Play as label)
- In this custom state fill the shape with an image or text you want to show when the course is paused, to resume Playing.
Here is a screenshot of the states I created:
Location Shape button
Once the button is ready, you have to decide where to put it, and take out the Pausing point. Reason: you want this button to be available all the time, but not a pausing point like you need for a Submit or a Next button. There are two possibilities for its location;
1. On master slides
If you want to use the Play/pause button on all slides, and you are creating a non-responsive project or a responsive project with breakpoint views, the easiest way is to copy/paste the button to the Main master slide. The daughter master slides can inherit the button. Careful: in some themes the Title master slides is not using the main master slide objects, you’ll need the button also on that master slide in that case.
There is a problem with this possible workflow due to the fact that shape buttons on master slides do not have an ID, and that means they cannot be used with the Chang State command. You can not show a custom state for shape buttons on master slides. As a workaround (not explained here in detail), you can combine the functionality of that button, with a two-state image which is on the first slide, timed for the rest of the project. That image will have an ID and you change the state of that image. The shape button on the master slide needs to be transparent (you can keep a stroke if you want) so that the images will be visible.
For a fluid boxes responsive project, you cannot use the main master slide (cannot have fluid boxes). You will need to insert the button on each used master slides where you want that functionality.
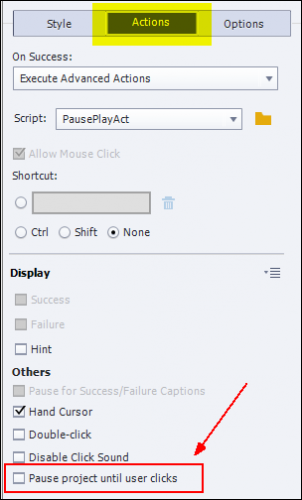
To turn off the pausing point: open the Actions tab of the button, and uncheck the option ‘Pause project until user clicks’.
Timed for the rest of the project
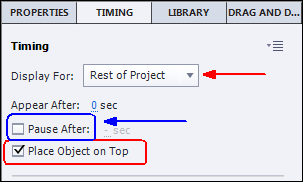
The alternative for the master slides, is to have the Play/pause button on the first slide, and time it for the rest of the project, always on top. That has to be done in the Timing Properties of the button. At that same place you can also turn off Pausing:
Advanced Action
The success event of the button has to trigger a rather simple advanced action. Check the ‘Conditional Tab’ and create this action:
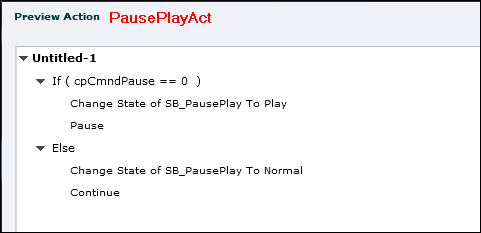
Explanation: I am checking the value of the Boolean variable cpCmndPause (see article). If that value = 0, the course is playing.
In that situation I will use the command ‘Pause’ (‘Pause’ is exactly the same as ‘Assign cpCmndPause with 1) and change the state of the button SB_PausePlay to the Play state.
If the course is paused however, that variable would not have the value = 0 (but = 1) and the ELSE commands are done: the state of the button is reset to Normal, and the playhead is released by the command ‘Continue’ (which is the same as Assign cpCmndResume with 1, which is also setting cpCmndPause back to 0).
Warning: not everything is ‘paused’!
As I explained more in detail in my sequence of blogs about the timeline, even an absolute pause (‘Pause’) will not pause everything. Here in short the most important:
- Animations of all type (animated GIF, SWF, OAM….).
- Event video if it is playing
- Audio which was started with the command ‘Play Audio’
For more information:
Same would happen with the Pause button on the default Captivate playbars. It is not due to the fact that this is a custom button.
Intro
Many years ago I did write this blog about a custom Play/Pause button. Meanwhile lot has changed in Adobe Captivate: new simple actions were added, multistate objects appeared, shape buttons became possible with InBuilt states and custom states. Due to a question on my personal blog, due to the recent posts about using System Variablees, time to write out a short article with a step-by step workflow to create a custom Play/pause button using a Shape Button.
Why Shape Button?
I wrote about States in this article: States and State Commands.
Captivate has 4 types of buttons, they all have the 4 InBuilt states: ‘Normal’, ‘Rollover’, ‘Down’, and ‘Visited’. They can all have supplementary custom states, which allows to create nice toggle buttons showing the situation at that moment. Examples: TOC open/closed, Audio playing/muted, CC visible/invisible etc. The three first states are included in the object style of the button or the shape, the Visited state is not included. Custom states are neither included in the style.
Text buttons, Transparent buttons (which are not necessarily transparent), Image buttons can NOT be used on master slides, can not be timed for the rest of the project. A shape button can be used on master slides, can be timed for the rest of the project. For a toggle button Play/oause this is a big advantage: you need only one shape button for your project. If you choose for one of the older button types, you would need a button on each slide.
Workflow
Shape Button – creation
You have to know what the start situation is in your course. By default (after having launched the course) everything will be in ‘Play’ situation. In that case the start look of the Shape button has to be ‘Pause’. You have to create that button on a slide, you cannot create states on a master slide.
- Create a shape and check off the option ‘Use as Button’.
- Open the State panel, using the button ‘State View’ in the Properties panel.
- In the Normal state, fill the shape with an image or text you want to show when the course is playing, to pause the course.
- Delete the InBuilt states ‘Rollover’ and ‘Down’, using the right-click menu on those states (you cannot use a simple Delete key).
- Add a Custom State, and label it (I use Play as label)
- In this custom state fill the shape with an image or text you want to show when the course is paused, to resume Playing.
Here is a screenshot of the states I created:
Location Shape button
Once the button is ready, you have to decide where to put it, and take out the Pausing point. Reason: you want this button to be available all the time, but not a pausing point like you need for a Submit or a Next button. There are two possibilities for its location;
1. On master slides
If you want to use the Play/pause button on all slides, and you are creating a non-responsive project or a responsive project with breakpoint views, the easiest way is to copy/paste the button to the Main master slide. The daughter master slides can inherit the button. Careful: in some themes the Title master slides is not using the main master slide objects, you’ll need the button also on that master slide in that case.
There is a problem with this possible workflow due to the fact that shape buttons on master slides do not have an ID, and that means they cannot be used with the Chang State command. You can not show a custom state for shape buttons on master slides. As a workaround (not explained here in detail), you can combine the functionality of that button, with a two-state image which is on the first slide, timed for the rest of the project. That image will have an ID and you change the state of that image. The shape button on the master slide needs to be transparent (you can keep a stroke if you want) so that the images will be visible.
For a fluid boxes responsive project, you cannot use the main master slide (cannot have fluid boxes). You will need to insert the button on each used master slides where you want that functionality.
To turn off the pausing point: open the Actions tab of the button, and uncheck the option ‘Pause project until user clicks’.
Timed for the rest of the project
The alternative for the master slides, is to have the Play/pause button on the first slide, and time it for the rest of the project, always on top. That has to be done in the Timing Properties of the button. At that same place you can also turn off Pausing:
Advanced Action
The success event of the button has to trigger a rather simple advanced action. Check the ‘Conditional Tab’ and create this action:
Explanation: I am checking the value of the Boolean variable cpCmndPause (see article). If that value = 0, the course is playing.
In that situation I will use the command ‘Pause’ (‘Pause’ is exactly the same as ‘Assign cpCmndPause with 1) and change the state of the button SB_PausePlay to the Play state.
If the course is paused however, that variable would not have the value = 0 (but = 1) and the ELSE commands are done: the state of the button is reset to Normal, and the playhead is released by the command ‘Continue’ (which is the same as Assign cpCmndResume with 1, which is also setting cpCmndPause back to 0).
Warning: not everything is ‘paused’!
As I explained more in detail in my sequence of blogs about the timeline, even an absolute pause (‘Pause’) will not pause everything. Here in short the most important:
- Animations of all type (animated GIF, SWF, OAM….).
- Event video if it is playing
- Audio which was started with the command ‘Play Audio’
For more information:
Same would happen with the Pause button on the default Captivate playbars. It is not due to the fact that this is a custom button.


You must be logged in to post a comment.
- Most Recent
- Most Relevant
IT is not a workaround, just a workflow.
Indeed, non master slides a shape button, a SVG as button or a bitmap as button cannot be addressed, since you don’t have an ID for the toggle button. INo object on master slides even has an ID and cannot have custom states since you cannot address it in an advanced action. As I showed in the interactive video, the best way is always to time it for the rest of the project.
In an older tutorial on my blog I have a real workaround: do not use a custom state but one of the shapes (not as button) which is on the first slide, and can be addressed. Use the action on the shape button on the master slide to show /hide that shape based on the state of the system variable cpCmndPause.
I will edit this post to add that old workflow. Here is the link to that old post:
http://blog.lilybiri.com/custom-playpause-button-in-captivate
This workaround does not work anymore. It pastes on the master as “Smart Shape” instead of the button name (SB_PausePlay) and the created custom state (play) is not present.
You’re welcome!
Thanks for the info!
