 Newbie
10 posts
Newbie
10 posts
This article describes how we can make animations with Captivate 2019 and 2017 by using cycles of picture as we do it in cartoons. Instead of using the Captivate Effects panel to animate pictures we use each state of a multi-state object as frame. It represents another way to make Captivate animations and can be helpful for people who are interested to animate a character (human or animal) in its different phases.
What is the objective?
– Showing how we can make a loop animation by using a cycle of pictures like we can do it in cartoons, by using as example the flight of a bird made in 3 pictures like shown in the video below.
– STEP BY STEP PROCESS –
CREATING THE PICTURES
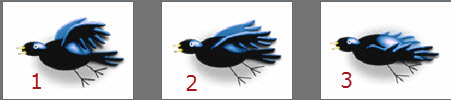
Prepare the cycle of picture you want to animate in a .png transparent format. This cycle can have the number of picture you want. For instance a walking cycle can have 12 pictures. In my example I have prepared 3 different pictures that will make a bird fly. (The wings are positioned differently).
MAKING THE CAPTIVATE ANIMATION
![]() Step 1
Step 1
Open your Adobe Captivate project into which you want to make your animation, and import all the pictures of your animated cycle into the Library. In my example I have imported my 3 pictures to the .png format.
![]() Step 2
Step 2
From the “Shapes” menu select a rectangle with a size which is a little larger than the size of your pictures, and make this shape completely transparent by setting its opacity and stroke to zero.

![]() Step 3
Step 3
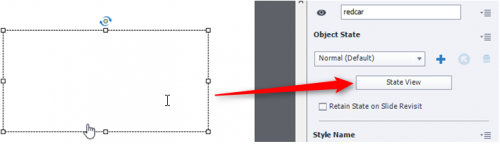
Select your transparent rectangle and click on the “State View” button.
![]() Step 4
Step 4
Into the Normal State, insert the first picture of your cycle into your shape and place it where you want your animation start.

![]() Step 5
Step 5
Click on the “+ New State” button and enter a name. In my example I have let the name of “NewSate1”.

![]() Step 6
Step 6
From the Library select your same first picture and place it at the same place than in your Normal state (same X and Y position).

![]() Step 7
Step 7
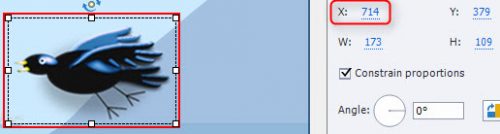
Create a new “State” and insert the second picture of your cycle by moving it to the right or left according your animation. In my example I have moved my second picture 30 pixels to the left.
![]() Step 8
Step 8
Repeat the same process by creating as many State as you have pictures in your cycle by moving them to the right or left according your animation. In my example, as I had 3 pictures in my cycle I have created a first cycle of 3 States like below, moving each one 30 pixels to the left (744px; 714px; 684px).

![]() Step 9
Step 9
Once you have created your first cycle of States like above, repeat this cycle as much as you want by continuing moving your pictures to the right or left. In my example I have repeated this cycle of 3 pictures 6 times, continuing moving each picture 30 pixels to the left. At the end my animation has been designed with 18 States in all. By doing so don’t forget to rearrange your pictures in a logical way so that your animation keeps the right movement.
(The picture below is just a snippet of all my created States.)

![]() Step 10
Step 10
Once you have set up all your animation, this one is completed. You do not need to use the Effects panel and you can Exit from your multi state object.
MAKING THE CAPTIVATE ANIMATION
This script will allow your animation to run in loop.
![]() Step 1
Step 1
In your Captivate slide, select your object and name it. In my example I have named it “bird”.

![]() Step 2
Step 2
Once done launch the “Advanced Actions” window from the “Project” menu and “Advanced Actions” sub-menu (you can also use other ways to launch this window).

![]() Step 3
Step 3
Create a script from the “+” sign, name it in the “Action Name” field and tick “Conditional Tab”.

![]() Step 4
Step 4
Select “While” as “Perform actions”, “All conditions are true” and enter the same script than in the screenshot below (“1 is equal to 1”).

Then in the “Actions” part below, display each of your States one by one by assigning them a “Change State of” and a “Delay Next Action by” action.
For the “Change State of”, assign the name of your different States in a logical way so that your animation be correctly animated. Then as the “Delay Next Action by” action represents the time of display of each State (picture), assign them the duration your picture needs. In my example I have entered a short duration (“0.1” second) for each one . (the screenshot below is just a snippet but what is missing has the same logic).

Once finished, save your script and close the window.
![]() Step 5
Step 5
Select the slide where your animation is, and from the “Actions” tab on the right, select “Execute Advanced Actions” from the “On Enter” drop-down menu. Then from the “Script” menu, select the script you have just created. In my example my script was “birdflight”.

![]() Step 6
Step 6
Save your project and launch a preview. Your animation should be correctly animated. If you are not satisfied by its rhythm you can improve it and make tests by changing the value of the “Delay Next Action by” action.
END OF THE DEMONSTRATION
Don’t hesitate to look at the video below. You will see other loop animations with their explanations.
https://www.youtube.com/watch?v=sFXxt9eJxC0
What is the objective?
– Showing how we can make a loop animation by using a cycle of pictures like we can do it in cartoons, by using as example the flight of a bird made in 3 pictures like shown in the video below.
– STEP BY STEP PROCESS –
CREATING THE PICTURES
Prepare the cycle of picture you want to animate in a .png transparent format. This cycle can have the number of picture you want. For instance a walking cycle can have 12 pictures. In my example I have prepared 3 different pictures that will make a bird fly. (The wings are positioned differently).
MAKING THE CAPTIVATE ANIMATION
![]() Step 1
Step 1
Open your Adobe Captivate project into which you want to make your animation, and import all the pictures of your animated cycle into the Library. In my example I have imported my 3 pictures to the .png format.
![]() Step 2
Step 2
From the “Shapes” menu select a rectangle with a size which is a little larger than the size of your pictures, and make this shape completely transparent by setting its opacity and stroke to zero.
![]() Step 3
Step 3
Select your transparent rectangle and click on the “State View” button.
![]() Step 4
Step 4
Into the Normal State, insert the first picture of your cycle into your shape and place it where you want your animation start.
![]() Step 5
Step 5
Click on the “+ New State” button and enter a name. In my example I have let the name of “NewSate1”.
![]() Step 6
Step 6
From the Library select your same first picture and place it at the same place than in your Normal state (same X and Y position).
![]() Step 7
Step 7
Create a new “State” and insert the second picture of your cycle by moving it to the right or left according your animation. In my example I have moved my second picture 30 pixels to the left.
![]() Step 8
Step 8
Repeat the same process by creating as many State as you have pictures in your cycle by moving them to the right or left according your animation. In my example, as I had 3 pictures in my cycle I have created a first cycle of 3 States like below, moving each one 30 pixels to the left (744px; 714px; 684px).
![]() Step 9
Step 9
Once you have created your first cycle of States like above, repeat this cycle as much as you want by continuing moving your pictures to the right or left. In my example I have repeated this cycle of 3 pictures 6 times, continuing moving each picture 30 pixels to the left. At the end my animation has been designed with 18 States in all. By doing so don’t forget to rearrange your pictures in a logical way so that your animation keeps the right movement.
(The picture below is just a snippet of all my created States.)
![]() Step 10
Step 10
Once you have set up all your animation, this one is completed. You do not need to use the Effects panel and you can Exit from your multi state object.
MAKING THE CAPTIVATE ANIMATION
This script will allow your animation to run in loop.
![]() Step 1
Step 1
In your Captivate slide, select your object and name it. In my example I have named it “bird”.
![]() Step 2
Step 2
Once done launch the “Advanced Actions” window from the “Project” menu and “Advanced Actions” sub-menu (you can also use other ways to launch this window).
![]() Step 3
Step 3
Create a script from the “+” sign, name it in the “Action Name” field and tick “Conditional Tab”.
![]() Step 4
Step 4
Select “While” as “Perform actions”, “All conditions are true” and enter the same script than in the screenshot below (“1 is equal to 1”).
Then in the “Actions” part below, display each of your States one by one by assigning them a “Change State of” and a “Delay Next Action by” action.
For the “Change State of”, assign the name of your different States in a logical way so that your animation be correctly animated. Then as the “Delay Next Action by” action represents the time of display of each State (picture), assign them the duration your picture needs. In my example I have entered a short duration (“0.1” second) for each one . (the screenshot below is just a snippet but what is missing has the same logic).
Once finished, save your script and close the window.
![]() Step 5
Step 5
Select the slide where your animation is, and from the “Actions” tab on the right, select “Execute Advanced Actions” from the “On Enter” drop-down menu. Then from the “Script” menu, select the script you have just created. In my example my script was “birdflight”.
![]() Step 6
Step 6
Save your project and launch a preview. Your animation should be correctly animated. If you are not satisfied by its rhythm you can improve it and make tests by changing the value of the “Delay Next Action by” action.
END OF THE DEMONSTRATION
Don’t hesitate to look at the video below. You will see other loop animations with their explanations.
https://www.youtube.com/watch?v=sFXxt9eJxC0


You must be logged in to post a comment.
- Most Recent
- Most Relevant
Whiteboard Animation is a type of video in which the content appears to be hand-drawn on a whiteboard or on a white backdrop. Since the basic graphics are easy to interpret, it’s a common way to share more complex details.
Such animations can add spice to a project. Your explanation is easy to follow. Thank you !
Absolutely brilliant. Thank you for sharing.
-Steve
Well, a common operation for people working with animations is to make sure they loop properly. For example, if a character is walking down a path, the walking motion comes from an Animation clip. The motion might last for only 10 frames but that motion plays in a continuous loop. In order to make the walking motion seamless, it must begin and end in a similar pose. Furthermore, being an animated video production maker I am loving to share my thought and get some knowledge from different resources and blogs which can help me to do something good in the animation industry.
Thanks for sharing this amazing technique. It is greatly appreciated!
Is there any reason why you are not filling the shape with an image in each state? I am thinking about fluid boxes project. Adding an image to a shape means this is not possible in a normal fluid box, only in a static fluid box.
