Captivate 2019, publishing html, white screeen
In the older versions of Captivate when publishing as HTML5 you could add an image to the Project Settings for the start and end to show instead of just the white screen. This option is not showing up in Captivate 2019. Is it possible to somehow have your first slide image or any image to show instead of just the white screen with the gray arrow.
Hello… Is there an update for this thread yet please? I am trying to preload my poster image underneath the play arrow because the white screen is confusing and will not engage users. I have posted my learning activity, but I am still not seeing the poster image in the background behind the start arrow.
Reason is that you posted the image in the wrong field. It is NOT a Preloader (that works only for SWF output), but you need to fill it in the first field (under AutoPlay). Whether Autoplay is checked or not is not important for HTML output, it is always disabled.
Have a look at my blog post:
http://blog.lilybiri.com/poster-image-autoplay
Thank you so much. I did see that blog post yesterday. I am not sure how I messed it up yesterday, but it is working now since I made the change you told me to. To change the play button… Do I just overwrite the ‘Play_icon.png’ file in the ‘assets/playbar/PlaybarIcons’ folder? Or… Do I change the play arrow within the Adobe Captive software interface?
You need administrator rights. As I explained in this blog, you find the Play icon in the folder HTML\assets\htmlimages and it is labeled play_icon.png.
Make a copy of that file to another location (you cannot edit in the original location). Open it in a graphics editor and clear the content, then save that empty image under the same name.
Got into the first folder, and rename the original image to play_icon_old.png. That could allow you to recover it later. Now copy the empty image to the htmlassets folder.
I am using Captivate 2017, but the image that I am replacing is not showing. I am keep getting the default spinning image. I even copied my image to /Applications/Adobe Captivate 2017/HTML/assets/htmlimages and used this path, still no luck. When I upload the SCORM file to the LMS the spin image changes to a different loader image with a green bar filling and the word Captivate above it (I can’t locate this image anywhere on my files). How can this be customized? Thank you!
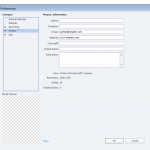
I appreciate your answer. My confusion comes in that when I look at your link about adding the poster image which I did see before I posted this question. My project settings screen does not look like yours with those options. It used to until I upgraded to 2019. Please see the image I attached.
Promised link in my first answer:
https://elearning.adobe.com/2018/05/cope-autoplay-turned-off/
When I see your title, you talk about a preloader image, not about the poster image. The description was confusing to me because you were talking about an image (not about an animation which is the preloader) . Are you talking about a preloader? Moreover I don’t see why a preloader would be needed at the end?
To speed up the launch of the course, avoid to have a heavy first slide, make it a simple Title slide, no audio if possible, no video, no Advanced or Shared actions On Enter.
Hmm…. really? Sorry for the smile, but I never had that option in Captivate which I am using daily since 10 years.
There has always been the option to use a poster image, when you turned off AutoPlay. Since the second version of CP2017, due to decisions by browsers to prevent AutoPlay in websites (and eLearning courses to HTML are really websites) AutoPlay is turned off automatically for all HTML5 output.
The poster image can still be added in the old way under Preferences, Project, Start and End.
I will post a link to a blog where you can see how to make that static splash screen more engaging.
As for an end image? I never did see that option, of course may bave missed it.
You must be logged in to post a comment.


