- User Variables – introduction
- Blog
- User Variables – introduction
 Legend
245 posts
Meant as introduction to User variables: defining a user variable, how can it be used, how to remove/edit/check usage.
Intro
In a recent post I described how you can create a variable to replace the generic variable associated with a Text Entry Box., by using the X button next to the Variable field:

This was a very specific but rare situation in Captivate: the variable needed for a TEB is created automatically, it has by default the same name as the TEB itself. There were two reasons to replace it: to recognize it easier in any dropdown list, and because I really don’t like to use the same name twice for two different items (the TEB and the variable), which in most situations is not a good practice, could cause problems.
In that same post I also mentioned that two user variables are created automatically for each project: cpQuizInfoStudentName and cpQuizInfoStudentID. They can be populated with data from the learner’s account by some LMS’s and are used for reporting to an Internal Server. In all other circumstances you need to create user variables.
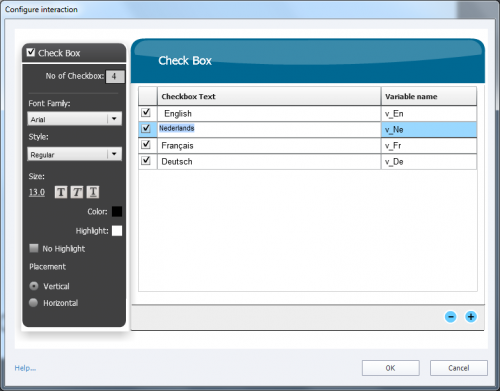
A typical use case are those Learning Interactions which can have one or more associated variables. You can consult my table in this post to find these. You can type in a variable in the Properties dialog box for those interactions, but that variable will not be automatically created, contrary to the situation with a Text Entry Box. You need to create it separately. There is also no way to select the variable from a dropdown list neither. Be careful: remember that variables are case sensitive, typos would lead to problems. Look at this screenshot for the Checkbox interaction, I associated 4 variables but have to create them (see further)

Defining a user variable
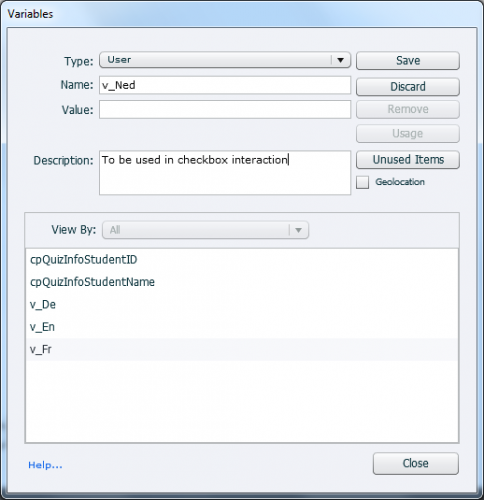
User variables are defined using Project, Variables. You’ll see the two default user variables cpQuizInfoID/Name and eventually variables defined with the TEB-workflow. To create a new user variable you click the button ‘Add New’. You could limit the definition to the variable name and clicking ‘Save’ button, but I strongly recommend to add a description as well. It makes it a lot easier to identify the variable when you have to edit the course weeks/months/years later. In this screenshot I still have to click the Save button or the ‘Discard’ if after all I don’t want this variable.

You see in the screenshot that I left the Value field blank, because for these variables I didn’t need a default nor start value at all. Those variables will be linked to an interaction.
As mentioned multiple times, the choice of the names is very important in Captivate. Except for some rare situations, you cannot use the same name for two or more different items (objects, variables, actions, ….). Using the first character(s) of the name to indicate the type of item is a way to avoid that. In most dropdown lists, you can use filtering to find a name (see the interactive video in Custom Play/Pause button). That makes the name choice even more important.
The other buttons in this dialog box are:
- Remove: if you want to clean up, check which variables are not used anymore after finishing the project and use this button. You can open the Variables dialog box from the Advanced Actions dialog box (see this article). In that case, the Remove button will be missing however.
- Usage: will list up where the variable is used. That will mostly be an action (simple/advanced.shared), can be compared with a similar button in the Library, and in the Advanced Actions dialog box.
- Unused items: also to be compared with a Library functionality. In the example of the dialog box, the two user variable cpQuizInfo…. would pop up.
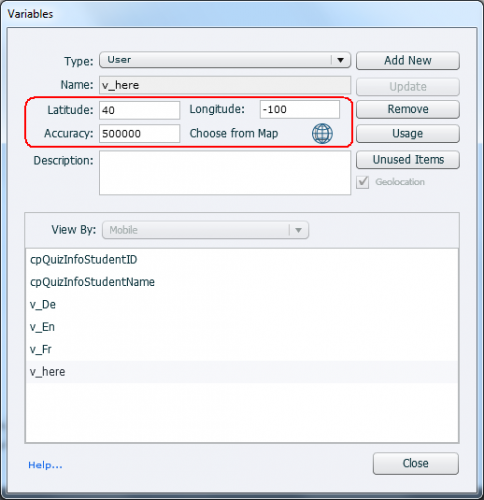
- check box Geolocation: if you want to use a conditional action based on comparison between the system variable cpInfoGeolocation and the present location of the learner, you need to define a user variable. Since both variables need exceptionally 3 numbers (all other variables have only one string or number) you need to check this box to be able to define a user variable of that type. The dialog box will then look like (I used the Map button and typed an address):

You can edit each field of a the variable dialog box, except the Name field. Do not forget to save the changes with the Save button in the top of the dialog box.
Variable commands
Captivate doesn’t allow to define the type of a variable: toggle, numeric, string but is smart enough to detect which variable you have based on the commands you use. Typical for variables are these simple commands:
- Assign: allows to fill a variable with a value or to change that value. This command can be used for any type of variable
Example: Assign v_name with Lieve
Assign v_score with 7 - Increment …. by …: variable will be recognized as a number, and its value will be increased by the indicated amount
Example: Increment v_counter by 1
Increment v_score by 3 - Decrement …. by …: variable will be recognized as a number, and its value will be decreased by the indicated amount
Example: Decrement v_counter by 1
Decrement v_score by 2 - Toggle: variable will be recognized as a Boolean variable. Its value will switch to the opposite value (0/1 or true/false).
Example: Toggle v_visb
These commands are of course also available in the dropdown lists of the Advanced Actions dialog box. For those actions you also will find variables often in:
- Expression (command): which allows you to do some simple mathematical operations. The variables will be recognized as numeric. Here is a simple example, where the percentage is calculated from a score and the maximum amount of points (not using the quizzing system variables):
Example: Expression v_total = v_score/v_max
Expression v_total = v_total * 100 - in Conditions (for a conditional action or a while loop) you will often use variables, either to compare with a literal or with another variable
Example: IF v_visib is equal to 1 or
IF v_name is equal to v_null or
While v_counter is equal or greater than 1
My favourite variables
In the examples above, and in other blog posts you’ll find often these variables. Read till the end to see how I avoid to define them from scratch in each course:
- v_counter: often used to show the number of clicks, of visits (to a chapter), and/or to create a progress bar or show a ‘reward’.
- v_null: an empty variable to check if the learner has entered at least one character in a field (see Where is Null?)
- v_visib: a variable to track if an object/group is visible or hidden (see Multiple toggle buttons with 1 Shared Action)
- v_name: often associated with a TEB
- v_start: often used to store the first frame number of a slide when using micro-navigation (see Force First View)
- v_one, v_two…..: variables which I use for multiple goals like a dashboard, the checkbox widget,
I use a shared action which I drag to each new course to avoid having to redefine these user variables. This is described in detail in the first tip in Rare Use of Shared Actions.
Intro
In a recent post I described how you can create a variable to replace the generic variable associated with a Text Entry Box., by using the X button next to the Variable field:

This was a very specific but rare situation in Captivate: the variable needed for a TEB is created automatically, it has by default the same name as the TEB itself. There were two reasons to replace it: to recognize it easier in any dropdown list, and because I really don’t like to use the same name twice for two different items (the TEB and the variable), which in most situations is not a good practice, could cause problems.
In that same post I also mentioned that two user variables are created automatically for each project: cpQuizInfoStudentName and cpQuizInfoStudentID. They can be populated with data from the learner’s account by some LMS’s and are used for reporting to an Internal Server. In all other circumstances you need to create user variables.
A typical use case are those Learning Interactions which can have one or more associated variables. You can consult my table in this post to find these. You can type in a variable in the Properties dialog box for those interactions, but that variable will not be automatically created, contrary to the situation with a Text Entry Box. You need to create it separately. There is also no way to select the variable from a dropdown list neither. Be careful: remember that variables are case sensitive, typos would lead to problems. Look at this screenshot for the Checkbox interaction, I associated 4 variables but have to create them (see further)

Defining a user variable
User variables are defined using Project, Variables. You’ll see the two default user variables cpQuizInfoID/Name and eventually variables defined with the TEB-workflow. To create a new user variable you click the button ‘Add New’. You could limit the definition to the variable name and clicking ‘Save’ button, but I strongly recommend to add a description as well. It makes it a lot easier to identify the variable when you have to edit the course weeks/months/years later. In this screenshot I still have to click the Save button or the ‘Discard’ if after all I don’t want this variable.

You see in the screenshot that I left the Value field blank, because for these variables I didn’t need a default nor start value at all. Those variables will be linked to an interaction.
As mentioned multiple times, the choice of the names is very important in Captivate. Except for some rare situations, you cannot use the same name for two or more different items (objects, variables, actions, ….). Using the first character(s) of the name to indicate the type of item is a way to avoid that. In most dropdown lists, you can use filtering to find a name (see the interactive video in Custom Play/Pause button). That makes the name choice even more important.
The other buttons in this dialog box are:
- Remove: if you want to clean up, check which variables are not used anymore after finishing the project and use this button. You can open the Variables dialog box from the Advanced Actions dialog box (see this article). In that case, the Remove button will be missing however.
- Usage: will list up where the variable is used. That will mostly be an action (simple/advanced.shared), can be compared with a similar button in the Library, and in the Advanced Actions dialog box.
- Unused items: also to be compared with a Library functionality. In the example of the dialog box, the two user variable cpQuizInfo…. would pop up.
- check box Geolocation: if you want to use a conditional action based on comparison between the system variable cpInfoGeolocation and the present location of the learner, you need to define a user variable. Since both variables need exceptionally 3 numbers (all other variables have only one string or number) you need to check this box to be able to define a user variable of that type. The dialog box will then look like (I used the Map button and typed an address):

You can edit each field of a the variable dialog box, except the Name field. Do not forget to save the changes with the Save button in the top of the dialog box.
Variable commands
Captivate doesn’t allow to define the type of a variable: toggle, numeric, string but is smart enough to detect which variable you have based on the commands you use. Typical for variables are these simple commands:
- Assign: allows to fill a variable with a value or to change that value. This command can be used for any type of variable
Example: Assign v_name with Lieve
Assign v_score with 7 - Increment …. by …: variable will be recognized as a number, and its value will be increased by the indicated amount
Example: Increment v_counter by 1
Increment v_score by 3 - Decrement …. by …: variable will be recognized as a number, and its value will be decreased by the indicated amount
Example: Decrement v_counter by 1
Decrement v_score by 2 - Toggle: variable will be recognized as a Boolean variable. Its value will switch to the opposite value (0/1 or true/false).
Example: Toggle v_visb
These commands are of course also available in the dropdown lists of the Advanced Actions dialog box. For those actions you also will find variables often in:
- Expression (command): which allows you to do some simple mathematical operations. The variables will be recognized as numeric. Here is a simple example, where the percentage is calculated from a score and the maximum amount of points (not using the quizzing system variables):
Example: Expression v_total = v_score/v_max
Expression v_total = v_total * 100 - in Conditions (for a conditional action or a while loop) you will often use variables, either to compare with a literal or with another variable
Example: IF v_visib is equal to 1 or
IF v_name is equal to v_null or
While v_counter is equal or greater than 1
My favourite variables
In the examples above, and in other blog posts you’ll find often these variables. Read till the end to see how I avoid to define them from scratch in each course:
- v_counter: often used to show the number of clicks, of visits (to a chapter), and/or to create a progress bar or show a ‘reward’.
- v_null: an empty variable to check if the learner has entered at least one character in a field (see Where is Null?)
- v_visib: a variable to track if an object/group is visible or hidden (see Multiple toggle buttons with 1 Shared Action)
- v_name: often associated with a TEB
- v_start: often used to store the first frame number of a slide when using micro-navigation (see Force First View)
- v_one, v_two…..: variables which I use for multiple goals like a dashboard, the checkbox widget,
I use a shared action which I drag to each new course to avoid having to redefine these user variables. This is described in detail in the first tip in Rare Use of Shared Actions.
 Legend
245 posts
- Most Recent
- Most Relevant
Since I have been sort of a promotor for advanced actions, although I have been programming a lot in my professional career, I can confirm that many users learned to use advanced and shared actions which are much more accessible than having to learn the syntax rules for Javascript. Adding JS can extend the possibilities of the advanced/shared actions. I wouldn’t call them newbies, I don’t consider myself to be a newbie and I do use shared actions (and advanced actions) a lot. They need a slightly different approach from programming but in most cases are an alternative, provided you know the tricks.
I often provide clients with shared actions, or sometimes with advanced actions and variables. A small explanation is sufficient to allow them to edit those actions. That would simply be impossible with real scripts.
It is interesting how Adobe decided for a menu based programing instead of language based programming. It certainly makes it easier for the newbie but more complicated for the advanced programmer. And I am wondering if there are more newbies trying to use variables and programming than real programmers.


