 Legend
245 posts
Legend
245 posts
Four tips for using the Assets panel: for QSP’s – Quick Start Projects, Characters, Icons and Buttons.
Intro
Do not expect a complete overview in this article. The user interface is really simple, intuitive. You can open the panel either with the big button Assets in the right part of the Big Button Bar. In the expert UI it will be the only button in that part, in the newbie UI the Assets button will be before the Properties and Library button. Alternative to the Assets button is the option ‘Asset Library…’ under the big button Slides on the left side of the bar.
At this moment the stored assets can only be those available with Captivate ( under Assets tab ) or downloaded assets ( under Downloads tab ), you cannot add custom assets for reuse. For those custom assets remember that you can use external libraries.
The center tab – Discover – gives you the choice to find ‘Templates’ (confusing term, not the cptl template files) or ‘Characters’, all on the site of the eLearning Brothers. Once downloaded, they’ll appear in the Downloads tab.
Tip 1: Projects/slides
First option under the Assets tab, opening by default with Slides option which allows you to choose individual slides to insert in an existing project. Under Projects you will see 6 Quick Start Projects (QSP). First one is the Branching file for those who hate variables and actions, and is based on the last QSP, labeled ‘Aspire’. All projects and slides are available in two formats:
- Non-responsive project (Blank project in Welcome screen)
- Responsive project with Fluid Boxes (none for Breakpoints)
If you insert a slide in an existing project created in one of those types, the inserted slide will automatically be of the same type. A master slide may have been added, and object styles but I’ll leave that for another blog post.
However, some users asked me how do you open a full QSP in the wanted type? There is no choice available.
Workaround which works for me: open first a project in the wanted type, either a blank project or a responsive project. Anyway you need an open project to be able to launch the Assets panel. If you now choose a QSP to open as new project, it will have the same type as the already opened project. You can then delete the first project, do not need it anymore.
Tip 2: Characters
Contrary to previous versions, the characters packaged with Captivate are only installed as thumbnails. You can find them under the eLearning assets in the Content folder. Each character has a folder with a Number as name, and a subfolder Children, where you find all the thumbnails. When you insert a character in a project, the image is downloaded and stored in another subfolder with the name of the character (in this screenshot David), either in the High or the Low sub-subfolder, depending on the chosen quality:
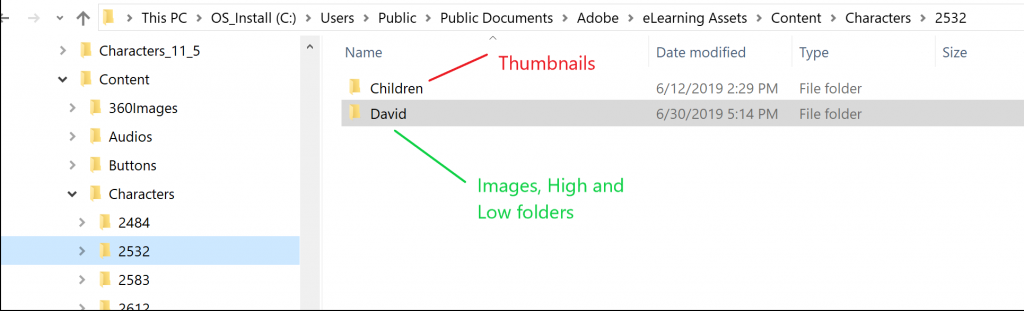
Screenshot is taken on a Windows system. If you download a extra character for the eLB site, it will be stored undeer Characters_11_5.
You still cannot download multiple all characters in one set in one download action (please log a feature request). However, if you like the Illustrated category, here is a tip. Those characters are based on one drawing file, which you can download as well. You have some choices for the format, but I prefer AI (Illustrator). If you are comfortable with that application, you can extract all characters from that file and export them as PNG, but also as SVG (smaller file size and vector based, crisp look whatever the resolution). Those drawing files are always labeled ‘Name: Illustrated work files’. You can also use it as a reference file, when downloaded it will be stored in the subfolder ‘Others’ under eLearning assets, not under Content, nor Characters. You can move it of course.

Tip 3: Icons
Those icons are SVG’s. This means that once inserted you can convert them to a button. Editing the colors is very easy as I explained in a previous article.

Where are those icons stored? The Contents folder in eLearning assets has an Icons subfolder. The icons stored here are exactly the same as the SVG’s present in the Assets panel, but …. they are in jpeg format. However on inserting an icon, the SVG is created in the same folder as the original jpeg image. Try it out, and rescale the SVG, you’ll see that it remains crisp in any size, contrary to bitmap images.
Tip 4: Buttons
I am finalizing another blog about the 6 types of buttons available in Captivate, advantages and disadvantages of each type. Which type of buttons do you insert from the Assets panel? That was bit of a mystery at first. When you insert a button, you’ll get a PNG image (bitmap) with the option ‘Use as button’ checked. The three InBuilt states (Normal, Rollover, Down) look exactly the same. You have the possibility to edit the image. However I was bit astonished at the name of the image. Look at this screenshot:

That name ‘Deep-download_up.png’ seems to point to the needed name convention for an (old) image button. For those buttons you need to create three images in the same size, with the same name followed by _up (for normal state), _over for rollover state and _down for the down state. I had a look at the Buttons folder in the already mentioned Content folder. It has has a similar structure as Characters and Icons subfolders, numbers as folder names. Each folder has indeed only an ‘up’ state.
Of course you can edit the states in the project, using the Object state panel, but you will not be able to reuse that button with the edited states in a future project. I followed my intuition:
- I duplicated the _up file in the ContentButtons folder for the button 5751 ‘Bubbly_downloads,
- renamed the duplicate to _over and _down with the same name,
- edited the duplicates in Photoshop, see result in this screenshot:
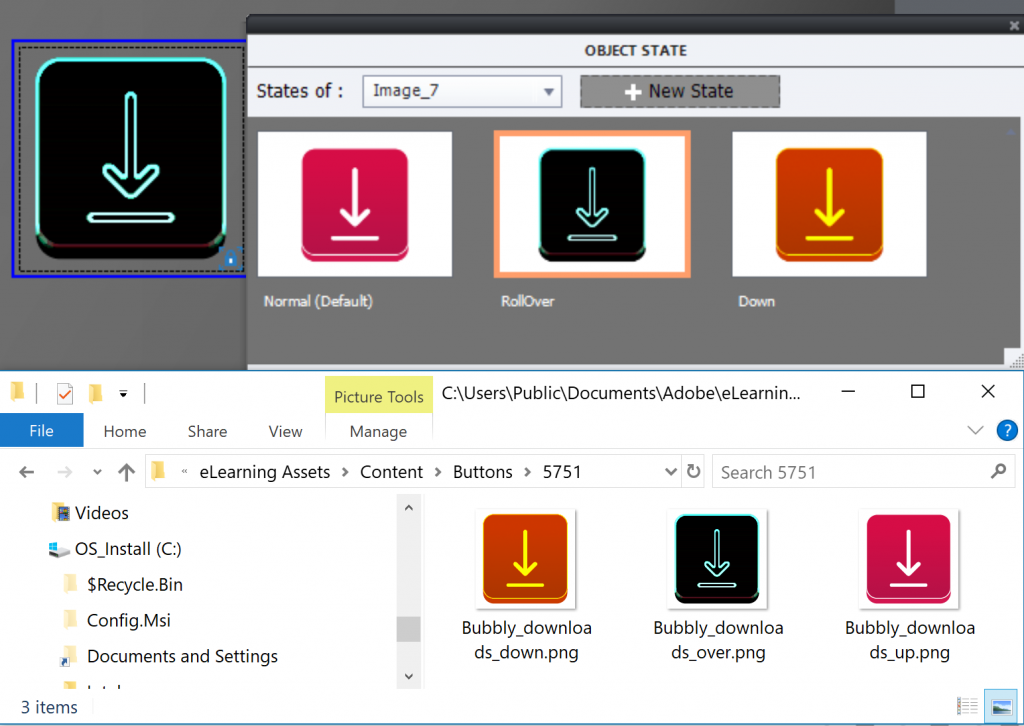
This was successful: I did insert the button and it did so including the InBuilt states, not only when inserting in the same project, but also in other projects. You cannot have an object style for Images used as buttons, but this opens another way to re-usability (where Captivate excels over other authoring tools). One drawback: only on the present device.
More about buttons in a future blog as promised.
Intro
Do not expect a complete overview in this article. The user interface is really simple, intuitive. You can open the panel either with the big button Assets in the right part of the Big Button Bar. In the expert UI it will be the only button in that part, in the newbie UI the Assets button will be before the Properties and Library button. Alternative to the Assets button is the option ‘Asset Library…’ under the big button Slides on the left side of the bar.
At this moment the stored assets can only be those available with Captivate ( under Assets tab ) or downloaded assets ( under Downloads tab ), you cannot add custom assets for reuse. For those custom assets remember that you can use external libraries.
The center tab – Discover – gives you the choice to find ‘Templates’ (confusing term, not the cptl template files) or ‘Characters’, all on the site of the eLearning Brothers. Once downloaded, they’ll appear in the Downloads tab.
Tip 1: Projects/slides
First option under the Assets tab, opening by default with Slides option which allows you to choose individual slides to insert in an existing project. Under Projects you will see 6 Quick Start Projects (QSP). First one is the Branching file for those who hate variables and actions, and is based on the last QSP, labeled ‘Aspire’. All projects and slides are available in two formats:
- Non-responsive project (Blank project in Welcome screen)
- Responsive project with Fluid Boxes (none for Breakpoints)
If you insert a slide in an existing project created in one of those types, the inserted slide will automatically be of the same type. A master slide may have been added, and object styles but I’ll leave that for another blog post.
However, some users asked me how do you open a full QSP in the wanted type? There is no choice available.
Workaround which works for me: open first a project in the wanted type, either a blank project or a responsive project. Anyway you need an open project to be able to launch the Assets panel. If you now choose a QSP to open as new project, it will have the same type as the already opened project. You can then delete the first project, do not need it anymore.
Tip 2: Characters
Contrary to previous versions, the characters packaged with Captivate are only installed as thumbnails. You can find them under the eLearning assets in the Content folder. Each character has a folder with a Number as name, and a subfolder Children, where you find all the thumbnails. When you insert a character in a project, the image is downloaded and stored in another subfolder with the name of the character (in this screenshot David), either in the High or the Low sub-subfolder, depending on the chosen quality:
Screenshot is taken on a Windows system. If you download a extra character for the eLB site, it will be stored undeer Characters_11_5.
You still cannot download multiple all characters in one set in one download action (please log a feature request). However, if you like the Illustrated category, here is a tip. Those characters are based on one drawing file, which you can download as well. You have some choices for the format, but I prefer AI (Illustrator). If you are comfortable with that application, you can extract all characters from that file and export them as PNG, but also as SVG (smaller file size and vector based, crisp look whatever the resolution). Those drawing files are always labeled ‘Name: Illustrated work files’. You can also use it as a reference file, when downloaded it will be stored in the subfolder ‘Others’ under eLearning assets, not under Content, nor Characters. You can move it of course.
Tip 3: Icons
Those icons are SVG’s. This means that once inserted you can convert them to a button. Editing the colors is very easy as I explained in a previous article.
Where are those icons stored? The Contents folder in eLearning assets has an Icons subfolder. The icons stored here are exactly the same as the SVG’s present in the Assets panel, but …. they are in jpeg format. However on inserting an icon, the SVG is created in the same folder as the original jpeg image. Try it out, and rescale the SVG, you’ll see that it remains crisp in any size, contrary to bitmap images.
Tip 4: Buttons
I am finalizing another blog about the 6 types of buttons available in Captivate, advantages and disadvantages of each type. Which type of buttons do you insert from the Assets panel? That was bit of a mystery at first. When you insert a button, you’ll get a PNG image (bitmap) with the option ‘Use as button’ checked. The three InBuilt states (Normal, Rollover, Down) look exactly the same. You have the possibility to edit the image. However I was bit astonished at the name of the image. Look at this screenshot:
That name ‘Deep-download_up.png’ seems to point to the needed name convention for an (old) image button. For those buttons you need to create three images in the same size, with the same name followed by _up (for normal state), _over for rollover state and _down for the down state. I had a look at the Buttons folder in the already mentioned Content folder. It has has a similar structure as Characters and Icons subfolders, numbers as folder names. Each folder has indeed only an ‘up’ state.
Of course you can edit the states in the project, using the Object state panel, but you will not be able to reuse that button with the edited states in a future project. I followed my intuition:
- I duplicated the _up file in the ContentButtons folder for the button 5751 ‘Bubbly_downloads,
- renamed the duplicate to _over and _down with the same name,
- edited the duplicates in Photoshop, see result in this screenshot:
This was successful: I did insert the button and it did so including the InBuilt states, not only when inserting in the same project, but also in other projects. You cannot have an object style for Images used as buttons, but this opens another way to re-usability (where Captivate excels over other authoring tools). One drawback: only on the present device.
More about buttons in a future blog as promised.


You must be logged in to post a comment.
- Most Recent
- Most Relevant
Yes, the files are in the content folder.
When I go to the Assets Panel >> Characters, I can double click on one of the characters shown, but when it takes me to the panel for that character the window is blank. It does not populate with the different poses for the character. I’ve checked and I have the folder shown at the beginning of the post. Why are the characters not populating in the window?
Attachment 
I explained that only the thumbnails are stored on your system (in the folders Children). When you insert a character, the full image will be downloaded and inserted, and you’ll see it appear in the folder of that character. It is a big difference with previous versions, where both thumbnails and full images were already stored on your system.
That is the problem. Every tutorial I’ve watched on 11.5 shows the trainer double-clicking on the image of the Character, for example, Angela from the Character Assets window. It takes them to the panel showing the 40 something thumbnails. They select one and then click on Insert. The images are not there for me. No images, and a grayed out insert button. The thumbnails never show up.
I cannot insert an image if I cannot click on the thumbnail.
You don’t have the thumbnails or they cannot be found. Did you check if you ave them in the eLearning assets?
Yes the files are in the content folder.
Thanks for trying to assist, but I’ve found the answer in another post. I needed to delete everything in the “Content” folder and then relaunch Captivate. After I did that, it worked fine.
I’ve had to do that in the past to get the new HTML5 version of interactions, just didn’t realize I’d need to do that with a new install and the characters.
Thanks for feedback. Content folder is new in this version. It didn’t exist in previous versions. What you are mentioning is to clean the Preferences file, or eventually the Layouts folder (in case of corruption). Content folder didn’t reveal all its mysteries yet, sorry that I didn’t suggest to clear it. Not intuitive that it got corrupted since it was installed for the first time ever.
Check out my walkthrough of the new Assets panel in Adobe Captivate version 11.5: https://youtu.be/gJjlj0WeJ1Y
You’re welcome, Shambu!
Im looking forward to your detailed Asset Panel review ![]()
Thanks Lieve for these Asset panel tips!
