 Newbie
8 posts
Newbie
8 posts
How to copy and paste a button at a specific time point on multiple slides.
This will just be a quick tip post for folks new to Captivate.
In some of my projects, I use a “Continue” button that I adapted from another resource in illustrator. It is saved in my image buttons folder so I can access it anytime I am needing it in a project. (I will do another tip post showing this process.)
My typical workflow is to create the “Continue” button on the first slide then copy and paste it to the remaining pages that need the next button. Here is the workflow I use. I have used this in both Captivate 9 projects and now more recently on Captivate 2019 (all version updates).
First I select “Interactions” and choose the “Button” option.

This will import the default button onto the project page.

Then I select the button and navigate to the Style Tab. I click on the text button to activate the drop-down menu which presents me with the option to change the text button to an “Image button”.

After selecting the image button, still under the “Style” Tab, I select the folder Icon. This will open up my default button save location.

Here I simply scroll down to the location of my required button and select my button. This will replace the default button Captivate created with my selected button.

Once I have my button in place I set the Style, Actions and Options parameters I want to be associated with the button before copying it. I do all of this upfront as it will save me having to go back and individually adding all those attributes to each button on each slide.
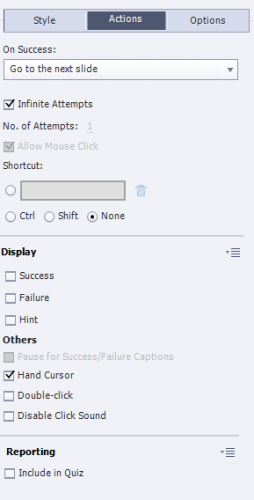
The button usually is displayed for 1 second and I typically set the pause point at 0.9 seconds under the timing tab. I do this so there is not a long delay for the user after clicking the button for the action to initiate especially when the “On Success:” action is set to continue.

In this case, though the “On Success:” action is set to “Go to the next slide”

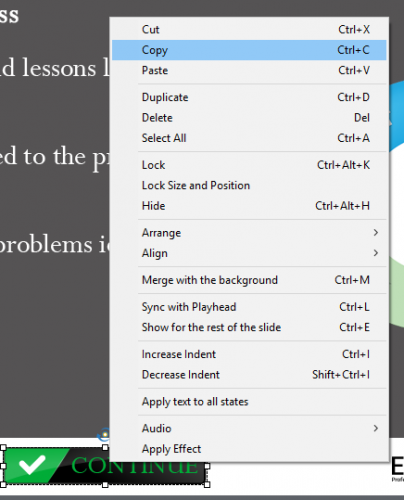
To copy the button once it is ready simply select the button, right click on it and select the “Copy” (Ctrl+c)
Next, in the filmstrip view select the first slide you are going to copy. Drag the time indicator bar to the starting point on the timeline where you want the button to show up from. If you do not move the timeline indicator Captivate will insert your copied button from the beginning of the slide and you will have to manually move it into position on each slide you copy the button to.
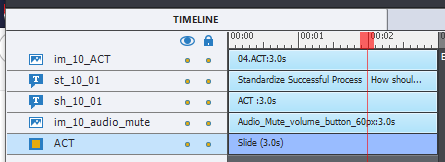
At this point let me say all my pages in this project are only 3 seconds long as it is a simple policy information update. When copying a next button that has specific timing to the last part of your slide page (on this page it is designed to show up after 2 seconds) then if you want the button to appear in the same place for all the slides you are copying to, you will need to move the time indicator (red indicator line) to the two second mark on you first selected slide before copying the button in place.
With your first slide chosen, scroll down to the last slide you want the continue button to appear on, and while holding down the “Shift” key select the last slide. This will cause all the slides in between the first and last to be selected. (If you don’t want all of them selected the simply use the Ctrl key and individually select the slides you want the button copies too).
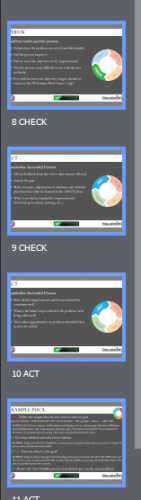
Now press Ctrl+v to paste the button onto the slides. Captivate will copy the button with all its settings automatically to each selected slide.

Simply check each slide now to ensure it meets with your approval.
I trust and hope this helps speed up some of your workflows.
This will just be a quick tip post for folks new to Captivate.
In some of my projects, I use a “Continue” button that I adapted from another resource in illustrator. It is saved in my image buttons folder so I can access it anytime I am needing it in a project. (I will do another tip post showing this process.)
My typical workflow is to create the “Continue” button on the first slide then copy and paste it to the remaining pages that need the next button. Here is the workflow I use. I have used this in both Captivate 9 projects and now more recently on Captivate 2019 (all version updates).
First I select “Interactions” and choose the “Button” option.
This will import the default button onto the project page.
Then I select the button and navigate to the Style Tab. I click on the text button to activate the drop-down menu which presents me with the option to change the text button to an “Image button”.
After selecting the image button, still under the “Style” Tab, I select the folder Icon. This will open up my default button save location.
Here I simply scroll down to the location of my required button and select my button. This will replace the default button Captivate created with my selected button.
Once I have my button in place I set the Style, Actions and Options parameters I want to be associated with the button before copying it. I do all of this upfront as it will save me having to go back and individually adding all those attributes to each button on each slide.
The button usually is displayed for 1 second and I typically set the pause point at 0.9 seconds under the timing tab. I do this so there is not a long delay for the user after clicking the button for the action to initiate especially when the “On Success:” action is set to continue.
In this case, though the “On Success:” action is set to “Go to the next slide”
To copy the button once it is ready simply select the button, right click on it and select the “Copy” (Ctrl+c)
Next, in the filmstrip view select the first slide you are going to copy. Drag the time indicator bar to the starting point on the timeline where you want the button to show up from. If you do not move the timeline indicator Captivate will insert your copied button from the beginning of the slide and you will have to manually move it into position on each slide you copy the button to.
At this point let me say all my pages in this project are only 3 seconds long as it is a simple policy information update. When copying a next button that has specific timing to the last part of your slide page (on this page it is designed to show up after 2 seconds) then if you want the button to appear in the same place for all the slides you are copying to, you will need to move the time indicator (red indicator line) to the two second mark on you first selected slide before copying the button in place.
With your first slide chosen, scroll down to the last slide you want the continue button to appear on, and while holding down the “Shift” key select the last slide. This will cause all the slides in between the first and last to be selected. (If you don’t want all of them selected the simply use the Ctrl key and individually select the slides you want the button copies too).
Now press Ctrl+v to paste the button onto the slides. Captivate will copy the button with all its settings automatically to each selected slide.
Simply check each slide now to ensure it meets with your approval.
I trust and hope this helps speed up some of your workflows.


You must be logged in to post a comment.
- Most Recent
- Most Relevant
Beginner here, giving you a big thumbs up on this tip! Thanks!
I am happy this has helped.
Thanks for taking out that confusing sentence that you are able to save and reuse a button from the Library (which is not possible).
However I am amazed that you choose that very old type of Image button. I expected 7 years ago with CP6 that the legacy type of buttons would disappear completely (like captions) because shape buttons are much more flexible and have much less limitations. I never use text buttons nor image buttons for that reason. Need still to cope with Transparent buttons as embedded objects on quiz/score slides because shape buttons are not allowed. Hope that those slides will be upgraded in the near future.
Coincidence: I am busy with a comparison between the 6 possibilities for buttons, advantages and disadvantages for each type. I have been crating lot of image buttons before CP6 but management of image buttons is a big problem as well. The last article I ever did read about creation of image buttons is at least 9 years old. I used Photoshop, not Illustrator but that is just a personal choice, feel more comfortable with PS as you probably prefer AI. I don’t like the layer system in AI, and love comps in PS (needed them a lot because used Image buttons also for localisation).
Great tip! This will definitely help some beginners save time.
I am bit confused, so I suppose not to be the only one.
Which type of button are you talking about? AFAIK buttons can never be in the Library at all, you can have the images used in the button in the Library but not the button itself. A button typically has at least 3 Inbuilt states, whatever its type: text button, transparent button, image button, shape button.
Or are you talking about using a bitmap image directly as button? Maybe a SVG? In that case it would be good to mention that this is only possible in the most recent release 11.5.0.
Lieve, It is an image button created in illustrator and saved as a .png as that is what most of the image buttons in the default location folder are created as. I have updated the post to explain a little of the process and will do another tip post showing how I created and saved the image to the button folder.
BTW, would be good for newbies to learn about the meaning and functionality of the pausing points.
https://elearning.adobe.com/2017/02/pause-captivates-timeline/
https://elearning.adobe.com/2018/06/pausing-timeline-audio-clips/
