 Staff
44 posts
Staff
44 posts
In this post I’ll explain how you can make wonderful, rich interactions in Adobe Captivate with simple multi-state objects. This is an easy exercise, simple enough for beginners and a great introduction to advanced actions. I’ll break the tutorial up into three basic parts, and along the way you’ll learn about three simple actions that when used together, create all of the changes and interactivity you find in the finished project.
To begin, check out the published version of this interaction.
http://p0qp0q.com/multiStateColorWheel/
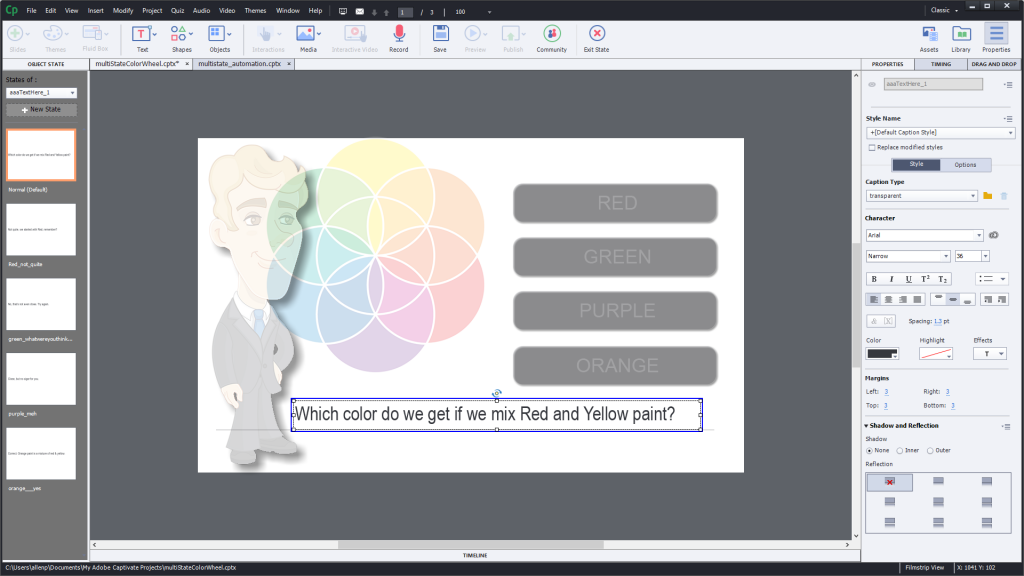
In the interaction you’ll note that there are three basic areas I will explain. On the left, there is a simple – multi-state object – which appears to the learner as an image of a cartoon illustrated man wearing a black suit and a blue tie. The illustrated character is one of many found in Captivate’s ‘Asset’ panel. You can use the illustrations in your own copy of Captivate if you want to build the interaction yourself.

Now if this is your first use of a multi-state object, don’t worry. The concept is pretty simple. Most objects in your Adobe Captivate projects can be turned into multi-state objects. Buttons create their own multi-states in order to help with rollover effects and down states, but in this case I just added multiple states to an image (character) in order to make the process of changing the character’s ‘reaction’ to the answer selections simple.
To add more states to an image, just select the image on the stage, and then click the big blue plus symbol in the property inspector, under the Object States section. You will be prompted to add a name for your new object state – in this example, I named the new object state ‘SAD’ – but you can name it anything you like.

It’s okay to think of object states – kind of like layers. You can imagine that the image has a stack of images behind it, and that you can pick or choose which image you want to show in any order or at any time. In fact there is a special ‘Advanced Action’ just for telling your project which state (layer) to show at any given time. That’s called the ‘ChangeState’ action. It’s super easy to use – you just pick ‘Change State Of’ from the drop down list of available actions, and then Captivate will suggest two things in drop down menus that appear beneath your new action. The first will be ‘which multi-state object’ that you want to change the state (or layer) for, and the second will be which of those layers do you want to change to. It’s kind of obvious when you start to break it down. Here’s an image of that.

So all we have to do to change the expression on the character’s face, is to create a new state, name it, and replace the old image in that state with a new image – the one with the correct expression. I just deleted the old image, and pasted in the new one. It is however important to make sure that you have the right state (layer) selected while you edit the state. You can do that by selecting the state view button from the property inspector. Captivate will go all grey and you’ll see the slide thumbnails change into ‘state’ thumbnails. This is a special view, and you’ll have to use the special exit button on the top button bar. Don’t forget – click the big red X to exit the state view – or you’ll find yourself thinking that you can’t edit your project. Remember, I told you, big red X to exit the state view.

Now while in the state view, the thumbnails will allow you to select any of the states. This is the perfect editing space to set up all of your character expressions. Just delete and replace the original image, with the ones you want to use for each expression. You can add new states from this view as well.

Okay, so we’ve created a character with a bunch of layers, and we named each layer according to our description of his facial reaction. But in this sample interaction, the little guy changes his face AND the text changes, every time we click one of the buttons. So we can think of this project as having three areas that change appearance whenever a button is clicked.
- The little suit guy changes his facial reaction
- The text below the question (feedback text) changes for each selected button (answer).
- Each button actually changes too – when a button is selected, the button changes its appearance as well.
We saw in the first part of this tutorial, how to change the states of the little suit guy. (Or at least how to give him multiple states to change into.) Now let’s do the same thing for that text at the bottom. That’s right, you probably guessed it already. The text is a multi-state object too. We create it the same way, just select the text, and then either click the blue add state button in the property inspector, or just push the state view button, and start adding states using the button above the thumbnails.
Multistate text is even easier to modify – as you simply type into the text area, while the correct state is selected. So just select the text area, click state view, and then create four more states, to match the states we added for the suit dude. Then select each text state using the state thumbnails, and type you ideal feedback string into the text area. That’s it – and you can think of this the same way as you did the image. It’s like layers of text, and you can use the same action to change which layer is visible – Change State Of. The logic is the same, so it will be easy to work with. Just don’t forget to use that big red x, exit multi-state button to get out of the multi-state view when you finish. (You forgot didn’t you. I know, I do it myself.)
Now for phase 3, the exciting part. Finally, we will want to create the buttons, and give them both multiple states, and to give them interactions that can control everything in the project. The buttons in this project are just shapes. I drew a single rounded rectangle and typed a color into its text area. Then I checked the box to ‘Use as button.’ which instantly converts the shape into an interactive button, AND adds special states (layers) that are used for rollover effects and the button press state. You can edit these shapes – just as you did with the other states of image and text objects – by going to the state view and altering the color and font properties of the shape for each state. Finally, I added a state – a special built in state, called ‘Visited.’ This state is displayed when the button has been used by the current learner.

Button states are a little different than regular states. They automatically include things like rollover and down states, and there are some rules that are related to the clickable area of a button that restrict how much you can change / manipulate for a button.
Finally, we will need to add actions to these new buttons. Most of the actions are simply changing the active state of an object on the screen. There is also an action that is used to delay a state change – that’s how I’m able to make a button change its appearance, wait a couple of seconds, then change back to another state. This delay action is called ‘delay’ – yup, it’s really that simple. We just ask Captivate to delay and then tell it how long (in seconds) that we want it to pause.
The only other action that we will use is to ‘GoToNextSlide’ which will ask Captivate to go on to the next slide after we get the right answer. Here’s an example of what that advanced action script looks like.

The first two actions just change the state(layer) of the suit guy, and of the text to the layer that is appropriate for response. Then we Pause for two seconds (Delay 2 seconds) and finally we change all of the states of everything back to default (normal) states. This acts like kind of a global reset. The button state doesn’t need to be changed initially because the rollover, down click, and visited states are all automatic.
The same action is used for all incorrect answers – with changes only to the top two lines – where we are triggering different layers for the image and the text. The correct answer action is even simpler. It uses exactly the same logic, but after the delay, we issue a command to ‘GoToNextSlide’ which takes the learner to the next slide.
I’ve included a sample version of the source code for this project here – so that you can download and play with the project yourself. As always, I hope you’ll add your own thoughts and ideas in the comment section below and don’t hesitate to ask any questions about the approach or about multi-state objects in general.
In this post I’ll explain how you can make wonderful, rich interactions in Adobe Captivate with simple multi-state objects. This is an easy exercise, simple enough for beginners and a great introduction to advanced actions. I’ll break the tutorial up into three basic parts, and along the way you’ll learn about three simple actions that when used together, create all of the changes and interactivity you find in the finished project.
To begin, check out the published version of this interaction.
http://p0qp0q.com/multiStateColorWheel/
In the interaction you’ll note that there are three basic areas I will explain. On the left, there is a simple – multi-state object – which appears to the learner as an image of a cartoon illustrated man wearing a black suit and a blue tie. The illustrated character is one of many found in Captivate’s ‘Asset’ panel. You can use the illustrations in your own copy of Captivate if you want to build the interaction yourself.
Now if this is your first use of a multi-state object, don’t worry. The concept is pretty simple. Most objects in your Adobe Captivate projects can be turned into multi-state objects. Buttons create their own multi-states in order to help with rollover effects and down states, but in this case I just added multiple states to an image (character) in order to make the process of changing the character’s ‘reaction’ to the answer selections simple.
To add more states to an image, just select the image on the stage, and then click the big blue plus symbol in the property inspector, under the Object States section. You will be prompted to add a name for your new object state – in this example, I named the new object state ‘SAD’ – but you can name it anything you like.
It’s okay to think of object states – kind of like layers. You can imagine that the image has a stack of images behind it, and that you can pick or choose which image you want to show in any order or at any time. In fact there is a special ‘Advanced Action’ just for telling your project which state (layer) to show at any given time. That’s called the ‘ChangeState’ action. It’s super easy to use – you just pick ‘Change State Of’ from the drop down list of available actions, and then Captivate will suggest two things in drop down menus that appear beneath your new action. The first will be ‘which multi-state object’ that you want to change the state (or layer) for, and the second will be which of those layers do you want to change to. It’s kind of obvious when you start to break it down. Here’s an image of that.
So all we have to do to change the expression on the character’s face, is to create a new state, name it, and replace the old image in that state with a new image – the one with the correct expression. I just deleted the old image, and pasted in the new one. It is however important to make sure that you have the right state (layer) selected while you edit the state. You can do that by selecting the state view button from the property inspector. Captivate will go all grey and you’ll see the slide thumbnails change into ‘state’ thumbnails. This is a special view, and you’ll have to use the special exit button on the top button bar. Don’t forget – click the big red X to exit the state view – or you’ll find yourself thinking that you can’t edit your project. Remember, I told you, big red X to exit the state view.
Now while in the state view, the thumbnails will allow you to select any of the states. This is the perfect editing space to set up all of your character expressions. Just delete and replace the original image, with the ones you want to use for each expression. You can add new states from this view as well.
Okay, so we’ve created a character with a bunch of layers, and we named each layer according to our description of his facial reaction. But in this sample interaction, the little guy changes his face AND the text changes, every time we click one of the buttons. So we can think of this project as having three areas that change appearance whenever a button is clicked.
- The little suit guy changes his facial reaction
- The text below the question (feedback text) changes for each selected button (answer).
- Each button actually changes too – when a button is selected, the button changes its appearance as well.
We saw in the first part of this tutorial, how to change the states of the little suit guy. (Or at least how to give him multiple states to change into.) Now let’s do the same thing for that text at the bottom. That’s right, you probably guessed it already. The text is a multi-state object too. We create it the same way, just select the text, and then either click the blue add state button in the property inspector, or just push the state view button, and start adding states using the button above the thumbnails.
Multistate text is even easier to modify – as you simply type into the text area, while the correct state is selected. So just select the text area, click state view, and then create four more states, to match the states we added for the suit dude. Then select each text state using the state thumbnails, and type you ideal feedback string into the text area. That’s it – and you can think of this the same way as you did the image. It’s like layers of text, and you can use the same action to change which layer is visible – Change State Of. The logic is the same, so it will be easy to work with. Just don’t forget to use that big red x, exit multi-state button to get out of the multi-state view when you finish. (You forgot didn’t you. I know, I do it myself.)
Now for phase 3, the exciting part. Finally, we will want to create the buttons, and give them both multiple states, and to give them interactions that can control everything in the project. The buttons in this project are just shapes. I drew a single rounded rectangle and typed a color into its text area. Then I checked the box to ‘Use as button.’ which instantly converts the shape into an interactive button, AND adds special states (layers) that are used for rollover effects and the button press state. You can edit these shapes – just as you did with the other states of image and text objects – by going to the state view and altering the color and font properties of the shape for each state. Finally, I added a state – a special built in state, called ‘Visited.’ This state is displayed when the button has been used by the current learner.
Button states are a little different than regular states. They automatically include things like rollover and down states, and there are some rules that are related to the clickable area of a button that restrict how much you can change / manipulate for a button.
Finally, we will need to add actions to these new buttons. Most of the actions are simply changing the active state of an object on the screen. There is also an action that is used to delay a state change – that’s how I’m able to make a button change its appearance, wait a couple of seconds, then change back to another state. This delay action is called ‘delay’ – yup, it’s really that simple. We just ask Captivate to delay and then tell it how long (in seconds) that we want it to pause.
The only other action that we will use is to ‘GoToNextSlide’ which will ask Captivate to go on to the next slide after we get the right answer. Here’s an example of what that advanced action script looks like.
The first two actions just change the state(layer) of the suit guy, and of the text to the layer that is appropriate for response. Then we Pause for two seconds (Delay 2 seconds) and finally we change all of the states of everything back to default (normal) states. This acts like kind of a global reset. The button state doesn’t need to be changed initially because the rollover, down click, and visited states are all automatic.
The same action is used for all incorrect answers – with changes only to the top two lines – where we are triggering different layers for the image and the text. The correct answer action is even simpler. It uses exactly the same logic, but after the delay, we issue a command to ‘GoToNextSlide’ which takes the learner to the next slide.
I’ve included a sample version of the source code for this project here – so that you can download and play with the project yourself. As always, I hope you’ll add your own thoughts and ideas in the comment section below and don’t hesitate to ask any questions about the approach or about multi-state objects in general.


You must be logged in to post a comment.
- Most Recent
- Most Relevant
Brilliant – very helpful for a beginner, thanks!
Cool. Thanks for the post.
Really helpful, thanks!
Very usefull and simple. Thanks
Nice
Thank you, simple and direct to the point.
As a beginner this is really good
good information for begginers!
Nice example. I have played around with different states – I might try this one out too. Thanks.
Thanks for sharing such a detailed tutorial.
Thanks a lot. This helped me!
There’s a lot of power in this example.
Thank you for sharing!
Thank you!
Lieve, so helpful!
Thank you, this is so helpful!
Thank you for sharing.
Thanks for sharing~
I love the way you write this article. Thank you very much
Thanks for sharing.
that was cool
Thank you for posting this!
A really cool example. Thank you for sharing.
What should we do if we don’t have access to this high quality of (hopefully) free assets?
Can you give some more explanation. The assets used in this example are available even in older versions. Multistate objects exist also since several versions. Which old version are you uising?
Oh, I didn’t notice that you provided a link with an interaction. Only discovered it after revisiting. Great !
Good Job. Thanks for sharing.
Thanks for sharing!
Thanks for the upload!! It helped a bunch! I’m totally new to Captivate and this was my first introduction to advanced actions. It did take me a good hour to figure out why my version of your project didn’t work. I had only set my buttons to default (=normal, roll over and down). And for some reason the buttons don’t show up in “change state of” if you don’t add your own state to a button. But I eventually figured it out 😉
Hi! I’m new to Captivate, and as practice I’m trying to create your project from a blank project without copying any of your elements directly. I have run into a problem. In the advanced action tab, non of my smartshapes show up. I.e. I can only select the cartoon guy or my text caption when selecting “Change State” in the advanced action pop-up. Am I missing a check mark somewhere?
Attachment 
If an object is not appearing in the dropdown list for the Change State command, it means that it has only the Normal state and maybe InBuilt states (you cannot change to the Rollover nor the Down state). Do you have multiple states for the shapes?
Great example and thanks for the assets!
For users: advantage of this ‘Character’ is that it has the full set of thumbnails installed with Captivate, will show up in the Assets. Contrary to older versions of Captivate, the full image will only be downloaded to the Content part of eLearning assets when you insert it in a project.
If you want to use a character which is not in the installed set (Illustrated , have a look at my post with tips for the Assets Panel:
