 Legend
245 posts
Intro
Captivate has always been famous for its interactive software simulations. Originally when it was released under the name ‘RoboDemo’ it was the primary goal. Although – in recent versions – not much has been changed for this feature, it could be worthwhile to explain some tips I acquired while recording interactive tutorials for many applications (in several languages). In Flanders we say ‘Goed begonnen is half gewonnen’, freely translated ‘a good preparation will spare you lot of work later on’. This blog is about this preparation phase. some recommendations are also valid for Video Demo. After this blog next blog will focus on the capturing workflow itself, and a third one on editing and polishing the sims into an engaging eLearning course.
Preferences
Preferences can be edited before opening a project, while you are in the Welcome screen. You do not have to start the Software simulation type of project to do so. Preferences are too be found under the Edit menu (Win users like me) or under the Captivate menu (Mac users). You have less options than from within a project, but the Recording category is completeThese options need to be checked, and eventually changed:
Settings:
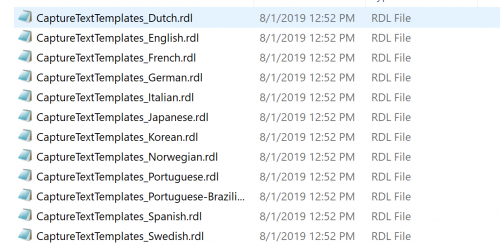
Check the language! If you need to use another language, this is the place to be before starting the simulation. The feedback messages during capture (both shapes and captions) can be found in a file with extension rdl, like you can see in this screenshot. You can edit the messages in an editor like Notepad (don’t use Word).

I keep mostly the other settings at their default value. Lot of them can be set up later on for the project (narration, system audio..). The Camera sound and the Keystrokes audio are useful during recording, will not be included when published. The Smoothening is meant for the movie slides which have to be created for drag and other mouse actions. Later on you’ll get tips in the second part which will treat the capture itself.
Video Demo
To have a better quality for the movie slides (setting is also used for the simulation movie slides, also indicated as Full Motion Recording slides), change to 32-bit instead of 16-bit. For Video demo the temporary files are in a dedicated folder, you may want to switch to another folder on another drive if your startup drive (C) is too small. That tip is only for Video Demo, which can become rather big in file size.
Keys
Some of those shortcut keys are only for software simulations, not for Video Demo. That is the case for the Pause button, you cannot pause a Video Demo (answered that question multiple times). You have to end the recording and eventually record another video at the end of the previous one later on.
Modes
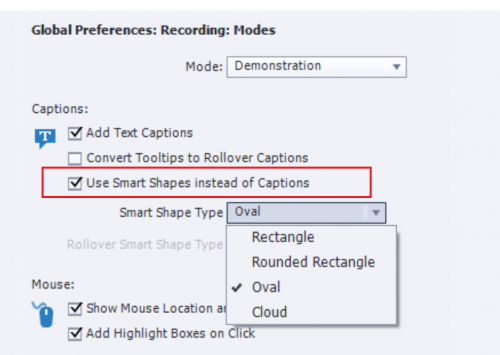
Allows to check the setup for the three default modes (Demonstration, Training, Assessment) and eventually set up a Custom mode. Beware: you cannot choose a ‘default’ mode for future recording, which is what some users seem to believe. Choosing the mode(s) always happens at the start of a new recording. Personally I will edit some settings in this category. The feedback messages in a software sim, contrary to all other feedback messages (shapes) are by default set to be Text Captions. I prefer to switch to shapes and you can have a choice for the shape; it is easier to control the style of shapes in Captivate (see Step 2: Themes). You need to make the choice for the Demonstration mode, but it will be taken over for the Hint messages in Training/Assessment:

Take note of the objects to be added during recording: besides the Success/Failure/Hint messages, highlight boxes, click boxes, Text Entry Boxes and eventually Rollover Captions (for Tooltips).
Defaults
This category is meant to edit the styles to be used. It is bit weird that this is included in the Preferences. Do not worry, Recording defaults will be added to the used Theme as well.
Beware: that will be the Theme set as Default theme. Of course if you opted for shapes instead of captions under 4., you only have to check the styles for shapes, not for captions. It is a bit confusing, because some captions have no counterpart as shapes: Capture Caption, Rollover caption. The styles for Smart Shape (used for both) is by default empty, but you can choose a styles there as well.
I will always create a different style for the Highlight box, instead of the thin lined Blue one which is the default. For the TEB, which often doesn’t have the wanted style that is a lot more difficult, because the wanted font and font size depends a lot on the application you’ll want to capture.
Theme
All software simulations (and the Video Demo) use the Blank master slide. It is important to keep that master slide blank. A background color or background image is not a problem. But you shouldn’t add other objects.
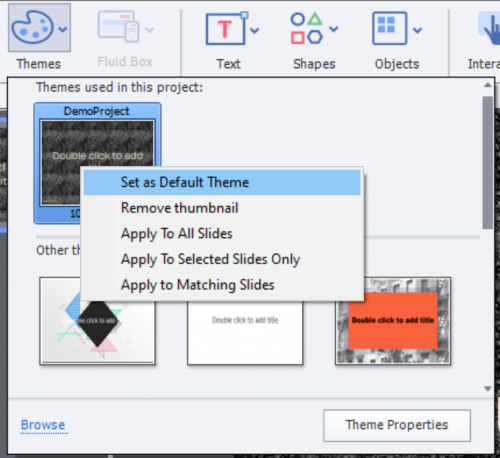
The Theme of your choice will need the wanted theme colors palette, theme fonts and object styles (maybe set in the Preferences, Defaults), Content and Quiz master slides are important if you want to add them later on to the course. Once the wanted theme has been double-checked mark it as the Default theme. Especially if you do create many software simulations it is recommended to keep a Theme dedicated to them.

Storyboard
You have to know precisely what you want to capture. For long workflows, do not hesitate to split them up in small logical parts. It is a lot easier to record a limited number of slides, certainly if you want to do narration at the same time (which I do not recommend). For a software simulation you don’t have to worry that much about the synchronization with audio, since that can easily be done while editing (phase 3). While preparing, keep in mind to limit Full Motion Recording slides when possible. In many case drag and other mouse actions can be replaced by alternatives. Example: instead of dragging in scrollbars click somewhere on those bars. There are a couple of reasons. Several users have reported issues with the FMR (Full Motion Recording) slides when publishing to HTML5 in some browsers. Originally those slides are SWF-based, they are converted to MP4 when publishing but apparently the result is not always optimal. A better solution is to replace FMR by Video Demo slides, but that slows down the recording workflow (see second post).
 Legend
245 posts
Thanks for sharing this
Please forgive me if I missed it, but is
Excelente recurso!!!
Some great info here!
Mostly ignored information… Thanks
No one responded to this blog, you are the first to comment. I didn’t publish the other two blogs yet, since I suspect no one is interested. My time is valuable as is yours, and spending hours on posts that no one reads seems a complete waste of time. Maybe I’ll post it on my personal blog, because this community seems to be dying. Cannot even find blogs which I posted one year ago, they just disappear from my profile.
Lieve: I read your posts but I never pay attention to the comments. Just happened to scroll down and see your message. I agree, your time is valuable. Even if I do not comment, I sincerely appreciate your willingness to share your knowledge. I have learned a lot from you and I should have conveyed my sincere thanks.
Nothing in this portal is available to test if it is worthwhile to blog more about a topic, except the possible comments. There used to be the number of views in the past, but that is gone as well. That makes it very frustrating to post blogs here. On my personal blog I can use analysis to detect which topics are most interesting. That is how I concluded that this topic is not worthwhile at all.
The author stated above that she did not see much response to her first post so she did not post the other parts.


