 Legend
245 posts
Legend
245 posts
Step-by-step explanation for a workflow where the Submit button on a scored D&D slide becomes available only after the first dragging action by the learner. Goal is to avoid ‘skipping’ such a slide by submitting without having dragged anything.
Intro
I posted a sample project as an answer to a user question. Drag&Drop slides used as scored question slides do not offer a possibility to avoid ’empty’ answers, learners who click the Submit button without any drag action on their side. The user wanted to disable to Submit button until at least one drag action was performed. This is not possible, because the Submit button is an embedded object, has no timeline nor an ID. The trick is to use the Timeline and a motion effect that is triggered by any Object action. Not really very complicated, follow the steps below. This workflow, due to stacking of objects, is not that easy in a Fluid Boxes project, the example was a non-responsive project with Scalable HTML output.
Step-by-step
1. Pause the timeline before the default pausing point
By default each Drag&Drop slide has a pausing point at 1.5seconds, similar to question slides and linked to the Submit process. Too bad, that pausing point is not visible in the Timeline panel, you can only see and edit it in the D&D panel.
You need to pause the timeline at a frame before 1.5secs by inserting an interactive object which remains invisible to the learner. In this case I choose a click box, small size (1px for both width and height) and located in a place where it is very improbable that learner will try to click. Set it to infinite attempts with the command ‘No action’ to be triggered by its Success event, do not show the Hand cursor neither. Have a look at this screenshot for the setup of this click box:
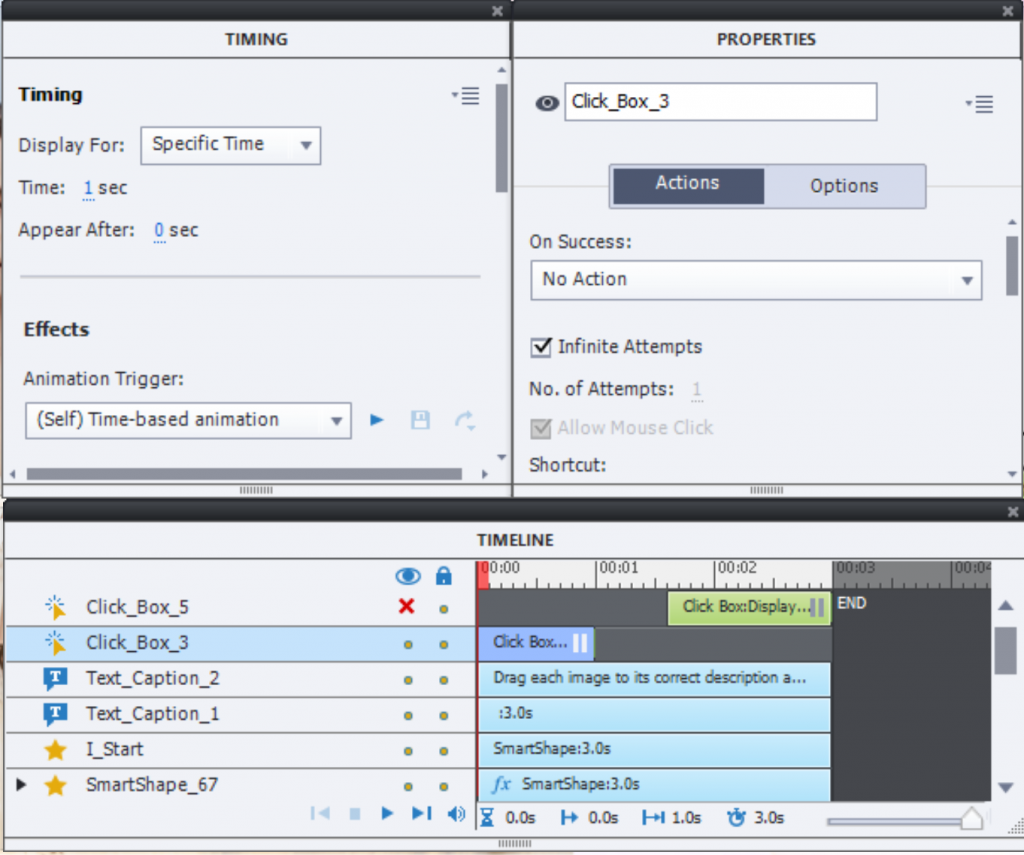
The topmost click box will be explained in a later step.
Step 2: Submit button off the slide
To make the Submit button invisible you drag it in the scratch area, either to the left (first D&D slide) or to the right (second D&D slide).
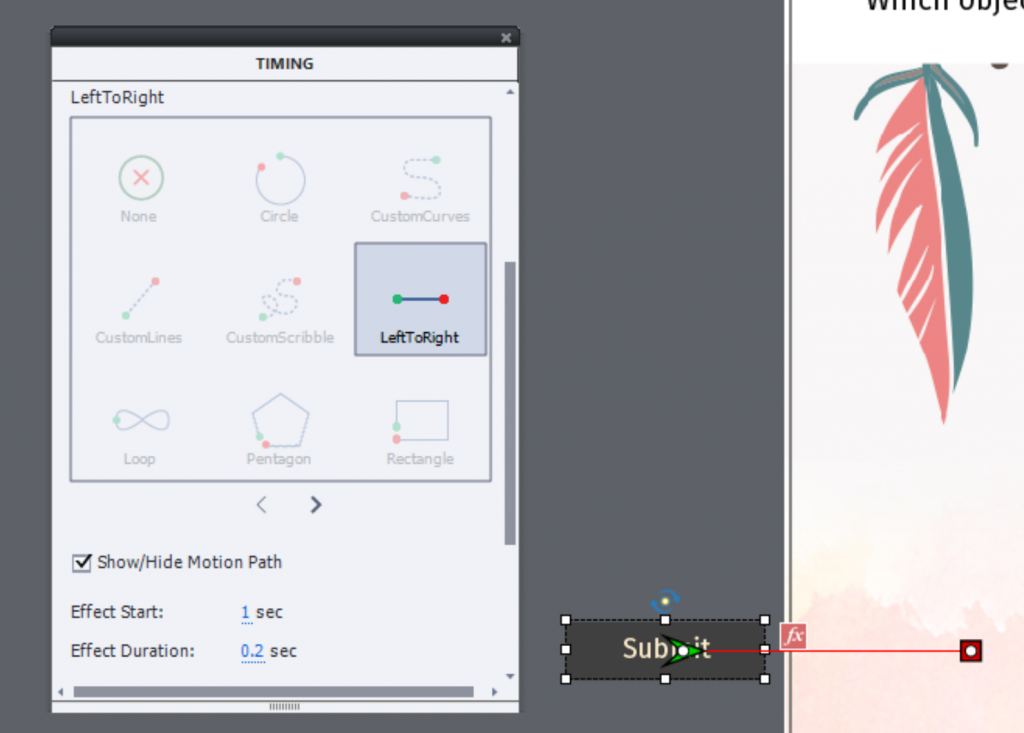
Step 3: Timebased motion effect to Submit
Although the Submit button is an embedded object, you can apply an effect to it using the Right-click menu or the Timing properties. The timing of the effect will not be visible in the Timeline panel, because the button has no timeline. The only way to set up the timing is with the numbers in the Timing panel. This motion effect (I used Left-to -right or the opposite one depending on the location) can be very short (used 0.2secs). It is important that it starts at or after the pausing point of the click box (step 1), and ends before the default D&D pausing point (which was kept at 1.5secs.). See this screenshot for one of the Submit buttons:
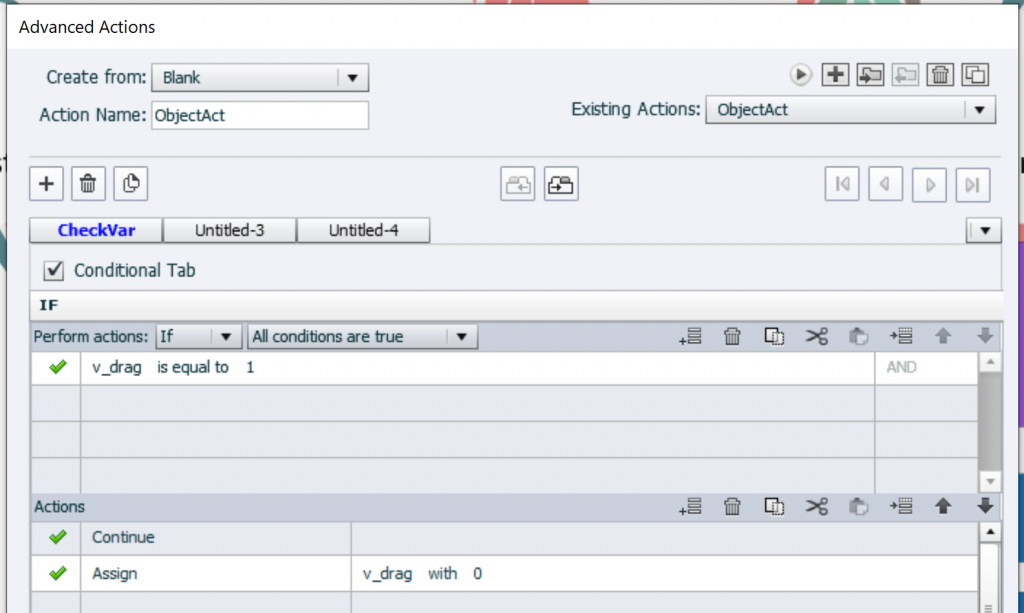
Step 4: User variable v_drag
Create a Boolean variable, I labeled it v_drag. Its default value should be 1. It will be toggled to 0 for each drag action.

Step 5: Advanced (conditional) action ObjectAct
The purpose of this action is to release the playhead with the first dragging of any drag source to a target. The result will be that the Timebased effect on the Submit button will occur, and the Submit button enters the slide. The playhead will be paused by the default D&D pausing point at 1.5secs. Hence the importance of the timing of the effect described in step 3. To avoid a same playhead release to happen on subsequent dragging, the tracking variable v_drag is toggled to 0, and the action is conditional:
Step 6: Attach action ObjectAct to all Object actions
This is the boring part: you have to attach ‘ObjectAct’ to all Object actions. This means for each drop target:
- Select the drop target
- Click the button ‘Object Actions’ in the tab ‘Format’
- For each of the drag sources open the No action list, choose Execute Advanced Action
- Choose ‘ObjectAct’ as advanced action.
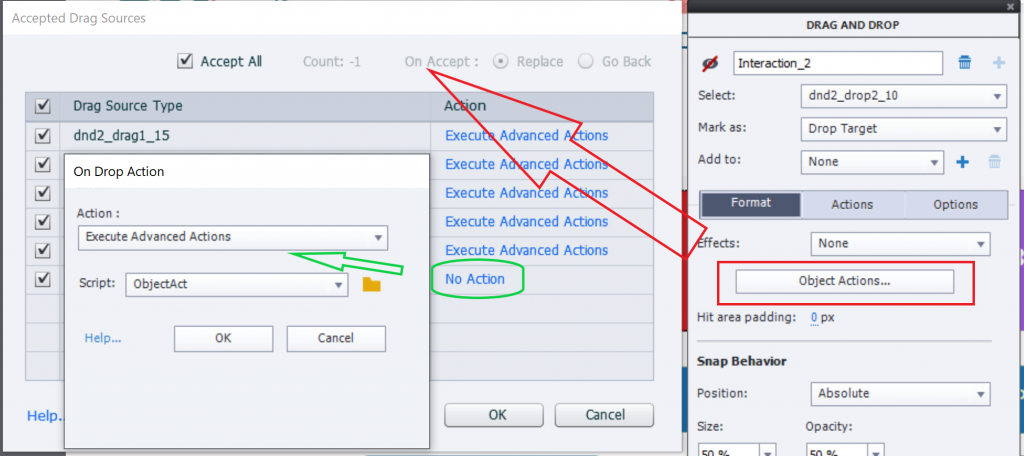
In total you’ll have 3*6=18 object actions in the first D&D slide, and 4*4=16 in the second slide. I really hope one day there will be a way to apply the same action to multiple object actions at once…
Do not forget to test! The actions Success and Last Attempt (wrongly labeled as Failure) were left both to the default command ‘Continue’.
Extra: adding second step to Submit Process
As you could test in the example file, there was a second step (click the slide to proceed) added. If you don’t do that, the feedback message will appear and the playhead will be released, out of control for the learner. It is a simple trick, as you may already have seen in the first screenshot of the Timeline for the first click box.
I added a second click box, covering the whole slide, but appearing after the release of the playhead by the Drag&Drop actions on Success of Last Attempt (1.5seconds). This click box triggers the default ‘Go to Next Slide’:

Don’t forget to warn the learner about this second step, as I did in the feedback messages.
This last extra workflow is NOT possible in a Fluid Boxes project because stacking is not allowed. You can use the first workflow with the motion path, but may have to replace the click box by an invisible shape or transparent button (no fill nor stroke) if you want to add them to a normal fluid box.
Intro
I posted a sample project as an answer to a user question. Drag&Drop slides used as scored question slides do not offer a possibility to avoid ’empty’ answers, learners who click the Submit button without any drag action on their side. The user wanted to disable to Submit button until at least one drag action was performed. This is not possible, because the Submit button is an embedded object, has no timeline nor an ID. The trick is to use the Timeline and a motion effect that is triggered by any Object action. Not really very complicated, follow the steps below. This workflow, due to stacking of objects, is not that easy in a Fluid Boxes project, the example was a non-responsive project with Scalable HTML output.
Step-by-step
1. Pause the timeline before the default pausing point
By default each Drag&Drop slide has a pausing point at 1.5seconds, similar to question slides and linked to the Submit process. Too bad, that pausing point is not visible in the Timeline panel, you can only see and edit it in the D&D panel.
You need to pause the timeline at a frame before 1.5secs by inserting an interactive object which remains invisible to the learner. In this case I choose a click box, small size (1px for both width and height) and located in a place where it is very improbable that learner will try to click. Set it to infinite attempts with the command ‘No action’ to be triggered by its Success event, do not show the Hand cursor neither. Have a look at this screenshot for the setup of this click box:
The topmost click box will be explained in a later step.
Step 2: Submit button off the slide
To make the Submit button invisible you drag it in the scratch area, either to the left (first D&D slide) or to the right (second D&D slide).
Step 3: Timebased motion effect to Submit
Although the Submit button is an embedded object, you can apply an effect to it using the Right-click menu or the Timing properties. The timing of the effect will not be visible in the Timeline panel, because the button has no timeline. The only way to set up the timing is with the numbers in the Timing panel. This motion effect (I used Left-to -right or the opposite one depending on the location) can be very short (used 0.2secs). It is important that it starts at or after the pausing point of the click box (step 1), and ends before the default D&D pausing point (which was kept at 1.5secs.). See this screenshot for one of the Submit buttons:
Step 4: User variable v_drag
Create a Boolean variable, I labeled it v_drag. Its default value should be 1. It will be toggled to 0 for each drag action.
Step 5: Advanced (conditional) action ObjectAct
The purpose of this action is to release the playhead with the first dragging of any drag source to a target. The result will be that the Timebased effect on the Submit button will occur, and the Submit button enters the slide. The playhead will be paused by the default D&D pausing point at 1.5secs. Hence the importance of the timing of the effect described in step 3. To avoid a same playhead release to happen on subsequent dragging, the tracking variable v_drag is toggled to 0, and the action is conditional:
Step 6: Attach action ObjectAct to all Object actions
This is the boring part: you have to attach ‘ObjectAct’ to all Object actions. This means for each drop target:
- Select the drop target
- Click the button ‘Object Actions’ in the tab ‘Format’
- For each of the drag sources open the No action list, choose Execute Advanced Action
- Choose ‘ObjectAct’ as advanced action.
In total you’ll have 3*6=18 object actions in the first D&D slide, and 4*4=16 in the second slide. I really hope one day there will be a way to apply the same action to multiple object actions at once…
Do not forget to test! The actions Success and Last Attempt (wrongly labeled as Failure) were left both to the default command ‘Continue’.
Extra: adding second step to Submit Process
As you could test in the example file, there was a second step (click the slide to proceed) added. If you don’t do that, the feedback message will appear and the playhead will be released, out of control for the learner. It is a simple trick, as you may already have seen in the first screenshot of the Timeline for the first click box.
I added a second click box, covering the whole slide, but appearing after the release of the playhead by the Drag&Drop actions on Success of Last Attempt (1.5seconds). This click box triggers the default ‘Go to Next Slide’:
Don’t forget to warn the learner about this second step, as I did in the feedback messages.
This last extra workflow is NOT possible in a Fluid Boxes project because stacking is not allowed. You can use the first workflow with the motion path, but may have to replace the click box by an invisible shape or transparent button (no fill nor stroke) if you want to add them to a normal fluid box.


You must be logged in to post a comment.
- Most Recent
- Most Relevant
